
import java.sql.Connection;

Connection connection = dataSource.getConnection(); // (1)

try (connection) {
    connection.setAutoCommit(false); // (2)
    // execute some SQL statements...
    connection.commit(); // (3)

} catch (SQLException e) {
    connection.rollback(); // (4)
}
Spring Transaction Management: @Transactional In-Depth
Last updated on June 03, 2022 - 91 comments
Star me on GitHub →You can use this guide to get a simple and practical understanding of how Spring's transaction management with the @Transactional annotation works.
The only prerequisite? You need to have a rough idea about ACID, i.e. what database transactions are and why to use them. Also, distributed transactions or reactive transactions are not covered here, though the general principles, in terms of Spring, still apply.
Introduction
In this guide you are going to learn about the main pillars of Spring core’s transaction abstraction framework (a confusing term, isn’t it?) - described with a lot of code examples:
-
@Transactional(Declarative Transaction Management) vs Programmatic Transaction Management. -
Physical vs Logical transactions.
-
Spring
@Transactionaland JPA / Hibernate integration. -
Spring
@Transactionaland Spring Boot or Spring MVC integration. -
Rollbacks, Proxies, Common Pitfalls and much more.
As opposed to, say, the official Spring documentation, this guide won’t confuse you by diving right into the topic Spring-first.
Instead you are going to learn Spring transaction management the unconventional way: From the ground up, step by step. This means, starting with plain old JDBC transaction management.
Why?
Because everything that Spring does is based on these very JDBC basics. And you’ll save a ton of time with Spring’s @Transactional annotation later, if you grasp these basics.
How plain JDBC Transaction Management works
If you are thinking of skipping this section, without knowing JDBC transactions inside-out: don’t.
How to start, commit or rollback JDBC transactions
The first important take-away is this: It does not matter if you are using Spring’s @Transactional annotation, plain Hibernate, jOOQ or any other database library.
In the end, they all do the very same thing to open and close (let’s call that 'manage') database transactions. Plain JDBC transaction management code looks like this:
-
You need a connection to the database to start transactions. DriverManager.getConnection(url, user, password) would work as well, though in most enterprise-y applications you will have a data source configured and get connections from that.
-
This is the only way to 'start' a database transaction in Java, even though the name might sound a bit off. setAutoCommit(true) makes sure that every single SQL statement automatically gets wrapped in its own transaction and setAutoCommit(false) is the opposite: You are the master of the transaction(s) and you’ll need to start calling
commitand friends. Do note, theautoCommitflag is valid for the whole time your connection is open, which means you only need to call the method once, not repeatedly. -
Let’s commit our transaction…
-
Or, rollback our changes, if there was an exception.
Yes, these 4 lines are (oversimplified) everything that Spring does whenever you are using the @Transactional annotation. In the next chapter you’ll find out how that works. But before we go there, there’s a tiny bit more you need to learn.
(A quick note for smarty-pants: Connection pool libraries like HikariCP might toggle the autocommit mode automatically for you, depending on the configuration. But that is an advanced topic.)
How to use JDBC isolation levels and savepoints
If you already played with Spring’s @Transactional annotation you might have encountered something like this:
@Transactional(propagation=TransactionDefinition.NESTED,
               isolation=TransactionDefinition.ISOLATION_READ_UNCOMMITTED)
We will cover nested Spring transactions and isolation levels later in more detail, but again it helps to know that these parameters all boil down to the following, basic JDBC code:
import java.sql.Connection;

// isolation=TransactionDefinition.ISOLATION_READ_UNCOMMITTED

connection.setTransactionIsolation(Connection.TRANSACTION_READ_UNCOMMITTED); // (1)

// propagation=TransactionDefinition.NESTED

Savepoint savePoint = connection.setSavepoint(); // (2)
...
connection.rollback(savePoint);-
This is how Spring sets isolation levels on a database connection. Not exactly rocket science, is it?
-
Nested transactions in Spring are just JDBC / database savepoints. If you don’t know what a savepoint is, have a look at this tutorial, for example. Note that savepoint support is dependent on your JDBC driver/database.
How Spring’s or Spring Boot’s Transaction Management works
As you now have a good JDBC transaction understanding, let’s have a look at how plain, core Spring manages transactions. Everything here applies 1:1 to Spring Boot and Spring MVC, but more about that a bit later..
What actually is Spring’s transaction management or its (rather confusingly named) transaction abstraction framework?
Remember, transaction management simply means: How does Spring start, commit or rollback JDBC transactions? Does this sound in any way familiar from above?
Here’s the catch: Whereas with plain JDBC you only have one way (setAutocommit(false)) to manage transactions, Spring offers you many different, more convenient ways to achieve the same.
How to use Spring’s Programmatic Transaction Management?
The first, but rather sparingly used way to define transactions in Spring is programmatically: Either through a TransactionTemplate or directly through the PlatformTransactionManager. Code-wise, it looks like this:
@Service
public class UserService {

    @Autowired
    private TransactionTemplate template;

    public Long registerUser(User user) {
        Long id = template.execute(status ->  {
            // execute some SQL that e.g.
            // inserts the user into the db and returns the autogenerated id
            return id;
        });
    }
}
Compared with the plain JDBC example:
-
You do not have to mess with opening or closing database connections yourself (try-finally). Instead you use Transaction Callbacks.
-
You also do not have to catch SQLExceptions, as Spring converts these exceptions to runtime exceptions for you.
-
And you have better integration into the Spring ecosystem. TransactionTemplate will use a TransactionManager internally, which will use a data source. All are beans that you have to specify in your Spring context configuration, but then don’t have to worry about anymore later on.
While this counts as a minor improvement, programmatic transaction management is not what Spring’s transaction framework mainly is about. Instead, it’s all about declarative transaction management. Let’s find out what that is.
How to use Spring’s XML Declarative Transaction Management?
Back in the day, when XML configuration was the norm for Spring projects, you could configure transactions directly in XML. Apart from a couple of legacy, enterprise projects, you won’t find this approach anymore in the wild, as it has been superseded with the much simpler @Transactional annotation.
We will not go into detail on XML configuration in this guide, but you can use this example as a starting point to dive deeper into it - if needed (taken straight from the official Spring documentation):
<!-- the transactional advice (what 'happens'; see the <aop:advisor/> bean below) -->
    <tx:advice id="txAdvice" transaction-manager="txManager">
        <!-- the transactional semantics... -->
        <tx:attributes>
            <!-- all methods starting with 'get' are read-only -->
            <tx:method name="get*" read-only="true"/>
            <!-- other methods use the default transaction settings (see below) -->
            <tx:method name="*"/>
        </tx:attributes>
    </tx:advice>
You are specifying an AOP advice (Aspect Oriented Programming) with the above XML block, that you can then apply to your UserService bean like so:
<aop:config>
    <aop:pointcut id="userServiceOperation" expression="execution(* x.y.service.UserService.*(..))"/>
    <aop:advisor advice-ref="txAdvice" pointcut-ref="userServiceOperation"/>
</aop:config>

<bean id="userService" class="x.y.service.UserService"/>
Your UserService bean would then look like this:
public class UserService {

    public Long registerUser(User user) {
        // execute some SQL that e.g.
        // inserts the user into the db and retrieves the autogenerated id
        return id;
    }
}
From a Java code perspective, this declarative transaction approach looks a lot simpler than the programmatic approach. But it leads to a lot of complicated, verbose XML, with the pointcut and advisor configurations.
So, this leads to the question: Is there a better way for declarative transaction management instead of XML? Yes, there is: The @Transactional annotation.
How to use Spring’s @Transactional annotation ( Declarative Transaction Management )
Now let’s have a look at what modern Spring transaction management usually looks like:
public class UserService {

    @Transactional
    public Long registerUser(User user) {
       // execute some SQL that e.g.
        // inserts the user into the db and retrieves the autogenerated id
        // userDao.save(user);
        return id;
    }
}
How is this possible? There is no more XML configuration and there’s also no other code needed. Instead, you now need to do two things:
-
Make sure that your Spring Configuration is annotated with the @EnableTransactionManagement annotation (In Spring Boot this will be done automatically for you).
-
Make sure you specify a transaction manager in your Spring Configuration (this you need to do anyway).
-
And then Spring is smart enough to transparently handle transactions for you: Any bean’s public method you annotate with the @Transactional annotation, will execute inside a database transaction (note: there are some pitfalls).
So, to get the @Transactional annotation working, all you need to do is this:
@Configuration
@EnableTransactionManagement
public class MySpringConfig {

    @Bean
    public PlatformTransactionManager txManager() {
        return yourTxManager; // more on that later
    }

}
Now, when I say Spring transparently handles transactions for you. What does that really mean?
Armed with the knowledge from the JDBC transaction example, the @Transactional UserService code above translates (simplified) directly to this:
public class UserService {

    public Long registerUser(User user) {
        Connection connection = dataSource.getConnection(); // (1)
        try (connection) {
            connection.setAutoCommit(false); // (1)

            // execute some SQL that e.g.
            // inserts the user into the db and retrieves the autogenerated id
            // userDao.save(user); <(2)

            connection.commit(); // (1)
        } catch (SQLException e) {
            connection.rollback(); // (1)
        }
    }
}-
This is all just standard opening and closing of a JDBC connection. That’s what Spring’s transactional annotation does for you automatically, without you having to write it explicitly.
-
This is your own code, saving the user through a DAO or something similar.
This example might look a bit magical, but let’s have a look at how Spring inserts this connection code for you.
CGlib & JDK Proxies - @Transactional under the covers
Spring cannot really rewrite your Java class, like I did above, to insert the connection code (unless you are using advanced techniques like bytecode weaving, but we are ignoring that for now).
Your registerUser() method really just calls userDao.save(user), there’s no way to change that on the fly.
But Spring has an advantage. At its core, it is an IoC container. It instantiates a UserService for you and makes sure to autowire that UserService into any other bean that needs a UserService.
Now whenever you are using @Transactional on a bean, Spring uses a tiny trick. It does not just instantiate a UserService, but also a transactional proxy of that UserService.
It does that through a method called proxy-through-subclassing with the help of the Cglib library. There are also other ways to construct proxies (like Dynamic JDK proxies), but let’s leave it at that for the moment.
Let’s see proxies in action in this picture:
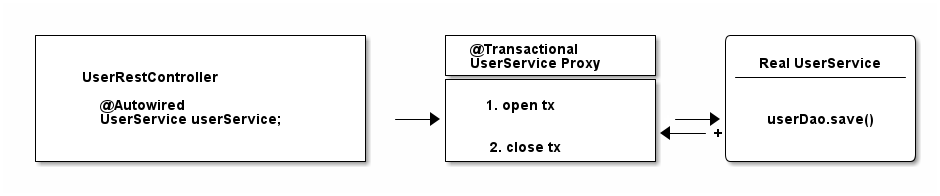
As you can see from that diagram, the proxy has one job.
-
Opening and closing database connections/transactions.
-
And then delegating to the real UserService, the one you wrote.
-
And other beans, like your UserRestController will never know that they are talking to a proxy, and not the real thing.
Quick Exam
Have a look at the following source code and tell me what type of UserService Spring automatically constructs, assuming it is marked with @Transactional or has a @Transactional method.
@Configuration
@EnableTransactionManagement
public static class MyAppConfig {

    @Bean
    public UserService userService() {  // (1)
        return new UserService();
    }
}-
Correct. Spring constructs a dynamic CGLib proxy of your UserService class here that can open and close database transactions for you. You or any other beans won’t even notice that it is not your UserService, but a proxy wrapping your UserService.
For what do you need a Transaction Manager (like PlatformTransactionManager)?
Now there’s only one crucial piece of information missing, even though we have mentioned it a couple of times already.
Your UserService gets proxied on the fly, and the proxy manages transactions for you. But it is not the proxy itself handling all this transactional state (open, commit, close), the proxy delegates that work to a transaction manager.
Spring offers you a PlatformTransactionManager / TransactionManager interface, which, by default, comes with a couple of handy implementations. One of them is the datasource transaction manager.
It does exactly what you did so far to manage transactions, but first, let’s look at the needed Spring configuration:
@Bean
public DataSource dataSource() {
    return new MysqlDataSource(); // (1)
}

@Bean
public PlatformTransactionManager txManager() {
    return new DataSourceTransactionManager(dataSource()); // (2)
}-
You create a database-specific or connection-pool specific datasource here. MySQL is being used for this example.
-
Here, you create your transaction manager, which needs a data source to be able to manage transactions.
Simple as. All transaction managers then have methods like "doBegin" (for starting a transaction) or "doCommit", which look like this - taken straight from Spring’s source code and simplified a bit:
public class DataSourceTransactionManager implements PlatformTransactionManager {

    @Override
    protected void doBegin(Object transaction, TransactionDefinition definition) {
        Connection newCon = obtainDataSource().getConnection();
        // ...
        con.setAutoCommit(false);
        // yes, that's it!
    }

    @Override
    protected void doCommit(DefaultTransactionStatus status) {
        // ...
        Connection connection = status.getTransaction().getConnectionHolder().getConnection();
        try {
            con.commit();
        } catch (SQLException ex) {
            throw new TransactionSystemException("Could not commit JDBC transaction", ex);
        }
    }
}
So, the datasource transaction manager uses exactly the same code that you saw in the JDBC section, when managing transactions.
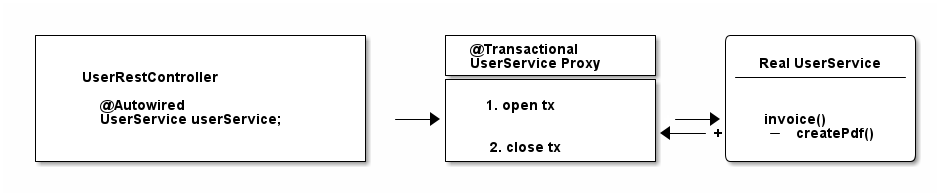
With this in mind, let’s extend our picture from above:

To sum things up:
-
If Spring detects the @Transactional annotation on a bean, it creates a dynamic proxy of that bean.
-
The proxy has access to a transaction manager and will ask it to open and close transactions / connections.
-
The transaction manager itself will simply do what you did in the plain Java section: Manage a good, old JDBC connection.
What is the difference between physical and logical transactions?
Imagine the following two transactional classes.
@Service
public class UserService {

    @Autowired
    private InvoiceService invoiceService;

    @Transactional
    public void invoice() {
        invoiceService.createPdf();
        // send invoice as email, etc.
    }
}

@Service
public class InvoiceService {

    @Transactional
    public void createPdf() {
        // ...
    }
}
UserService has a transactional invoice() method. Which calls another transactional method, createPdf() on the InvoiceService.
Now in terms of database transactions, this should really just be one database transaction. (Remember: getConnection(). setAutocommit(false). commit().) Spring calls this physical transaction, even though this might sound a bit confusing at first.
From Spring’s side however, there’s two logical transactions happening: First in UserService, the other one in InvoiceService. Spring has to be smart enough to know that both @Transactional methods, should use the same underlying, physical database transaction.
How would things be different, with the following change to InvoiceService?
@Service
public class InvoiceService {

    @Transactional(propagation = Propagation.REQUIRES_NEW)
    public void createPdf() {
        // ...
    }
}
Changing the propagation mode to requires_new is telling Spring that createPDF() needs to execute in its own transaction, independent of any other, already existing transaction. Thinking back to the plain Java section of this guide, did you see a way to "split" a transaction in half? Neither did I.
Which basically means your code will open two (physical) connections/transactions to the database. (Again: getConnection() x2. setAutocommit(false) x2. commit() x2) Spring now has to be smart enough that the two logical transactional pieces (invoice()/createPdf()) now also map to two different, physical database transactions.
So, to sum things up:
-
Physical Transactions: Are your actual JDBC transactions.
-
Logical Transactions: Are the (potentially nested) @Transactional-annotated (Spring) methods.
This leads us to covering propagation modes in more detail.
What are @Transactional Propagation Levels used for?
When looking at the Spring source code, you’ll find a variety of propagation levels or modes that you can plug into the @Transactional method.
  @Transactional(propagation = Propagation.REQUIRED)

  // or

  @Transactional(propagation = Propagation.REQUIRES_NEW)
  // etc
The full list:
-
REQUIRED
-
SUPPORTS
-
MANDATORY
-
REQUIRES_NEW
-
NOT_SUPPORTED
-
NEVER
-
NESTED
Exercise:
In the plain Java section, I showed you everything that JDBC can do when it comes to transactions. Take a minute to think about what every single Spring propagation mode at the end REALLY does to your datasource or rather, your JDBC connection.
Then have a look at the following answers.
Answers:
-
Required (default): My method needs a transaction, either open one for me or use an existing one → getConnection(). setAutocommit(false). commit().
-
Supports: I don’t really care if a transaction is open or not, i can work either way → nothing to do with JDBC
-
Mandatory: I’m not going to open up a transaction myself, but I’m going to cry if no one else opened one up → nothing to do with JDBC
-
Require_new: I want my completely own transaction → getConnection(). setAutocommit(false). commit().
-
Not_Supported: I really don’t like transactions, I will even try and suspend a current, running transaction → nothing to do with JDBC
-
Never: I’m going to cry if someone else started up a transaction → nothing to do with JDBC
-
Nested: It sounds so complicated, but we are just talking savepoints! → connection.setSavepoint()
As you can see, most propagation modes really have nothing to do with the database or JDBC, but more with how you structure your program with Spring and how/when/where Spring expects transactions to be there.
Look at this example:
public class UserService {

     @Transactional(propagation = Propagation.MANDATORY)
     public void myMethod() {
        // execute some sql
     }

}
In this case, Spring will expect a transaction to be open, whenever you call myMethod() of the UserService class. It does not open one itself, instead, if you call that method without a pre-existing transaction, Spring will throw an exception. Keep this in mind as additional points for "logical transaction handling".
What are @Transactional Isolation Levels used for?
This is almost a trick question at this point, but what happens when you configure the @Transactional annotation like so?
@Transactional(isolation = Isolation.REPEATABLE_READ)Yes, it does simply lead to this:
connection.setTransactionIsolation(Connection.TRANSACTION_REPEATABLE_READ);Database isolation levels are, however, a complex topic, and you should take some time to fully grasp them. A good start is the official Postgres Documentation and their section on isolation levels.
Also note, that when it comes to switching isolation levels during a transaction, you must make sure to consult with your JDBC driver/database to understand which scenarios are supported and which not.
The most common @Transactional pitfall
There is one pitfall that Spring beginners usually run into. Have a look at the following code:
@Service
public class UserService {

    @Transactional
    public void invoice() {
        createPdf();
        // send invoice as email, etc.
    }

    @Transactional(propagation = Propagation.REQUIRES_NEW)
    public void createPdf() {
        // ...
    }
}
You have a UserService class with a transactional invoice method. Which calls createPDF(), which is also transactional.
How many physical transactions would you expect to be open, once someone calls invoice()?
Nope, the answer is not two, but one. Why?
Let’s go back to the proxies' section of this guide. Spring creates that transactional UserService proxy for you, but once you are inside the UserService class and call other inner methods, there is no more proxy involved. This means, no new transaction for you.
Let’s have a look at it with a picture:
There’s some tricks (like self-injection), which you can use to get around this limitation. But the main takeaway is: always keep the proxy transaction boundaries in mind.
How to use @Transactional with Spring Boot or Spring MVC
So far, we have only talked about plain, core Spring. But what about Spring Boot? Or Spring Web MVC? Do they handle transactions any differently?
The short answer is: No.
With either frameworks (or rather: all frameworks in the Spring ecosystem), you will always use the @Transactional annotation, combined with a transaction manager and the @EnableTransactionManagement annotation. There is no other way.
The only difference with Spring Boot is, however, that it automatically sets the @EnableTransactionManagement annotation and creates a PlatformTransactionManager for you - with its JDBC auto-configurations. Learn more about auto-configurations here.
How Spring handles rollbacks (and default rollback policies)
The section on Spring rollbacks will be handled in the next revision of this guide.
How Spring and JPA / Hibernate Transaction Management works
The goal: Syncing Spring’s @Transactional and Hibernate / JPA
At some point, you will want your Spring application to integrate with another database library, such as Hibernate (a popular JPA-implementation) or Jooq etc.
Let’s take plain Hibernate as an example (note: it does not matter if you are using Hibernate directly,or Hibernate via JPA).
Rewriting the UserService from before to Hibernate would look like this:
public class UserService {

    @Autowired
    private SessionFactory sessionFactory; // (1)

    public void registerUser(User user) {

        Session session = sessionFactory.openSession(); // (2)

        // lets open up a transaction. remember setAutocommit(false)!
        session.beginTransaction();

        // save == insert our objects
        session.save(user);

        // and commit it
        session.getTransaction().commit();

        // close the session == our jdbc connection
        session.close();
    }
}-
This is a plain, old Hibernate SessionFactory, the entry-point for all Hibernate queries.
-
Manually managing sessions (read: database connections) and transactions with Hibernate’s API.
There is one huge problem with the above code, however:
-
Hibernate would not know about Spring’s @Transactional annotation.
-
Spring’s @Transactional would not know anything about Hibernate’s transaction.
But we’d actually love for Spring and Hibernate to integrate seamlessly, meaning that they know about each others' transactions.
In plain code:
@Service
public class UserService {

    @Autowired
    private SessionFactory sessionFactory; // (1)

    @Transactional
    public void registerUser(User user) {
        sessionFactory.getCurrentSession().save(user); // (2)
    }

}-
The same SessionFactory as before
-
But no more manual state management. Instead, getCurrentSession() and @Transactional are in sync.
How to get there?
Using the HibernateTransactionManager
There is a very simple fix for this integration problem:
Instead of using a DataSourcePlatformTransactionManager in your Spring configuration, you will be using a HibernateTransactionManager (if using plain Hibernate) or JpaTransactionManager (if using Hibernate through JPA).
The specialized HibernateTransactionManager will make sure to:
-
Manage transactions through Hibernate, i.e. the SessionFactory.
-
Be smart enough to allow Spring to use that very same transaction in non-Hibernate, i.e. @Transactional Spring code.
As always, a picture might be simpler to understand (though note, the flow between the proxy and real service is only conceptually right and oversimplified).
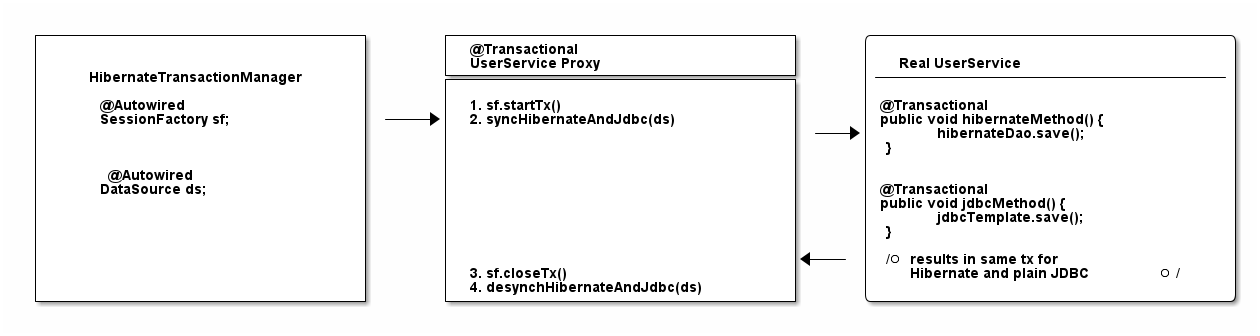
That is, in a nutshell, how you integrate Spring and Hibernate.
For other integrations or a more in-depth understanding, it helps to have a quick look at all possible PlatformTransactionManager implementations that Spring offers.
Fin
By now, you should have a pretty good overview of how transaction management works with the Spring framework and how it also applies to other Spring libraries like Spring Boot or Spring WebMVC. The biggest takeaway should be, that it does not matter which framework you are using in the end, it is all about the JDBC basics.
Get them right (Remember: getConnection(). setAutocommit(false). commit().) and you will have a much easier understanding of what happens later on in your complex, enterprise application.
Thanks for reading.
Acknowledgements
Thanks to Andreas Eisele for feedback on the early versions of this guide. Thanks to Ben Horsfield for coming up with much-needed Javascript snippets to enhance this guide.
There's more where that came from
I'll send you an update when I publish new guides. Absolutely no spam, ever. Unsubscribe anytime.
Comments (read-only)
91 comments
Anonymous
December 06, 2024
Nice post!!! It really helps me to have a better understanding of JPA transaction managements with hibernate.
Anonymous
October 09, 2024
very nice!
Anonymous
June 17, 2024
I am using jdbcTemplate and Oracle and connection.rollback(); doesn't work
ivoronline
June 17, 2024
I am using jdbcTemplate and Oracle and connection.rollback(); doesn't work
https://github.com/ivoronline/spring_transaction_part2
So this doesn't work with JdbcTemplate?
Maybe to include code that executes into DB but it works with this example rather then just saying
// execute some SQL statements...
Whats the point of such partial tutorials where you have to waste so much time figuring out details that were ommited when they would take one extra line to have fully working tutorial.
Anonymous
April 29, 2024
Great article. Even if You use Spring abstractions daily You should be familiar with what is going on behind the scenes.
Anonymous
December 12, 2023
Thanks for a great explanation
Anonymous
June 14, 2023
Thank you Marco! A question: to be sure for a right Transanction management, what is the best practice?
I refer to the UserService class and @Transactional annotation.
If I make a simple spring boot app, and from a controller i call userRepository.save(...), the new user is persisted in the database.
So, why do we need of a UserService with @Transactional? Are these things under the wood of Spring Boot?
Is it better to write the service and the annotatio, and why?
aoyunyoung
May 17, 2023
I use the System.setProperty(DebuggingClassWriter.DEBUG_LOCATION_PROPERTY, "path/to/cglib_proxy_classes");
I check one proxy class which has @Transactional method, but I don't found info about transaction manager in the proxy service class. the imported classes don't contain Transaction Manager class. why?
I check one proxy class which has @Transactional method, but I don't found info about transaction manager in the proxy service class. the imported classes don't contain Transaction Manager class. why?
paul_frischknecht
April 26, 2023
Thanks for the good writeup. Now here's my question: who would think that the Spring transaction management facilities are simple?! They obscure a lot of the important implementation details of the actual physical transactions.
For instance: What is the default isolation level in Spring? Probably the default isolation level of the database, which can be anything. Which means anything can happen with concurrent transactions when you switch the database engine...
For instance: What is the default isolation level in Spring? Probably the default isolation level of the database, which can be anything. Which means anything can happen with concurrent transactions when you switch the database engine...
galnikhil
March 26, 2023
Awesome post from basics to advanced. I have never enjoyed reading tech posts like I did this one. Beautifully written like a story!
Thank you very much. Helped a lot clearing the concepts on Spring Transaction Management :)
Thank you very much. Helped a lot clearing the concepts on Spring Transaction Management :)
Anonymous
March 20, 2023
What is the difference between using hibernate directly and using hibernate with jpa? when should i prefer one over the other?
Anonymous
January 30, 2023
Thanks a lot for the clear explanation. A question i have, how could we make the transactional behavior in spring boot work for more than one database?
For example, if we update a table on DB1, then update table on DB2, and then try to update a table on DB3 but fails, how to rollback operations on all databases?
For example, if we update a table on DB1, then update table on DB2, and then try to update a table on DB3 but fails, how to rollback operations on all databases?
mixamus
January 08, 2023
Thanks for explanation, it was very useful for me. On of the best article about Transactional.
Anonymous
December 01, 2022
Thank you
Anonymous
October 20, 2022
thanks for creating this doc, it super useful.
spmswapnil
September 16, 2022
Hello Marco,
Thank you very much for explaining this in simple way.
I have one question,
For first example in section (What is the difference between physical and logical transactions?)
two logical and one physical transaction as said,
So will spring create proxy for both classes? I feel for createPdf it should create NoopProxy implementation. Can you clarify?
swapnilagarwal2001
September 09, 2022
Thank you for the detailed Explanation. It was such a great in-depth knowledge of Spring Transactional Management.
Anonymous
September 01, 2022
Amazing article! This is great stuff. Thank you so much!
Anonymous
August 20, 2022
excellent explanation!!!!
Anonymous
August 12, 2022
Awesome. That was a really great detailed explanation of how Spring Transaction Management works!!.
Thank you very much.
Thank you very much.
20151845
August 04, 2022
Thanks for your nice post :3
hasanli.vusala.73
August 03, 2022
Thank you, Marco! It was another great article which I read today.
Anonymous
July 30, 2022
Excellent article and tutorial, if I had read this before my interview, I would pass it!
Anonymous
July 21, 2022
Hi Marco, thanks for this detailed article! I was actually searching for help with an "no qualified bean" error, when introducing @Transactional into a project. I got the error resolved btw. It seems I had too many @Transactional annotations in the repository and my service class.
Anonymous
July 14, 2022
This is up to date the best article for spring transaction management out there
Anonymous
May 19, 2022
Thank you so much for awesome explanation
Anonymous
May 17, 2022
Thanks for a very good article. One question I have surrounds how you go about using @Transactional annotation when you are using AbstractRoutingDataSource. Is it simply a case of injecting the AbstractRoutingDataSource into the constructor when you create the DataSourceTransactionManager bean or is there more to it?
Wondwosen Muhea
April 25, 2022
Hi Marco,
Great article.
I have one question regarding read/write and readonly transaction in Springboot and Hibernate.
Calling read only transaction with in read/write, does it flush the persistence context once the "read only" transaction is done?
I will appreciate it if you share your thought on this.
Thanks,
Wonde
Anonymous
April 23, 2022
Thats Wonderful
Anonymous
April 21, 2022
Marco, very, very nice post!
if setting a method to read_uncommited without a transactional, can it be?
@Transactional(propagation = Propagation.SUPPORTS, isolation = Isolation.READ_UNCOMMITTED)?
any other options?
if setting a method to read_uncommited without a transactional, can it be?
@Transactional(propagation = Propagation.SUPPORTS, isolation = Isolation.READ_UNCOMMITTED)?
any other options?
Anonymous
April 17, 2022
Excellent post. Thank you for the article!
I have a question on applying transactions - does every read operation ex - userDao.getById(Long id) needs a transaction? I understand the create, update methods do need a tx.
I have a question on applying transactions - does every read operation ex - userDao.getById(Long id) needs a transaction? I understand the create, update methods do need a tx.
Anonymous
March 21, 2022
Only one thing to say : amen and thanks you very much
you targetted just the points that were missing in my mind to complete the picture.
you targetted just the points that were missing in my mind to complete the picture.
Anonymous
February 18, 2022
Really very well explained in simple words the magic of Spring.
Anonymous
February 11, 2022
Great work !!!
Explained in the way developer understands
Explained in the way developer understands
Anonymous
January 20, 2022
Awesome, I can say its one of the simplest explanation of this many complex things together, that too this precise info.
Thanks Marco for putting this together.
Thanks Marco for putting this together.
Anonymous
December 27, 2021
Thanks, very helpful, really appreciate your efforts.
Anonymous
December 06, 2021
Thanks for such a wonderful explanation!
Anonymous
November 11, 2021
Excellent post, thank you very much! :D
Anonymous
October 16, 2021
Hi Macro.Very nice post.I have a lot of confusion seeing multiple transaction managers with spring/hibernate/ejb/jpa/jdbc.
Most of the questions answered here.Continue the good work.Thanks again.
Most of the questions answered here.Continue the good work.Thanks again.
wmuhea
October 12, 2021
Hi Marco,
Interesting.
I just got one question. Assume we have two/three private methods in a service class, and those methods interact with different repositories to save unrelated entities.
Can we have one public method in the class with @Transactional that calls all the private methods? The idea to all the insertions under one Transaction and any failure will cause rollback of all changes.
Thank you,
wonde
Marco Behler
October 12, 2021
Short answer: Yes :)
lexsav7
October 12, 2021
I would like to say a very big Thank You for this guide !
After hours traversing through different web-sites in search of the answers, I've got kinda confused and happened to have even more questions.
But your guide is something else! Definitely will bookmark this and refer to it in the darkest hour of need :)
After hours traversing through different web-sites in search of the answers, I've got kinda confused and happened to have even more questions.
But your guide is something else! Definitely will bookmark this and refer to it in the darkest hour of need :)
Anonymous
September 20, 2021
Great post Marco! Gave a clear overview on the subject.
1758759399
September 01, 2021
it is a greate help for me,thank your very much
andreymstepanov
August 24, 2021
Fantastic tutorial. I have no words to express enough my gratitude to Marco.
Just a tiny remark. In the section "Using the HibernateTransactionManager" I believe that the sentence "There is a very simple fix for this integration problem: Instead of using a DataSourcePlatformTransactionManager... " should be written as "... Instead of using a DataSourceTransactionManager..."
Just a tiny remark. In the section "Using the HibernateTransactionManager" I believe that the sentence "There is a very simple fix for this integration problem: Instead of using a DataSourcePlatformTransactionManager... " should be written as "... Instead of using a DataSourceTransactionManager..."
Anonymous
June 16, 2021
Good one. Thanks for this
Anonymous
June 06, 2021
@Service
public class UserService {
@Autowired
private InvoiceService ins;
@Transactional
public void invoice() {
createPdf();
// send invoice as email, etc.
}
@Transactional(propagation = Propagation.REQUIRES_NEW)
public void createPdf() {
ins.invoiceServiceCreatePdf();
}
}
@Service
public class InvoiceService {
@Transactional(propagation = Propagation.REQUIRES_NEW)
public void invoiceServiceCreatePdf() {
// ...
}
}
In this Case will Spring be creating 2 transnational proxies
one for InvoiceService and other for UserService ?
Marco Behler
June 20, 2021
A bit hard to read, but yes. Every transactional class will be proxied independently from another.
Anonymous
May 25, 2021
Great article !
Anonymous
May 18, 2021
Hi Marco,
Really good article and superb content on your site. However, I am a little confused about "requires_new".
In the first part of the article you mentioned that when you use requires_new on a method which is called by another method that in annotated with Transactions, Spring will create two physical transactions.
In the "The most common @Transactional pitfall" section you mentioned that in the same scenario (where a method with Transactional calls another method with Requires_New) Spring opens only one Transaction due to the proxy.
Can you please clarify? Am I missing something?
Marco Behler
May 19, 2021
Yes, requires_new will create a new physical transaction, so you'll end up with two.
The problem is, if you call a requires_new method from INSIDE a bean, nothing will happen, because you don't go through the "proxy" that manages the transactions - hence the annotation will be ignored. Does that make sense?
The problem is, if you call a requires_new method from INSIDE a bean, nothing will happen, because you don't go through the "proxy" that manages the transactions - hence the annotation will be ignored. Does that make sense?
lexsav7
October 13, 2021
Marco, thanks for the answer. Also was a little confused by this.
Now I notice that in the "The most common @Transactional pitfall" section only one bean is used, so there is only one transaction created. We can see the proof in Spring documentation (https://docs.spring.io/spring-framework/docs/current/reference/html/data-access.html#transaction-declarative-annotations):
"In proxy mode (which is the default), only external method calls coming in through the proxy are intercepted. This means that self-invocation (in effect, a method within the target object calling another method of the target object) does not lead to an actual transaction at runtime even if the invoked method is marked with @Transactional."
And in the "What is the difference between physical and logical transactions?" section you use two separate services (beans).
This way we get an external method call coming in through the proxy and, therefore, a new transaction is created.
P.S. now that I wrote my comment, I read again those sections and noticed that you had actually mentioned this nuance. Should pay more attention :)
Anonymous
May 04, 2021
Such a wonderful post. Thanks marco.
Anonymous
April 23, 2021
"The section on Spring rollbacks will be handled in the next revision of this guide." - Where it is? please... I need it!
Anonymous
April 15, 2021
This article is fu* good! :)
plusmancn
April 09, 2021
Greate article!
Anonymous
April 08, 2021
I had looked at various tutorials for transaction Management in Spring, but you have explained in very simple and layman language and most of my doubts got cleared, Thanks so much
adithyakrishna.k
March 24, 2021
Hi Marco,
Thanks for giving a detailed explanation on Transaction Management by Spring
Thanks for giving a detailed explanation on Transaction Management by Spring
Anonymous
March 19, 2021
Thank you! Really good guide!
Anonymous
February 27, 2021
Thanks a lot! Very good explanation! :)
Anonymous
February 11, 2021
Thank you for this good article. I refreshed my concepts :)
Anonymous
February 11, 2021
It's the best what I've read about Transactions for the last 3-4(?) years.
Thank you so much for your time and effort.
Thank you so much for your time and effort.
Anonymous
December 04, 2020
Beautifully written sir! So well-structured. Perfect English. Simplified without complex technical jargon. Loved. It. Thank you for writing this. You have a new internet fan! <3
I was adding this comment after signing in but damn those SSO permissions are a lot! So here's an anonymous comment! :D
I was adding this comment after signing in but damn those SSO permissions are a lot! So here's an anonymous comment! :D
Anonymous
November 25, 2020
I found that post when looking for a template - congratulation !
I am 'forced' to set up a spring boot application for the following task :
Read from an Oracle Advanced Queue in one database and perform some tasks in another database. My first tests using simple JDBC have been easy and successful until the point where I wanted to use both databases : The commit of the second one also affected the first one with the queue. This behaviour is not desired.
Since then I try to look for a solution and ended up reading this excellent article.
I did not want to buw now also added two separate TransactionManagers. But for my way of handling the Oracle Advanced Queue I need an OracleConnection. I've no idea where to get it from.
As I am 55+ years, tired and very new to these spring (boot) things any help were welcome.
Anonymous
November 25, 2020
I found that post when looking for a template - congratulation !
I am 'forced' to set up a spring boot application for the following task :
Read from an Oracle Advanced Queue in one database and perform some tasks in another database. My first tests using simple JDBC have been easy and successful until the point where I wanted to use both databases : The commit of the second one also affected the first one with the queue. This behaviour is not desired.
Since then I try to look for a solution and ended up reading this article.
I also constructed two separate TransactionManagers but for my way of handling the Oracle Advanced Queue I need an OracleConnection.
As I am 55+ years, tired and very new to these spring (boot) things any help were welcome.
Anonymous
November 21, 2020
It's morning 4 am and you made my day
Anonymous
October 30, 2020
super useful stuff
Anonymous
October 22, 2020
Thanks man, that helped a lot.
It takes quite some time to find comprehensive information about transactional handling in Spring,
since Spring itself has only 'sparse' documentation when it comes to 'when shit get's real'.
Cheers!
It takes quite some time to find comprehensive information about transactional handling in Spring,
since Spring itself has only 'sparse' documentation when it comes to 'when shit get's real'.
Cheers!
Anonymous
September 30, 2020
Hi Marco,
I really enjoy your every tutorial and this was also an loving one.
Thanks alot for sharing your experience in so nice way. :)
I really enjoy your every tutorial and this was also an loving one.
Thanks alot for sharing your experience in so nice way. :)
Anonymous
September 24, 2020
This is the best article I've ever read about Spring Transactions!!! Thanks so much!!!!!
Anonymous
September 23, 2020
Thank you for this awesome post. Good refresher on transaction management. SUPER!!!!
Rickson Menezes
August 25, 2020
Suggestion to add to the guide: as many in the industry use DAO pattern(interfaces), it can get difficult to understand why the proxy is not working. Apparently there's some thin in the spring doc that says to only use dynamic proxy on interfaces and CGLIB on non-interfaces.
karthikaBalakrishnan4
July 30, 2020
Thank you so much for the detailed explanations. This article gives me clear picture of the transaction. I have been reading about Transaction and this is what exactly I was searching for.
Thanks a lot
Thanks a lot
Anonymous
July 17, 2020
This is the best blog post on this subject.!!!!
Will be binging rest of your blogs now.!
Will be binging rest of your blogs now.!
bimsarayapa
June 22, 2020
This is a really good article which explains things quite simply and clearly. Thank you! :)
Anonymous
June 15, 2020
Thank you for explanations, but where to find the source code for the @Transactional Java/Spring annotation (where it opens session, begins, commits and rollbacks transaction)?
maks.mephi
June 06, 2020
Thanks for the post.
I like it)
Could you tell me what does "@Transactional(readOnly = true)" do?)
I like it)
Could you tell me what does "@Transactional(readOnly = true)" do?)
stirfries
May 23, 2020
Thank You, this was clear, concise, no fluff just stuff, very easy to understand - exactly what I needed. my best wishes to you.
Anonymous
May 19, 2020
Very good Explanation.
Anonymous
May 17, 2020
Thanks from India, and Nice Article!
Anonymous
May 16, 2020
Thanks for this simplified article. I love and appreciate your work.
Anonymous
May 16, 2020
Hi Marco, nice post.
The official Spring documentation is missin exactly such demystifying chapters so that the developers have a chance to understand the principles of how do the pieces fit into the puzzle.
Thanks for your article.
May be I've missed it - but there is still one magical area you didn't uncover. It is the mechanism the storage layer uses to get the right
I had to quickly debug to find out this magic happens in the
With this piece of information the overall "How do the Spring transactions work?" question would be answered.
Regards Jan
The official Spring documentation is missin exactly such demystifying chapters so that the developers have a chance to understand the principles of how do the pieces fit into the puzzle.
Thanks for your article.
May be I've missed it - but there is still one magical area you didn't uncover. It is the mechanism the storage layer uses to get the right
Connection to do inserts, updates ....I had to quickly debug to find out this magic happens in the
JdbcTemplate getting a connection via DataSourceUtils#doGetConnection which first tries to acquire the "transaction-bound" connection from the TransactionSynchronizationManager which stores it in the ThreadLocal.With this piece of information the overall "How do the Spring transactions work?" question would be answered.
Regards Jan
Anonymous
May 05, 2021
Excellent post by the way.
I would very much like the update regarding how to retrieve the connection within the @Transactional method in my case.
I would very much like the update regarding how to retrieve the connection within the @Transactional method in my case.
Marco Behler
May 16, 2020
Hi Jan,
thanks for bringing that up! I will try and add it to the next revision of this guide. :) Have a nice weekend, Marco
thanks for bringing that up! I will try and add it to the next revision of this guide. :) Have a nice weekend, Marco
Anonymous
May 04, 2020
Any detail about batch insert in terms of @transacrional
Marco Behler
May 07, 2020
Is there anything specific you'd like to know in terms of batch inserts?
Anonymous
April 17, 2020
Hello Khurram,
SERIALIZABLE is still not working.What is the possible solution to this situation?
@Transactional(isolation = Isolation.SERIALIZABLE)
public void transfer(String fromIban, String toIban, Long transferCents) {
Account account = accountRepository.findById(fromIban)
.orElseThrow(()
->new IllegalArgumentException("Can't find account with IBAN: " + fromIban));
Long fromBalance = account.getBalance();
if(fromBalance >= transferCents) {
Account account1 = accountRepository.findById(fromIban).orElseThrow(()
->new IllegalArgumentException("Can't find account with IBAN: " + fromIban));
long bal = account1.getBalance()+(-1) * transferCents;
account1.setBalance(bal);
Account account2 = accountRepository.findById(toIban).orElseThrow(()
->new IllegalArgumentException("Can't find account with IBAN: " + toIban));
long bal2 = account2.getBalance()+ transferCents;
account2.setBalance(bal2);
// addBalance(fromIban, (-1) * transferCents); //addBalance(toIban, transferCents);
}
} ---------------------------------------------------------------------------------------------------------------------------------------------------------------------------
public void parallelExecution() {
CountDownLatch startLatch = new CountDownLatch(1);
CountDownLatch endLatch = new CountDownLatch(threadCount);
for (int i = 0; i < threadCount; i++) {
new Thread(() -> {
awaitOnLatch(startLatch);
acountService.transfer("Alice-123", "Bob-456", 5L);
endLatch.countDown();
}).start();
}
//LOGGER.info("Starting threads");
startLatch.countDown();
awaitOnLatch(endLatch);
}
-----------------------------------------------------------
protected void awaitOnLatch(CountDownLatch latch) {
try {
latch.await();
} catch (InterruptedException e) {
throw new IllegalStateException(e);
}
}
private void create() {
Account from = new Account();
from.setIban("Alice-123");
from.setOwner("Alice");
from.setBalance(10); accountRepository.save(from);
Account to = new Account();
to.setIban("Bob-456");
to.setOwner("Bob");
to.setBalance(0L); accountRepository.save(to);
}
Result is 0,15 ..0,20
Anonymous
April 14, 2020
Great article! THANK U! I've spent so much time trying to understand this topic earlier...
Anonymous
March 12, 2020
the best article , simple yet powerful, thank you
Anonymous
March 09, 2020
Thank you so much! I rarely comment on internet, but this is great!
Anonymous
February 27, 2020
Greetings from Indonesia, this in-depth explanation is what our team is currently looking. Thank you so much
Anonymous
February 23, 2020
Thanks, very nice explanation and details - Binh
Anonymous
February 22, 2020
super useful man, i wish you the best of luck in your future endeavors!
Khurram Naseem
November 07, 2019
Nice write up Marco, thank you. I've one exact question what's your take on for read only transactions? do you think there is any benefit to add transaction annotation for read only work i.e. "select"
Marco Behler
November 09, 2019
Hi Khurram,
I misinterpreted your question the first time around, I thought you were talking @Transactional(readOnly=true), which in the end (I think) calls setReadonly(true) on the jdbc connection, which is however just a hint, i.e. it depends on the database driver what really happens.
As for having @Transactional on services that maybe just execute a couple of selects: Yes, I would put the annotation there and , e.g. when executing Hibernate Criteria Queries (as opposed to HQL) without a transaction, you get an exception anyway, if I remember correctly.
Marco Behler
November 08, 2019
## see my other answer ##
Arun Menon
November 06, 2019
This is awesome. Thank you very much.
leo mayer
November 01, 2019
I think you are wrong comparing catching SqlException and rollback with @Transactional mechanism. Cuz Springs rollback mechanism only kicks in if an Error is thrown - not an Exception. For exception rollback you need to change the annotation! @Transactional(rollback=Exception.class). Otherwise no rollback would happen!
Marco Behler
November 01, 2019
Hi Leo,
where do you get the idea from that Spring only rolls back errors (like OutOfMemory), not any (runtime) exception and that you would have to specify "Exception"? That would be a major detriment to using the annotation.
Here, taken straight from the Spring documentation:
By default, a transaction will be rolling back on RuntimeException and Error but not on checked exceptions (business exceptions).
Now, you might be hinting at "checked" exceptions, but then again "using" the connection throws a SQLException inevitably, which Spring will internally wrap in its own (runtime) exception, which will result in a rollback as well.
Though you might want to have a look at the reddit comments, there was a discussion about exceptions as well:
https://www.reddit.com/r/ja...
leo mayer
November 02, 2019
Hi Marco,
strange to read the documentation and than your conclusion. An SQLException is by no way a descendant of either Error or RuntimeException. How you conclude that this exception is wrapped interally? I don't see neither any evidence from the docu nor from the search results in Google. I have as well no evidence from my own expierence with running into that kind of problems while coding.
Perhaps there is a switch which could be used to tell Spring to wrap any kind of exception into an interal one which initiates a rollback. Beside the Annotation I didn't find anything.
RyeBrye
October 30, 2019
If you use the aspectj advice mode and use either compile-time weaving or load-time-weaving it _will_ actually modify your class bytecode and _will_ allow methods to call each other within the same class.
You can read more about it if you look up the details behind
You can read more about it if you look up the details behind
@EnableTransactionManagement(mode=AdviceMode.ASPECTJ)`
Marco Behler
October 30, 2019
Hi RyeBrye, yes, weaving is an option but really not in the scope of this guide regarding Spring's default behaviour. I might take it up in a further revision of the guide, though. Thanks for the suggestion.
Arne Vandamme
October 30, 2019
Fine guide Marco, thank you very much. Good and clear explanation. I immediately passed it on to some people at work to help them better understand the mechanics :-)
A possible suggestion for adding a second pitfall which I've several times: using REQUIRES_NEW opens a new connection as you state, but when nesting transactions and using a connection pool this can actually lead to pool starvation and deadlock-like scenarios. Much like the proxy pitfall, it appears to be something that is often overlooked and might be worth mentioning explicitly.
thanks again for the write up!
Marco Behler
October 30, 2019
Thank you, Arne. In the next revision of this guide, I'll also put your suggested pitfall, thanks!

let mut author = ?
I'm @MarcoBehler and I share everything I know about making awesome software through my guides, screencasts, talks and courses.
Follow me on Twitter to find out what I'm currently working on.