
public class UserDao {

    public User findById(Integer id) {
        // execute a sql query to find the user
    }
}
What is Spring Framework? An Unorthodox Guide
Last updated on June 23, 2022 - 110 comments
Star me on GitHub →You can use this guide to understand what Spring framework is and how its core features like dependency injection or aspected oriented programming work. Also, a comprehensive FAQ.
(Editor’s note: At ~6700 words, you probably don’t want to try reading this on a mobile device. Bookmark it and come back later. And even on a desktop, eat read this elephant one bite at a time.)
Introduction
The complexity of the Spring ecosystem
A lot of companies are using Spring, but then you go to spring.io and see that the Spring universe actually consists of 21 different, active projects. Ouch!
Furthermore, if you started programming with Spring in the last couple of years, there is a very high chance that you went directly into Spring Boot or Spring Data.
However, this guide is solely about one, the most important one, of these projects: Spring Framework. Why?
Because it is essential to learn that Spring Framework is the basis for all other projects. Spring Boot, Spring Data, Spring Batch all build on top of Spring.
This has two implications:
-
Without proper Spring framework knowledge, you will sooner or later get lost. You won’t fully grok e.g. Spring Boot, no matter how unimportant you think that core knowledge is.
-
Spending ~15 minutes reading this guide, which covers the most important 80% of Spring framework, will pay-off a million times in your professional career.
What is Spring Framework?
The short answer:
At its core, Spring framework is really just a dependency injection container, with a couple of convenience layers (think: database access, proxies, aspect-oriented programming, RPC, a web mvc framework) added on top. It helps you build Java application faster and more conveniently.
Now, that doesn’t really help, does it?
Luckily, there’s also a long answer:
The remainder of this document.
Dependency Injection Basics
In case you already know what dependency injection is, feel free to skip straight to Spring’s Dependency Injection Container. Otherwise, read on.
What is a dependency?
Imagine you are writing a Java class that lets you access a users table in your database. You would call these classes DAOs (data access object) or Repositories. So, you are going to write a UserDAO class.
Your UserDAO has only one method which lets you find users in your database table by their respective IDs.
To execute the appropriate SQL query, your UserDAO needs a database connection. And in the Java world, you (usually) get that database connection from another class, called a DataSource. So, your code now would look something like this:
import javax.sql.DataSource;

public class UserDao {

    public User findById(Integer id) throws SQLException {
        try (Connection connection = dataSource.getConnection()) { // (1)
               PreparedStatement selectStatement = connection.prepareStatement("select * from users where id =  ?");
               // use the connection etc.
        }
    }

}-
The question is now, where does your UserDao get its dataSource dependency from? The DAO obviously depends on a valid DataSource to fire those SQL queries.
How to instantiate dependencies with new()
The naive approach would be to simply create a new DataSource through a constructor, every time you need one. So, to connect to a MySQL database your UserDAO could look like this:
import com.mysql.cj.jdbc.MysqlDataSource;

public class UserDao {

    public User findById(Integer id) {
        MysqlDataSource dataSource = new MysqlDataSource(); // (1)
        dataSource.setURL("jdbc:mysql://localhost:3306/myDatabase");
        dataSource.setUser("root");
        dataSource.setPassword("s3cr3t");

        try (Connection connection = dataSource.getConnection()) { // (2)
             PreparedStatement selectStatement = connection.prepareStatement("select * from users where id =  ?");
             // execute the statement..convert the raw jdbc resultset to a user
             return user;
        }
    }
}-
We want to connect to a MySQL database; hence we are using a MysqlDataSource and hardcoding url/username/password here for easier reading.
-
We use our newly created DataSource for the query.
This works, but let’s see what happens when we extend our UserDao class with another method, findByFirstName.
Unfortunately, that method also needs a DataSource to work with. We can add that new method to our UserDAO and apply some refactorings, by introducing a newDataSource method.
import com.mysql.cj.jdbc.MysqlDataSource;

public class UserDao {

    public User findById(Integer id) {
        try (Connection connection = newDataSource().getConnection()) { // (1)
               PreparedStatement selectStatement = connection.prepareStatement("select * from users where id =  ?");
               // TODO execute the select , handle exceptions, return the user
        }
    }

    public User findByFirstName(String firstName) {
        try (Connection connection = newDataSource().getConnection()) { // (2)
               PreparedStatement selectStatement = connection.prepareStatement("select * from users where first_name =  ?");
               // TODO execute the select ,  handle exceptions, return the user
        }
    }

    public DataSource newDataSource() {
        MysqlDataSource dataSource = new MysqlDataSource(); // (3)
        dataSource.setUser("root");
        dataSource.setPassword("s3cr3t");
        dataSource.setURL("jdbc:mysql://localhost:3306/myDatabase");
        return dataSource;
    }
}-
findById has been rewritten to use the new newDataSource() method.
-
findByFirstName has been added and also uses the new newDataSource() method.
-
This is our newly extracted method, able to create new DataSources.
This approach works, but has two drawbacks:
-
What happens if we want to create a new ProductDAO class, which also executes SQL statements? Your ProductDAO would then also have a DataSource dependency, which now is only available in your UserDAO class. You would then have another similar method or extract a helper class that contains your DataSource.
-
We are creating a completely new DataSource for every single SQL query. Consider that a DataSource opens up a real, socket connection from your Java program to your database. This takes time and is rather expensive. It would be much nicer if we opened just one DataSource and re-used it, instead of opening and closing tons of them. One way of doing this could be by saving the DataSource in a private field in our UserDao, so it can be reused between methods - but that does not help with the duplication between multiple DAOs.
How to 'manage' dependencies in a global Application class
To accommodate these issues, you could think about writing a global Application class, that looks something like this:
import com.mysql.cj.jdbc.MysqlDataSource;

public enum Application {

    INSTANCE;

    private DataSource dataSource;

    public DataSource dataSource() {
        if (dataSource == null) {
            MysqlDataSource dataSource = new MysqlDataSource();
            dataSource.setUser("root");
            dataSource.setPassword("s3cr3t");
            dataSource.setURL("jdbc:mysql://localhost:3306/myDatabase");
            this.dataSource = dataSource;
        }
        return dataSource;
    }
}
Your UserDAO could now look like this:
import com.yourpackage.Application;

public class UserDao {
    public User findById(Integer id) {
        try (Connection connection = Application.INSTANCE.dataSource().getConnection()) { // (1)
               PreparedStatement selectStatement = connection.prepareStatement("select * from users where id =  ?");
               // TODO execute the select etc.
        }
    }

    public User findByFirstName(String firstName) {
        try (Connection connection = Application.INSTANCE.dataSource().getConnection()) { // (2)
               PreparedStatement selectStatement = connection.prepareStatement("select * from users where first_name =  ?");
               // TODO execute the select etc.
        }
    }
}
It is an improvement in two ways:
-
Your UserDAO does not have to construct its own DataSource dependency anymore, instead it can ask the Application class to give it a fully-functioning one. Same for all your other DAOs.
-
Your application class is a singleton (meaning there will only be one INSTANCE created), and that application singleton holds a reference to a DataSource singleton.
There are however still several drawbacks to this solution:
-
The UserDAO actively has to know where to get its dependencies from, it has to call the application class → Application.INSTANCE.dataSource().
-
If your program gets bigger, and you get more and more dependencies, you will have one monster Application.java class, which handles all your dependencies. At which point you’ll want to try and split things up into more classes/factories etc.
What is Inversion of Control?
Let’s go one step further.
Wouldn’t it be nice if you and the UserDAO didn’t have to worry about finding dependencies at all? Instead of actively calling Application.INSTANCE.dataSource(), your UserDAO could shout (somehow) that it needs one, but has no control anymore when/how/where it gets it from?
This is what is called inversion of control.
Let’s have a look at what our UserDAO could look like, with a brand-new constructor.
import javax.sql.DataSource;

public class UserDao {

    private DataSource dataSource;

    public UserDao(DataSource dataSource) { // (1)
        this.dataSource = dataSource;
    }

    public User findById(Integer id) {
        try (Connection connection = dataSource.getConnection()) { // (2)
               PreparedStatement selectStatement = connection.prepareStatement("select * from users where id =  ?");
               // TODO execute the select etc.
        }
    }

    public User findByFirstName(String firstName) {
        try (Connection connection = dataSource.getConnection()) { // (2)
               PreparedStatement selectStatement = connection.prepareStatement("select * from users where first_name =  ?");
               // TODO execute the select etc.
        }
    }
}-
Whenever a caller creates a new UserDao through its constructor, the caller also has to pass in a valid DataSource.
-
The findByX methods will then simply use that DataSource.
From the UserDao perspective this reads much nicer. It doesn’t know about the application class anymore, or how to construct DataSources itself. It only announces to the world "if you want to construct (i.e. use) me, you need to give me a datasource".
But imagine you now want to run your application. Whereas you could call "new UserService()" previously, you’ll now have to make sure to call new UserDao(dataSource).
public class MyApplication {

    public static void main(String[] args) {
        UserDao userDao = new UserDao(Application.INSTANCE.dataSource());
        User user1 = userDao.findById(1);
        User user2 = userDao.findById(2);
        // etc ...
    }
}
Dependency Injection Containers
Hence, the issue is that you, as a programmer are still actively constructing UserDAOs through their constructor and thus setting the DataSource dependency manually.
Wouldn’t it be nice if someone knew that your UserDAO has a DataSource constructor dependency and knew how to construct one? And then magically construct both objects for you: A working DataSource and a working UserDao?
That someone is a dependency injection container and is exactly what Spring framework is all about.
The Confident Spring Professional
My Spring course starts you with a plain Java web app and zero Spring — HttpServlets, hand-rolled DI. Then you add Spring on top, and the IoC container stops feeling like magic.
Want to try the first module for free?
View CourseSpring’s Dependency Injection Container
As already mentioned at the very beginning, Spring Framework, at its core, is a dependency injection container that manages the classes you wrote and their dependencies for you (see the previous section). Let’s find out how it does that.
What is an ApplicationContext?
That someone, who has control over all your classes and can manage them appropriately (read: create them with the necessary dependencies), is called ApplicationContext in the Spring universe.
What we want to achieve is the following code (I described the UserDao and DataSource in the previous section, go skim it if you came right here and skipped it):
import org.springframework.context.ApplicationContext;
import org.springframework.context.annotation.AnnotationConfigApplicationContext;
import javax.sql.DataSource;

public class MyApplication {

    public static void main(String[] args) {
        ApplicationContext ctx = new AnnotationConfigApplicationContext(someConfigClass); // (1)

        UserDao userDao = ctx.getBean(UserDao.class); // (2)
        User user1 = userDao.findById(1);
        User user2 = userDao.findById(2);

        DataSource dataSource = ctx.getBean(DataSource.class); // (3)
        // etc ...
    }
}-
Here we are constructing our Spring ApplicationContext. We’ll go into much more detail on how this works in the next paragraphs.
-
The ApplicationContext can give us a fully configured UserDao, i.e. one with its DataSource dependency set.
-
The ApplicationContext can also give us the DataSource directly, which is the same DataSource that it sets inside the UserDao.
This is pretty cool, isn’t it? You as the caller don’t have to worry about constructing classes anymore, you can simply ask the ApplicationContext to give you working ones!
But how does that work?
How to create an ApplicationContext?
In the code above, we put a variable called "someConfigClass" in the AnnotationConfigApplicationContext constructor. Here’s a quick reminder:
import org.springframework.context.annotation.AnnotationConfigApplicationContext;
public class MyApplication {

    public static void main(String[] args) {
        ApplicationContext ctx = new AnnotationConfigApplicationContext(someConfigClass); // (1)
        // ...
    }
}
What you really want to pass into the ApplicationContext constructor, is a reference to a configuration class, which should look like this:
import org.springframework.context.annotation.Bean;
import org.springframework.context.annotation.Configuration;

@Configuration
public class MyApplicationContextConfiguration {  // (1)

    @Bean
    public DataSource dataSource() {  // (2)
        MysqlDataSource dataSource = new MysqlDataSource();
        dataSource.setUser("root");
        dataSource.setPassword("s3cr3t");
        dataSource.setURL("jdbc:mysql://localhost:3306/myDatabase");
        return dataSource;
    }

    @Bean
    public UserDao userDao() { // (3)
        return new UserDao(dataSource());
    }

}-
You have a dedicated ApplicationContext configuration class, annotated with the @Configuration annotation, that looks a bit like the Application.java class from How to 'manage' dependencies in a global Application class.
-
You have a method that returns a DataSource and is annotated with the Spring-specific @Bean annotation.
-
You have another method, which returns a UserDao and constructs said UserDao by calling the dataSource bean method.
This configuration class is already enough to run your very first Spring application.
import org.springframework.context.ApplicationContext;
import org.springframework.context.annotation.AnnotationConfigApplicationContext;

public class MyApplication {

    public static void main(String[] args) {
        ApplicationContext ctx = new AnnotationConfigApplicationContext(MyApplicationContextConfiguration.class);
        UserDao userDao = ctx.getBean(UserDao.class);
        // User user1 = userDao.findById(1);
        // User user2 = userDao.findById(1);
        DataSource dataSource = ctx.getBean(DataSource.class);
    }
}
Now, let’s find out what exactly Spring and the AnnotationConfigApplicationContext do with that Configuration class you wrote.
Are there alternatives to AnnotationConfigApplicationContext?
There are many ways to construct a Spring ApplicationContext, for example through XML files, annotated Java configuration classes or even programmatically. To the outside world, this is represented through the single ApplicationContext interface.
Look at the MyApplicationContextConfiguration class from above. It is a Java class that contains Spring-specific annotations. That is why you would need to create an Annotation ConfigApplicationContext.
If, instead, you wanted to create your ApplicationContext from XML files, you would create a ClassPathXmlApplicationContext.
There are also many others, but in a modern Spring application, you will usually start out with an annotation-based application context.
What does the @Bean annotation do? What is a Spring Bean?
You’ll have to think of the methods inside your ApplicationContext configuration class as factory methods. For now, there is one method that knows how to construct UserDao instances and one method that constructs DataSource instances.
These instances that those factory methods create are called beans. It is a fancy word for saying: I (the Spring container) created them and they are under my control.
But this leads to the question: How many instances of a specific bean should Spring create?
What are Spring bean scopes?
How many instances of our DAOs should Spring create? To answer that question, you need to learn about bean scopes.
-
Should Spring create a singleton: All your DAOs share the same DataSource?
-
Should Spring create a prototype: All your DAOs get their own DataSource?
-
Or should your beans have even more complex scopes, like saying: A new DataSource per HttpRequest? Or per HttpSession? Or per WebSocket?
You can read up on a full list of available bean scopes here, but for now it is suffice to know that you can influence the scope with yet another annotation.
import org.springframework.context.annotation.Bean;
import org.springframework.context.annotation.Scope;
import org.springframework.context.annotation.Configuration;

@Configuration
public class MyApplicationContextConfiguration {

    @Bean
    @Scope("singleton")
    // @Scope("prototype") etc.
    public DataSource dataSource() {
        MysqlDataSource dataSource = new MysqlDataSource();
        dataSource.setUser("root");
        dataSource.setPassword("s3cr3t");
        dataSource.setURL("jdbc:mysql://localhost:3306/myDatabase");
        return dataSource;
    }
}
The scope annotation controls how many instances Spring will create. And as mentioned above, that’s rather simple:
-
Scope("singleton") → Your bean will be a singleton, there will only be one instance.
-
Scope("prototype") → Every time someone needs a reference to your bean, Spring will create a new one. (There’s a couple of caveats here, like injecting prototypes in singletons, though).
-
Scope("session") → There will be one bean created for every user HTTP session.
-
etc.
The gist: Most Spring applications almost entirely consist of singleton beans, with the occasional other bean scope (prototype, request, session, websocket etc.) sprinkled in.
Now that you know about ApplicationContexts, Beans & Scopes, let’s have another look at dependencies, or the many ways our UserDAO could obtain a DataSource.
What is Spring’s Java Config?
So far, you explicitly configured your beans in your ApplicationContext configuration, with the help of @Bean annotated Java methods.
This is what you would call Spring’s Java Config, as opposed to specifying everything in XML, which was historically the way to go with Spring. Just a quick recap of what this looks like:
import org.springframework.context.annotation.Bean;
import org.springframework.context.annotation.Configuration;

@Configuration
public class MyApplicationContextConfiguration {

    @Bean
    public DataSource dataSource() {
        MysqlDataSource dataSource = new MysqlDataSource();
        dataSource.setUser("root");
        dataSource.setPassword("s3cr3t");
        dataSource.setURL("jdbc:mysql://localhost:3306/myDatabase");
        return dataSource;
    }

    @Bean
    public UserDao userDao() { // (1)
        return new UserDao(dataSource());
    }

}-
One question: Why do you have to explicitly call new UserDao() with a manual call to dataSource()? Cannot Spring figure all of this out itself?
This is where another annotation called @ComponentScan comes in.
What does @ComponentScan do?
The first change you’ll need to apply to your context configuration is to annotate it with the additional @ComponentScan annotation.
import org.springframework.context.annotation.Bean;
import org.springframework.context.annotation.ComponentScan;
import org.springframework.context.annotation.Configuration;

@Configuration
@ComponentScan  // (1)
public class MyApplicationContextConfiguration {

    @Bean
    public DataSource dataSource() {
        MysqlDataSource dataSource = new MysqlDataSource();
        dataSource.setUser("root");
        dataSource.setPassword("s3cr3t");
        dataSource.setURL("jdbc:mysql://localhost:3306/myDatabase");
        return dataSource;
    }

    // (2)

    // no more UserDao @Bean method!
}-
We added the @ComponentScan annotation.
-
Note, that the UserDAO definition is now missing from the context configuration!
What this @ComponentScan annotation does, is tell Spring: Have a look at all Java classes in the same package as the context configuration if they look like a Spring Bean!
This means if your MyApplicationContextConfiguration lives in package com.marcobehler, Spring will scan every package, including subpackages, that starts with com.marcobehler for potential Spring beans.
How does Spring know if something is a Spring bean? Easy: Your classes need to be annotated with a marker annotation, called @Component.
What do @Component & @Autowired do?
Let’s add the @Component annotation to your UserDAO.
import javax.sql.DataSource;
import org.springframework.stereotype.Component;

@Component
public class UserDao {


    private DataSource dataSource;

    public UserDao(DataSource dataSource) { // (1)
        this.dataSource = dataSource;
    }
}-
This tells Spring, similarly to that @Bean method you wrote before: Hey, if you find me annotated with @Component through your @ComponentScan, then I want to be a Spring bean, managed by you, the dependency injection container!
(When you look at the source code of annotations like @Controller, @Service or @Repository later on, you’ll find that they all consist of multiple, further annotations, always including @Component!).
There’s only one little piece of information missing. How does Spring know that it should take the DataSource that you specified as a @Bean method and then create new UserDAOs with that specific DataSource?
Easy, with another marker annotation: @Autowired. Hence, your final code will look like this.
import javax.sql.DataSource;
import org.springframework.stereotype.Component;
import org.springframework.beans.factory.annotation.Autowired;

@Component
public class UserDao {

    private DataSource dataSource;

    public UserDao(@Autowired DataSource dataSource) {
        this.dataSource = dataSource;
    }
}
Now, Spring has all the information it needs to create UserDAO beans:
-
UserDAO is annotated with @Component → Spring will create it
-
UserDAO has an @Autowired constructor argument → Spring will automatically inject the DataSource that is configured via your @Bean method
-
Should there be no DataSources configured in any of your Spring configurations, you will receive a NoSuchBeanDefinition exception at runtime.
Constructor Injection & Autowired Revisited
I have been lying to you a tiny bit in the previous section. In earlier Spring versions (pre 4.2, see history), you needed to specify @Autowired in order for constructor injection to work.
With newer Spring versions, Spring is actually smart enough to inject these dependencies without an explicit @Autowired annotation in the constructor. So this would also work.
@Component
public class UserDao {

    private DataSource dataSource;

    public UserDao(DataSource dataSource) {
        this.dataSource = dataSource;
    }
}
Why did I mention @Autowired then? Because it does not hurt, i.e. makes things more explicit and because you can use @Autowired in many other different places, apart from constructors.
Let’s have a look at different ways of dependency injection - constructor injection just being one many.
What are Field and Setter Injection?
Simply put, Spring does not have to go through a constructor to inject dependencies.
It can also directly inject fields.
import javax.sql.DataSource;
import org.springframework.stereotype.Component;
import org.springframework.beans.factory.annotation.Autowired;

@Component
public class UserDao {

    @Autowired
    private DataSource dataSource;

}
Alternatively, Spring can also inject setters.
import javax.sql.DataSource;
import org.springframework.stereotype.Component;
import org.springframework.beans.factory.annotation.Autowired;

@Component
public class UserDao {

    private DataSource dataSource;

    @Autowired
    public void setDataSource(DataSource dataSource) {
        this.dataSource = dataSource;
    }

}
These two injection styles (fields, setters) have the same outcome as constructor injection: You’ll get a working Spring Bean. (In fact, there’s also another one, called method injection which we won’t cover here.)
But obviously, they differ from one another, which means there has been a great many debates about which injection style is best and which one you should use in your project.
Constructor Injection vs. Field Injection
There have been a great many debates online, whether constructor injection or field injection is better, with a number of strong voices even claiming that field injection is harmful.
To not add further noise to these arguments, the gist of this article is:
-
I have worked with both styles, constructor injection and field injection in various projects over the recent years. Based solely on personal experience, I do not truly favor one style over the other.
-
Consistency is king: Do not use constructor injection for 80% of your beans, field injection for 10% and method injection for the remaining 10%.
-
Spring’s approach from the official documentation seems sensible: Use constructor injection for mandatory dependencies and setter/field injection for optional dependencies. Be warned: Be really consistent with that.
Most importantly, keep in mind: The overall success of your software project will not depend on the choice of your favorite dependency injection method (pun intended).
The Confident Spring Professional
My Spring course covers all of this in your IDE: scopes, injection styles, lifecycles, @Value and profiles — with a checkpoint after every lesson.
Want to try the first module for free?
View CourseSummary: Spring’s IoC container
By now, you should know pretty much everything you need to know about Spring’s dependency container.
There is of course more to it, but if you have a good grasp of ApplicationContexts, Beans, dependencies and different methods of dependency injection, then you are already on a good path.
Let’s see what else Spring has to offer, apart from pure dependency injection.
Spring’s Aspect-Oriented Programming (AOP)
Dependency injection might lead to better structured programs, but injecting a dependency here and there is not what Spring’s ecosystem is all about. Let’s have a look at a simple ApplicationContextConfiguration again:
import org.springframework.context.annotation.Bean;
import org.springframework.context.annotation.Configuration;

@Configuration
public class MyApplicationContextConfiguration {

    @Bean
    public UserService userService() { // (1)
        return new UserService();
    }
}-
Let’s assume that UserService is a class that lets you find users from a database table - or save users to that database table.
Here’s where Spring’s hidden killer feature comes in:
Spring reads in that context configuration, containing the @Bean method you wrote and therefore Spring knows how to create and inject UserService beans.
But Spring can cheat and create something else than your UserService class. How? Why?
Spring’s Proxy Facilities
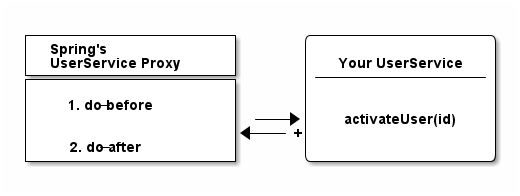
Because under the hood, any Spring @Bean method can return you something that looks and feels like (in your case) a UserService, but actually isn’t.
It can return you a proxy.
The proxy will at some point delegate to the UserService you wrote, but first, will execute its own functionality.
More specifically, Spring will, by default, create dynamic Cglib proxies, that do not need an interface for proxying to work (like JDK’s internal proxy mechanism): Instead, Cglib can proxy classes through subclassing them on the fly. ( If you are unsure about the individual proxy patterns, read more about the proxies on Wikipedia. )
Why Proxies?
Because it allows Spring to give your beans additional features, without modifying your code. In a gist, that is what aspect-oriented (or: AOP) programming is all about.
Let’s have a look at the most popular AOP example, Spring’s @Transactional annotation.
Spring’s @Transactional
Your UserService implementation above could look a bit like this:
import org.springframework.stereotype.Component;
import org.springframework.transaction.annotation.Transactional;

@Component
public class UserService {

    @Transactional           // (2)
    public User activateUser(Integer id) {  // (1)
        // execute some sql
        // send an event
        // send an email
    }
}-
We wrote an activateUser method, which, when called, needs to execute some SQL to update the User’s state in the database, maybe send an email or a messaging event.
-
@Transactional on that method signals Spring that you need an open database connection/transaction for that method to work and that said transaction should also be committed at the end. And that Spring needs to do this.
The problem: While Spring can create your UserService bean through the applicationContext configuration, it cannot rewrite your UserService. It cannot simply inject code in there that opens a database connection and commits a database transaction.
But what it can do, is to create a proxy around your UserService that is transactional. So, only the proxy needs to know about how to open up and close a database connection and can then simply delegate to your UserService in between.
Let’s have a look at that innocent ContextConfiguration again.
@Configuration
@EnableTransactionManagement // (1)
public class MyApplicationContextConfiguration {

    @Bean
    public UserService userService() { // (2)
        return new UserService();
    }
}-
We added an annotation signaling Spring: Yes, we want @Transactional support, which automatically enables Cglib proxies under the hood.
-
With the above annotation set, Spring does not just create and return your UserService here. It creates a Cglib proxy of your bean, that looks, smells and delegates to your UserService, but actually wraps around your UserService and gives its transaction management features.
This might seem a bit unintuitive first, but most Spring developers encounter proxies very soon in debugging sessions. Because of the proxies, Spring stacktraces can get rather long and unfamiliar: When you step inside a method, you could very well step inside the proxy first - which scares people off. It is, however, completely normal and expected behavior.
Are there alternatives to CGlib proxies?
Proxies are the default choice when programming AOP with Spring. You are however not restricted to using proxies, you could also go the full AspectJ route, that modifies your actual bytecode, if wanted. Covering AspectJ is however outside the scope of this guide.
AspectJ allows you to change actual bytecode through load-time-weaving or compile-time-weaving. This gives you a lot more possibilities, in exchange for a lot more complexity.
You can however configure Spring to use AspectJ’s AOP, instead of its default, proxy-based AOP.
Here are a couple of links if you want to get more information on this topic:
Spring’s AOP Support: A Summary
There is of course much more to be said about aspect-oriented programming, but this guide gives you an idea of how the most popular Spring AOP use-cases like @Transactional or Spring Security’s @Secured work. You could even go as far as write your own AOP annotations, if wanted.
As a consolation for the abrupt end, if you want to get more information on how Spring’s @Transactional management works in detail, have a look at my @Transactional guide.
Spring’s Resources
We’ve been talking about dependency injection & proxies for a while. Let’s now have a first look at what I would call important convenience utilities in Spring framework. One of these utilities is Spring’s resources support.
Think about how you would try to access a file in Java via HTTP or FTP. You could use Java’s URL class and write some plumbing code.
Similarly, how would you read in files from your application’s classpath? Or from a servlet context, that means from a web applications root directory (admittedly, this gets rarer and rarer in modern, packaged.jar application).
Again, you’d need to write a fair amount of boilerplate code to get that working and unfortunately the code would differ for each use case (URLs, classpaths, servlet contexts).
But there’s a solution: Spring’s resource abstraction. It is easily explained in code.
import org.springframework.core.io.Resource;

public class MyApplication {

    public static void main(String[] args) {
            ApplicationContext ctx = new AnnotationConfigApplicationContext(someConfigClass); // (1)

            Resource aClasspathTemplate = ctx.getResource("classpath:somePackage/application.properties"); // (2)

            Resource aFileTemplate = ctx.getResource("file:///someDirectory/application.properties"); // (3)

            Resource anHttpTemplate = ctx.getResource("https://marcobehler.com/application.properties"); // (4)

            Resource depends = ctx.getResource("myhost.com/resource/path/myTemplate.txt"); // (5)

            Resource s3Resources = ctx.getResource("s3://myBucket/myFile.txt"); // (6)
    }
}-
As always, you need an ApplicationContext to start off.
-
When you call getResource() on an applicationContext with a string that starts with classpath:, Spring will look for a resource on your..well..application classpath.
-
When you call getResource() with a string that starts with file:, Spring will look for a file on your harddrive.
-
When you call getResource() with a string that starts with https: (or http), Spring will look for a file on the web.
-
If you don’t specify a prefix, it actually depends on what kind of applicationContext you configured. More on that here.
-
This does not work out of the box with Spring Framework, but with additional libraries like Spring Cloud, you can even directly access s3:// paths.
In short, Spring gives you the ability to access resources via a nice little syntax. The resource interface has a couple of interesting methods:
public interface Resource extends InputStreamSource {

    boolean exists();

    String getFilename();

    File getFile() throws IOException;

    InputStream getInputStream() throws IOException;

    // ... other methods commented out
}
As you can see, it allows you to execute the most common operations on a resource:
-
Does it exist?
-
What is the filename?
-
Get a reference to the actual File object.
-
Get a direct reference to the raw data (InputStream).
This lets you do everything you want with a resource, independent of it living on the web or on your classpath or your hard drive.
The resources abstraction looks like such a tiny feature, but it really shines when combined with the next convenience feature offered by Spring: Properties.
What is Spring’s Environment?
A big part of any application is reading in properties, like database username & passwords, email server configuration, Stripe payment detail configuration, etc.
At its simplest form, these properties live in .properties files and there could be many of them:
-
Some of them on your classpath, so you have access to some development related passwords.
-
Others in the filesystem or a network drive, so a production server can have its own, secure properties.
-
Some could even come in the form of operating system environment variables.
Spring tries to make it easy for you to register and automatically find properties across all these different sources, through its environment abstraction.
import org.springframework.core.env.Environment;
public class MyApplication {

    public static void main(String[] args) {
           ApplicationContext ctx = new AnnotationConfigApplicationContext(someConfigClass);
           Environment env = ctx.getEnvironment(); // (1)
           String databaseUrl = env.getProperty("database.url"); // (2)
           boolean containsPassword = env.containsProperty("database.password");
           // etc
    }
}-
Through an applicationContext, you can always access the current program’s environment.
-
The environment on the other hand, lets you, among other things, access properties.
Now, what is an environment exactly?
What are Spring’s @PropertySources?
In a nutshell, an environment consists of one to many property sources. For example:
-
/mydir/application.properties
-
classpath:/application-default.properties
(Note: An environment also consists of profiles, i.e. "dev" or "production" profiles, but we won’t go into detail on profiles in this revision of this guide).
By default, a Spring MVC web application environment consists of ServletConfig/Context parameter, JNDI and JVM system property sources. They are also hierarchical, that means they have an order of importance and override each other.
However, it is rather easy to define new @PropertySources yourself:
import org.springframework.context.annotation.PropertySources;
import org.springframework.context.annotation.PropertySource;

@Configuration
@PropertySources(
        {@PropertySource("classpath:/com/${my.placeholder:default/path}/app.properties"),
         @PropertySource("file://myFolder/app-production.properties")})
public class MyApplicationContextConfiguration {
    // your beans
}
Now it makes much more sense, why we talked about Spring’s Resources before. Because both features go hand in hand.
The @PropertySource annotation works with any valid Spring configuration class and lets you define new, additional sources, with the help of Spring’s resources abstraction: Remember, it’s all about the prefixes: http://, file://, classpath: , etc.
Defining properties through @PropertySources is nice, but isn’t there a better way than having to go through the environment to access them? Yes, there is.
Spring’s @Value annotation & Property injection
You can inject properties into your beans, similarly like you would inject a dependency with the @Autowired annotation. But for properties, you need to use the @Value annotation.
import org.springframework.stereotype.Component;
import org.springframework.beans.factory.annotation.Value;

@Component
public class PaymentService {

    @Value("${paypal.password}")  // (1)
    private String paypalPassword;

     public PaymentService(@Value("${paypal.url}") String paypalUrl) { // (2)
         this.paypalUrl = paypalUrl;
    }
}-
The @Value annotation works directly on fields…
-
Or on constructor arguments.
There really isn’t much more to it. Whenever you use the @Value annotation, Spring will go through your (hierarchical) environment and look for the appropriate property - or throw an error message if such a property does not exist.
The Confident Spring Professional
The modules below — Web MVC, JdbcTemplate, @Transactional, Spring Boot, auto-configuration — are exactly the path my course takes from here. One small app, extended step by step.
Want to try the first module for free?
View CourseAdditional Modules
There’s even more modules that Spring Framework consists of. Let’s have a look at them now.
Spring Web MVC
You can find an extensive description of Spring MVC, Spring’s Web Framework, in this guide: Spring MVC: In-Depth Guide.
Data Access, Testing, Integration & Languages
Spring framework consists of even more convenience utilities than you have seen so far. Let’s call them modules and do not confuse these modules with the 20 other Spring projects on spring.io. To the contrary, they are all part of the Spring framework project.
So, what kind of convenience are we talking about?
You’ll have to understand that basically everything Spring offers in these modules, is also available in pure Java. Either offered by the JDK or a third-party library. Spring framework always builds on top of these existing features.
Here’s an example: Sending email attachments with Java’s Mail API is certainly doable, but a bit cumbersome to use. See here for a code example.
Spring provides a nice little wrapper API on top of Java’s Mail API, with the added benefit that everything it offers blends in nicely with Spring’s dependency injection container. It is part of Spring’s integration module.
import org.springframework.core.io.FileSystemResource;
import org.springframework.mail.javamail.JavaMailSender;
import org.springframework.mail.javamail.MimeMessageHelper;

public class SpringMailSender {

    @Autowired
    private JavaMailSender mailSender; // (1)

    public void sendInvoice(User user, File pdf) throws Exception {
        MimeMessage mimeMessage = mailSender.createMimeMessage();

        MimeMessageHelper helper = new MimeMessageHelper(mimeMessage, true); // (2)

        helper.setTo("john@rambo.com");
        helper.setText("Check out your new invoice!");
        FileSystemResource file = new FileSystemResource(pdf);
        helper.addAttachment("invoice.pdf", file);

        mailSender.send(mimeMessage);
    }
}-
Everything related to configuring an email server (url, username, password) is abstracted away into the Spring specific MailSender class, that you can inject in any bean that wants to send emails.
-
Spring offers convenience builders, like the MimeMessageHelper, to create multipart emails from, say, files as fast as possible.
So, to sum it up, Spring framework’s goal is to 'springify' available Java functionality, preparing it for dependency injection and therefore making the APIs easier to use in a Spring context.
Module Overview
I’d like to give you a quick overview of the most common utilities, features and modules you might encounter in a Spring framework project. Note, however, that detailed coverage of all these tools is impossible in the scope of this guide. Instead, have a look at the official documentation for a full list.
-
Spring’s Data Access: Not to be confused with Spring Data (JPA/JDBC) libraries. It is the basis for Springs @Transactional support, as well as pure JDBC and ORM (like Hibernate) integration.
-
Spring’s Integration Modules: Makes it easier for you to send emails, integrate with JMS or AMQP, schedule tasks, etc.
-
Spring Expression Language (SpEL): Even though this is not really correct, think about it as a DSL or Regex for Spring Bean creation/configuration/injection. It will be covered in more detail in future versions of this guide.
-
Spring’s Web Servlet Modules: Allows you writing web applications. Includes Spring MVC, but also support for WebSockets, SockJS and STOMP messaging.
-
Spring’s Web Reactive Modules: Allows you writing reactive web applications.
-
Spring’s Testing Framework: Allows you to (integration) test Spring contexts and therefore Spring applications, including helper utilities for testing REST services. If you want to deep dive into testing Spring (Boot) applications, have a look at this masterclass (note: I’m affiliated with Philip, the author).
The Confident Spring Professional
Plain Java → Spring → MVC → JDBC → Boot → Spring Data. My course walks the whole path as one project, module by module.
Want to try the first module for free?
View CourseFAQ
What is the difference between Spring Framework & Spring Boot?
If you have read this guide, you should understand by now that Spring Boot builds on top of Spring. While a comprehensive Spring Boot guide is coming up soon, here’s an example what "opinionated defaults" in Spring Boot mean.
Spring offers you the ability to read in .properties files from a variety of places, e.g. with the help of @PropertySource annotations. It also offers you the ability to write JSON REST controllers with the help of its Web MVC framework.
The issue is, you have to write and configure all these individual pieces yourself. Spring Boot, on the other hand, takes these single pieces and bundles them up together. Example:
-
Always and automatically look for application.properties files in various places and read them in.
-
Always booting up an embedded Tomcat so you can immediately see the results of writing your @RestControllers.
-
Automatically configuring everything for you to send/receive JSON, without needing to worry a ton about specific Maven/Gradle dependencies.
All, by running a main method in a Java class, which is annotated with the @SpringBootApplication annotation. Even better, Spring Boot offers Maven/Gradle plugins that let you package up your application into a .jar file, which you can run like this:
java -jar mySpringBootApp.jarSo, Spring Boot is all about taking the existing Spring framework parts, pre-configuring and packaging them up - with as little development work needed as possible.
What do the 20 other Spring.io projects do?
In the scope of this guide, I cannot go into detail of all the different projects, but let’s have a look at the ones you are most likely going to encounter.
-
Spring Boot: Probably the most popular Spring project. Spring Boot is an opinionated version of Spring Framework. Look at What is the difference between Spring Framework & Spring Boot? to find out what that rather meaningless phrase actually means.
-
Spring Batch: A library that helps you write good old batch jobs.
-
Spring Cloud: A set of libraries that help your Spring project integrate easier with "the cloud" (think: AWS) or write microservices.
-
Spring Security: A library that helps you secure, e.g. your web-application with OAuth2 or Basic Auth.
-
and many more…
Takeaway: All these libraries extend Spring Framework and build on top of its dependency injection core principles.
Where can I find out more about Spring’s version history?
Check out this guide: Spring And Spring Boot Versions.
Which is better? Spring XML or annotation or Java configuration?
Spring started out with XML configuration only. Then, slowly, more and more annotation / Java configuration features came out.
Today, you’ll find XML configuration mainly used in older, legacy projects - with newer projects all going for the Java / annotation-based configuration.
Do note two things though:
-
There is essentially nothing stopping you from combining XML / Annotations / Java Config in the same project, which usually leads to a mess.
-
You want to strive for homogeneity in your Spring configuration, i.e. not randomly generate some configurations with XML, some with Java config and some with component-scanning.
Are there alternatives to Spring Framework’s dependency injection container?
Yes, two popular ones in the Java ecosystem are:
-
Google’s Dagger, formerly Square’s.
Note that Dagger only offers dependency injection, with no additional convenience features. Guice offers dependency injection and other features like transaction management (with the help of Guice Persist).
Fin
If you have read this far, you should now have a pretty thorough understanding of what Spring framework is about.
You’ll find out how this connects to other Spring ecosystem libraries (like Spring Boot, or Spring Data) in the follow-up guides, but for now I want you to keep this metaphor in mind when trying to answer the question What is Spring Framework?
Imagine you want to renovate a house (~= build a software project).
Spring Framework is your DIY store (~=dependency injection container), which offers a ton different tools, from Bunsen burners (~= resources / properties) to sledgehammers (~= Web MVC) for your renovation. These tools simply help you renovate your house (=~ build your Java application) faster and more conveniently.
(note: Don’t ask me how I came up with these comparisons ;) )

That’s it for today. If you have any questions or suggestions, drop me a mail at marco@marcobehler.com or leave a comment below. For hands-on practice, check out the Learning Spring exercise course.
Thanks for reading. Auf Wiedersehen.
Acknowledgments
Big thanks go out to:
-
Patricio "Pato" Moschcovich, for doing an amazing job proof-reading this article and pointing out a ton of tiny mistakes.
-
Maciej Walkowiak, for rightfully pointing out that @RestController has always been part of Spring MVC, not Spring Boot.
There's more where that came from
I'll send you an update when I publish new guides. Absolutely no spam, ever. Unsubscribe anytime.
Comments (read-only)
110 comments
Anonymous
October 17, 2025
Thank you for the explanations about Spring, just the right balance of example and detail, and a surprisingly easy read - I will recommend.
Anonymous
September 06, 2025
Mantap bang marco
Anonymous
February 25, 2025
So freaking good introduction! Are you considering also make a video on those basic ideas underneath Spring? I believe this can be even more helpful than e.g. a Spring Boot example video.
Anonymous
December 14, 2024
Thanks man! You maked it clear now!
Anonymous
October 06, 2024
Gold Mine for Spring Developer
Anonymous
August 07, 2024
I was a great read, and I've already shared this post a multiple times. Many thanks👍
Anonymous
July 16, 2024
Great tutorial! Just one tiny typo, in "Are there alternatives to AnnotationConfigApplicationContext?" section, end of line 5 AnnotationConfigApplicationContext is separated into two parts
Anonymous
June 28, 2024
Since I went straight for Spring Boot from the start, I could not understand them so well. This article help me to understand Spring more.
Anonymous
March 10, 2024
Great guide! Many thanks.
Anonymous
December 11, 2023
Thank you so much, it was so easy for me to understand this concepts rather than reading tons of docs first, it was so helpful and I like how you explain things here, thank you so much it will help me in my incoming interviews ;)
facuarielgomezz
November 01, 2023
Greatk articlee!! you are the best!! i have a little idea about all this but with this i understand it at all
Anonymous
October 25, 2023
This is without a doubt the best Spring article for beginners in the world. Thank you so much!!
Anonymous
September 21, 2023
Fucking details really interesting. Thanks you
toriboi.fo
September 04, 2023
Amazing article, so glad I stumbled upon this website, thanks Marco. I've been building spring apps for a couple of years now, but this is like going literally from "confused" to "feeling like a spring master" about its internals...the "feeling" part is very important.
Anonymous
August 06, 2023
Wow.. explained so well.. thank you so much!
Anonymous
July 06, 2023
Made me understand the basics of Spring. Thank you!
Anonymous
June 26, 2023
Great Thanks for your really good article!!
Anonymous
June 11, 2023
Love your articles. I am switching from .NET to Java and as I am a person who likes to understand things under the hood, your articles are awesome!
Anonymous
April 12, 2023
Great article. Actually was looking for something else and stumbled upon this. Have to admit that - "I could never put the book down once I picked it"
Wish there were more such articles for popular modern day frameworks that gives a developer a good overview.
Wish there were more such articles for popular modern day frameworks that gives a developer a good overview.
Anonymous
April 12, 2023
Thank you for this wonderful article. It helped me to quickly recap my basics on Spring
rajshreerai931
February 23, 2023
The best article on Spring on the internet.
Anonymous
February 16, 2023
It's a really good article for starters, thanks for your work
Anonymous
February 14, 2023
Thank you so much for this explanation, great article!.
Anonymous
January 30, 2023
If the author was my teacher, I bet I would ace all his lessons. The language used on this doc makes it feel like the author is standing right before you. The language used here to drive home the points is simply the best.
Anonymous
January 26, 2023
great information, thank u for putting this out :)
ashokezhilsiddharth
December 09, 2022
An impressive explanation of Spring Fundamentals . I have read lot of Tech stuff on Spring online, but this was impressive one.
Anonymous
December 06, 2022
Pretty good
Anonymous
September 15, 2022
# Simply, a masterpiece!
What a pity that such a gem is buried under tons of questionable articles. Speaking of which, I believe somebody is plagiarizing you Marco - see this
What a pity that such a gem is buried under tons of questionable articles. Speaking of which, I believe somebody is plagiarizing you Marco - see this
Marco Behler
September 16, 2022
Thanks man! Probably not much I can do in regard to the plagiarization :(
Anonymous
August 23, 2022
Best article on spring framework. So much detail covered in a simpler understandable way!
Anonymous
August 03, 2022
I've rarely seen such a great work !
Thanks a lot.
Thanks a lot.
Anonymous
July 31, 2022
Thank you very much. Most clear explanation about Spring I read so far. Keep up the good work !!!
Anonymous
June 14, 2022
This is a world treasure... Save this man
Anonymous
June 11, 2022
thanks a lot ! i learnt so much through this article !
ignacio.casbar
April 29, 2022
I am grateful for this article. It resumes tons and tons of guides all over the web in the simplest way possible. I learned a lot reading it. Thank Marco for writing it.
Anonymous
March 31, 2022
Thanks.
Anonymous
March 07, 2022
Can't thank you enough.
I wish I found this earlier.
I wish I found this earlier.
Anonymous
February 04, 2022
Such a nice way to explain Spring. Thanks for this work, you gained a new follower ;)
Anonymous
January 24, 2022
Dude.... I love you man... This entire post is so intuitive and much relieving for me given my background of dotnet, I was struggling understand these annotation all these while. Thanks a ton
Anonymous
January 05, 2022
The best overlook of Spring I have ever come across! Starting a new job as a junior dev in a couple of months at a place that has Spring as one of their core technologies. I feel much more prepared with my understanding of Spring foundations from this article! Thank you so much for this!
Anonymous
January 03, 2022
Thanks, very helpful...
Anonymous
November 19, 2021
This is by far the best explanation of spring framework that I've seen.
Anonymous
September 13, 2021
A must read :-)
Many thanks :-)
Many thanks :-)
Anonymous
September 05, 2021
Amazing job explaining Spring framework. I stumbled upon this and just loved it.
Anonymous
August 14, 2021
@ConfigurationProperties could be added to environment properties topic as they make it easier to access than using multiple @Value.
But this is an excellent guide! It mentions all topics I have seen people struggle with.
But this is an excellent guide! It mentions all topics I have seen people struggle with.
Alexander Tochin
July 24, 2021
Hi Marco, great guide!
A question regarding optional (setter) injection.
Let's imagine we have a main bean and optional sub bean injected via setter into main.
In what order Spring will create beans?
Is it possible that it will create main first with sub = null and then create sub?
Or it guarantees that sub always be created before main if it is available?
Marco Behler
July 29, 2021
Hi Alexander, yes. There's pretty much a "two-phase" pass going on, i.e. the first bean will be created with the other dependencies set to = null. And once those are created, they will all be set. That way, they can also resolve (most) "circles" rather elegantly.
Anonymous
July 22, 2021
Wish I had a chance to read your article before I started to code using Spring Boot during my internship!
Anonymous
July 20, 2021
Aboslutely excellent set of articles! You managed to share all the important parts in simple terms and therefore created a complete picture of how things work. This feels like a good basis to start digging into individual moving parts further whenever needed. Keep it up!
Anonymous
May 19, 2021
This is really a nice guide to learn Spring Framework for beginners as well professionals to brush up. Thank you Marco!
harmandeepsidhu4091
April 25, 2021
Best article on Spring. :)
Anonymous
March 26, 2021
Great article! At one point though, when you start explaining IoC, you state "Whereas you could call "new UserService()" previously...". Didn't you mean "new UserDao()"?
Anonymous
March 21, 2021
This is beautiful, thanks a lot for this awesome article.
God bless you
God bless you
Anonymous
March 20, 2021
Can't thank you enough for this amazing guide.
Spring framework can be intimidating , but this guide makes look spring framework so much more fun .
Spring framework can be intimidating , but this guide makes look spring framework so much more fun .
Anonymous
March 20, 2021
Awesome Post Marco
himanshupratap
March 12, 2021
Thank you so much for the wonderful article. Thi is probably the best article on spring concepts.
ukrposhta
February 04, 2021
Link to " injecting prototypes in singletons" not working. It has an extra "p" in the end!
Anonymous
January 19, 2021
Congratulations on your efforts to clarify these topics ! A very good job !
Anonymous
December 23, 2020
You are gifted in the art of taking something complex and explaining it in the simplest of terms that one will remember forever. Thank you!
Anonymous
November 28, 2020
Brilliant guide to spring. I tried to learn spring 4 years back and settled with spring boot. But the missing knowledge is fulfilled now. Excellent article and a brilliant approach to explain. Thanks a ton.
igor.inas
November 23, 2020
    @Bean
    public UserDao userDao() { // (3)
        return new UserDao(dataSource());
    }
Is this correct? Shouldn't
dataSource be rather a parameter of the userDao() method, so that it is provided by Spring ?Because this is just a direct method invocation inside the same class.
Marco Behler
November 23, 2020
Hi Igor,
so, both ways actually work.
The "magic" is, that it's actually _not_ a direct method invocation, as Spring will create a proxy of your configuration (and all the methods) at runtime and not invocate your configuration directly. So, it does not matter how often call dataSource() inside a configuration, it will be a proxied call, thus cached and always refer to the same e.g. singleton.
igor.inas
November 24, 2020
Hello Marco,
by trying to disprove you, I learned something new. Here's my story.
I have always understood, that Spring uses byte code manipulation to create a new class, that provides same methods with same signatures as the annotated class. However, I was under the impression, that the new class keeps around an instance of the original class and ultimately delegates the call to the original class. And once a delegated method is invoked, all transitive invocations would happen on the original class.
I created a simple app to check my assumption:
https://github.com/ygor-sk/tutorials/blob/master/marco-behler/blog-question/src/main/java/com/example/demo/MyApplicationContextConfiguration.java
I see now, that I was wrong. I see now, that Spring does not use byte code manipulation just to create some kind of a wrapper. It really picks apart the original class, collects bytecodes of individual methods and assembles a brand new class.
Ok, so is that something, that I can rely on from now on? Even when I call "this.methodAnnotatedWithTransactional()" ?
I got this is as a trick question during an interview, though about it for a bit and I told the guy, that "this.callPublicAnnotatedMethod()" are always direct calls and they bypass Spring's byte code. He said: "exactly, you are right!".
Just to be sure, is it perhaps possible to reconfigure Spring to use a different byte code manipulation library, that does not have this capability anymore? Or is CGLIB practically the standard that we can rely on?
Anonymous
November 19, 2020
@Inversion of Control (IoC) section, your UserDao constructor is private. I don't think that is correct to use it like:
UserDao userDao = new UserDao(Application.INSTANCE.dataSource());
in MyApplication class.
UserDao userDao = new UserDao(Application.INSTANCE.dataSource());
in MyApplication class.
Marco Behler
November 19, 2020
You are absolutely right, that was a typo. Fixed.
Anonymous
October 20, 2020
For me this is the best ever explanation for spring framework, Great Work.
Anonymous
October 18, 2020
Thank you so much insightful article. It was not 15 mins read. I spent more than 30 mins and it was worth it.
Nguyen Van Bau
October 16, 2020
thankyou so much!
gautham.g
October 08, 2020
An excellent article that really helped me understand the specifics of what Spring Framework actually does. Also, never knew you need bunsen burners when building a house. Very enlightening all around. Thanks!
gautham.g
October 08, 2020
Excellent article. Also, never realized you needed bunsen burners before building a house. Very enlightening all around! Thanks!
Anonymous
September 21, 2020
Very nice intro to spring framework, Thank you :)
Anonymous
September 19, 2020
This is absolutely the best guide on Spring I've read so far. Simply incredible to find such a jewel amidst the badly written garbage we find a cross the web. Congratulations and thank you very much!
Anonymous
September 01, 2020
Great artical which explains spring framework very well. :)
Anonymous
August 31, 2020
Hi Marco, I have been trying to learn Spring since 2 years but every time I start with one tutorial and I end up with another tutorial understanding nothing. But your tutorial is so clear explaining each and every concept of Spring. Excellent and master piece article! Thank you so much.
Anonymous
August 27, 2020
It's a really great article! Thanks for this comprehensive guide
Anonymous
August 06, 2020
Really helpful and well-structured, there is a small part where you write "Note: An environment also consists of profiles, i.e. "dev" or "production" profiles, but we won’t go into detail on profiles in this revision of this guide". Can you put a link to go deeper on this?, please.
Thanks in advance
Thanks in advance
Anonymous
July 29, 2020
Great article indeed. If only I had found it earlier I didn't have to do hundreds of google searches to understand spring.
Anonymous
July 22, 2020
Great Article! Excellent explanation. Thank you!
Anonymous
July 18, 2020
Excellent Article!!!!!
Anonymous
July 11, 2020
Awesome article and website. Really love your guides. Thanks!!
Anonymous
July 08, 2020
Nice read!
What I want to add is that you can use default values within your @Value annotations, which can be convenient from time to time, e.g. if you want to have overridable default behavior:
What I want to add is that you can use default values within your @Value annotations, which can be convenient from time to time, e.g. if you want to have overridable default behavior:
@Value("${some.setting:defaultValue}")
Anonymous
June 29, 2020
Just excellent. Nothing more.
Anonymous
June 26, 2020
THis is the best blog i have ever read on spring. Period.
Anonymous
June 18, 2020
Great blog for getting a grasp about spring.
Their website at first glance wasn't that helpful.
Now I feel like I have a good base knowledge to dig deeper into their resources.
Their website at first glance wasn't that helpful.
Now I feel like I have a good base knowledge to dig deeper into their resources.
Anonymous
June 17, 2020
Fantastic article. For someone with 15+ years of experience in software engineering (including Java for Android) that really struggled with Spring Boot, this answered a lot of question marks!
Anonymous
June 03, 2020
Excellent article! Much Thanks
Anonymous
May 28, 2020
Absolutely amazing article. I've read through this and the spring boot article, and I've learned more doing that than DAYS of trudging through Spring's official "LMAO just use Spring Boot™ it's magic" documentation. Thanks a lot.
Anonymous
May 27, 2020
My goodness!! I accidentally stumbled upon the website and I am loving it now. Thanks a million Marco. You are absolutely awesome at the way you present in an interesting manner and at making it so easy. Eagerly awaiting your other guides. You rock! Thanks again.
mixamus
May 24, 2020
Thanks for the article || Excellent || Very good job 👍 👏 :)
mixamus
May 24, 2020
thanks for the article | Excellent :)
Anonymous
May 11, 2020
Thank you for this excellent post! 15 minutes well spent :)
Anonymous
April 06, 2020
Hi Marco,
great article , than you for you efforts.
great article , than you for you efforts.
Anonymous
March 26, 2020
Hey Marco,
Great article! My only comment regards the Constructor/Field/Setter injection. You link to an external article that is titled 'Field Injection Considered Harmful' where the article goes into detail on how field injection leads to DI container coupling, mutability, etc. However, in your article, you label the external resource as 'setter injection is harmful.' In the rest of your article, you put more emphasis on the combination of field and constructor injection.
Is this a mishap on your part, or am I missing an argument you're trying to make in favor of field injection?
Marco Behler
March 26, 2020
Mishap on my part! Thanks for bringing it up, will be fixed soon.
Anonymous
March 22, 2020
Excellent article! Thank you very much for putting the time and effort into it
Anonymous
March 10, 2020
Nice overview! The only thing I'd complain about is that it uses annotated controllers with field injection, which was the standard pattern about 10 years ago. These days, most people agree that @Configuration classes with constructor injection are the way to go, mostly because that combination leads to better testability. Don't want to create a login here. Disagree with me at https://twitter.com/oldJavaGuy
Rickson Menezes
March 01, 2020
Hi Marco,
import org.springframework.context.ApplicationContext;
import org.springframework.context.annotation.AnnotationConfigApplicationContext;
public class MyApplication {
public static void main(String[] args) {
ApplicationContext ctx = new AnnotationConfigApplicationContext(MyApplicationContextConfiguration.class);
UserDao userDao = ctx.getBean(UserDao.class);
// User user1 = userDao.findById(1);
// User user2 = userDao.findById(1);
DataSource dataSource = ctx.getBean(DataSource.class);
}
}
In the code here there is a main method. In my spring mvc project, there is no main. We have web.xml, our main servlet mapped there, other bean objects declared in dispatcher-servlet.xml but no main().
Why is it that your demo code has it? Does it not use a servlet? If the answer is too long, do you think you can point me to a resource?
Thank you for reading.
Marco Behler
March 01, 2020
Hi Rickson,
so, there's a couple of things that need to be untangled here.
Spring, as in the core dependency injection container, has nothing to do with the web or servlets. You can instantiate an ApplicationContext anywhere you like, so for example in the main() method or really anywhere else.
Now, you seem to be using Spring "WebMVC" (!), with the old-school web.xml & dispatcher-servlet.xml configuration. That means you will have a Tomcat (or similar servlet container), package up your application into a .war file and put it into your Tomcat. Your Tomcat will be able to read he web.xml and - in the end - instantiate a DispatcherServlet which internally needs (to instantiate) an ApplicationContext. So what we do here in the main method is basically hidden for you that way.
There are other, more modern ways, though. First, you could use an embedded Tomcat and ,second, then use the servlet 3+ servlet initialization mechanisms without having a web.xml, and at the end with a Spring Java Config instead of the dispatcher-servlet.xml.
As for further reading, I actually explain and make you practice pretty much all of these concepts in my new Spring Framework course https://www.marcobehler.com/academy/learning-spring , which will be published this week. You will be able to try out the first part for free, which explains most of these concepts.
Cheers
Rickson Menezes
February 21, 2020
Marco, what made you write this? The fact that you found this need to fill the gap with an in-depth write-up requires many shout-outs. Thanks you.
Anonymous
February 18, 2020
Awesome overview of what is spring and what it does !
Many thanks.
Many thanks.
Anonymous
February 17, 2020
I read other tutorials to explore Spring, and they were winding and had unnecessary details. Yours was crisp, clear and much useful. Explained clearly why the framework is so popular. Thanks!!
Anonymous
February 16, 2020
thanks so much
Anonymous
February 13, 2020
Well written; with a good deal of links to follow up for more details. Sterling job!
Anonymous
February 10, 2020
Great article and summary. I would just add that the @Scope("singleton") is the default setting for a new creation of a bean. Your text suggest it but doesn't mention it explicitly.
Another idea: The @Scope("prototype") could be used if one connection should have 'UTF-8' encoding while the other not or different timezones. Than one could easily get the same basic settings but different flavors of the same settings.
Beside this - wonderful to read this article especially after working some time already with Spring. Now getting a little bit more detailed idea. THX
goyalshub
February 09, 2020
"Spending ~15 minutes reading this guide" are you kidding me?
Marco Behler
February 09, 2020
Time flies by when you enjoy yourself ;)
Anonymous
February 09, 2020
Best doc I have seen for Spring boot, easy understand
Anonymous
February 06, 2020
Thanks for this article! I loved the one on Microservices and this one as well. Keep em coming :)
Anonymous
February 03, 2020
Thank you very much for this very insightful article. I am a Spring developer since one year, but always had some issues understanding how the internals of Spring work and what is actually doing. Thanks to your article I now have a better understanding of all things that are happening intrinsically. Kudos!
Anonymous
February 02, 2020
Best thing for Spring beginners.
Anonymous
February 01, 2020
What a great way to explain Spring Framework, this is indeed a hidden jewel. Many thanks!
Anonymous
January 31, 2020
This is an amazing article, thanks! That's what I missed before is here on one html page :)
Anonymous
January 31, 2020
Explaining core concepts to its brim.Thanks !
Anonymous
January 31, 2020
Is it ok to use 78% Constructor injection and 22% field?
Marco Behler
January 31, 2020
Best would be 66% Constructor, 33% field and 1% method injection ;)
Anonymous
January 31, 2020
Really awesome and clear article. Thank you!
Anonymous
January 30, 2020
Thanks a lot for this master-piece article!
Anbu Sampath
January 30, 2020
Excellent article, clear explanation to understand various spring modules.
Anonymous
January 30, 2020
Awesome Article! Thanks!

let mut author = ?
I'm @MarcoBehler and I share everything I know about making awesome software through my guides, screencasts, talks and courses.
Follow me on Twitter to find out what I'm currently working on.