


Spring Security: Authentication and Authorization In-Depth
Last updated on May 30, 2022 - 157 comments
Star me on GitHub →You can use this guide to understand what Spring Security is and how its core features like authentication, authorization or common exploit protection work. Also, a comprehensive FAQ.
(Editor’s note: At ~6500 words, you probably don’t want to try reading this on a mobile device. Bookmark it and come back later.)
Introduction
Sooner or later everyone needs to add security to his project and in the Spring ecosystem you do that with the help of the Spring Security library.
So you go along, add Spring Security to your Spring Boot (or plain Spring) project and suddenly…
-
…you have auto-generated login-pages.
-
…you cannot execute POST requests anymore.
-
…your whole application is on lockdown and prompts you to enter a username and password.
Having survived the subsequent mental breakdown, you might be interested in how all of this works.
What is Spring Security and how does it work?
The short answer:
At its core, Spring Security is really just a bunch of servlet filters that help you add authentication and authorization to your web application.
It also integrates well with frameworks like Spring Web MVC (or Spring Boot), as well as with standards like OAuth2 or SAML. And it auto-generates login/logout pages and protects against common exploits like CSRF.
Now, that doesn’t really help, does it?
Luckily, there’s also a long answer:
The remainder of this article.
Web Application Security: 101
Before you become a Spring Security Guru, you need to understand three important concepts:
-
Authentication
-
Authorization
-
Servlet Filters
Parental Advice: Don’t skip this section, as it is the basis for everything that Spring Security does. Also, I’ll make it as interesting as possible.
1. Authentication
First off, if you are running a typical (web) application, you need your users to authenticate. That means your application needs to verify if the user is who he claims to be, typically done with a username and password check.
User: "I’m the president of the United States. My username is: potus!"
Your webapp: "Sure sure, what’s your password then, Mr. President?"
User: "My password is: th3don4ld".
Your webapp: "Correct. Welcome, Sir!"
2. Authorization
In simpler applications, authentication might be enough: As soon as a user authenticates, she can access every part of an application.
But most applications have the concept of permissions (or roles). Imagine: customers who have access to the public-facing frontend of your webshop, and administrators who have access to a separate admin area.
Both type of users need to login, but the mere fact of authentication doesn’t say anything about what they are allowed to do in your system. Hence, you also need to check the permissions of an authenticated user, i.e. you need to authorize the user.
User: "Let me play with that nuclear football…."
Your webapp: "One second, I need to check your permissions first…..yes Mr. President, you have the right clearance level. Enjoy."
User: "What was that red button again…??"
3. Servlet Filters
Last but not least, let’s have a look at Servlet Filters. What do they have to do with authentication and authorization? (If you are completely new to Java Servlets or Filters, I advise you to read the old, but still very valid Head First Servlets book.)
Why use Servlet Filters?
Think back to my other article, where we found out that basically any Spring web application is just one servlet: Spring’s good old DispatcherServlet, that redirects incoming HTTP requests (e.g. from a browser) to your @Controllers or @RestControllers.
The thing is: There is no security hardcoded into that DispatcherServlet and you also very likely don’t want to fumble around with a raw HTTP Basic Auth header in your @Controllers. Optimally, the authentication and authorization should be done before a request hits your @Controllers.
Luckily, there’s a way to do exactly this in the Java web world: you can put filters in front of servlets, which means you could think about writing a SecurityFilter and configure it in your Tomcat (servlet container/application server) to filter every incoming HTTP request before it hits your servlet.
A naive SecurityFilter
A SecurityFilter has roughly 4 tasks and a naive and overly-simplified implementation could look like this:
import javax.servlet.*;
import javax.servlet.http.HttpFilter;
import javax.servlet.http.HttpServletRequest;
import javax.servlet.http.HttpServletResponse;
import java.io.IOException;

public class SecurityServletFilter extends HttpFilter {

    @Override
    protected void doFilter(HttpServletRequest request, HttpServletResponse response, FilterChain chain) throws IOException, ServletException {

        UsernamePasswordToken token = extractUsernameAndPasswordFrom(request);  // (1)

        if (notAuthenticated(token)) {  // (2)
            // either no or wrong username/password
            // unfortunately the HTTP status code is called "unauthorized", instead of "unauthenticated"
            response.setStatus(HttpServletResponse.SC_UNAUTHORIZED); // HTTP 401.
            return;
        }

        if (notAuthorized(token, request)) { // (3)
            // you are logged in, but don't have the proper rights
            response.setStatus(HttpServletResponse.SC_FORBIDDEN); // HTTP 403
            return;
        }

        // allow the HttpRequest to go to Spring's DispatcherServlet
        // and @RestControllers/@Controllers.
        chain.doFilter(request, response); // (4)
    }

    private UsernamePasswordToken extractUsernameAndPasswordFrom(HttpServletRequest request) {
        // Either try and read in a Basic Auth HTTP Header, which comes in the form of user:password
        // Or try and find form login request parameters or POST bodies, i.e. "username=me" & "password="myPass"
        return checkVariousLoginOptions(request);
    }


    private boolean notAuthenticated(UsernamePasswordToken token) {
        // compare the token with what you have in your database...or in-memory...or in LDAP...
        return false;
    }

    private boolean notAuthorized(UsernamePasswordToken token, HttpServletRequest request) {
       // check if currently authenticated user has the permission/role to access this request's /URI
       // e.g. /admin needs a ROLE_ADMIN , /callcenter needs ROLE_CALLCENTER, etc.
       return false;
    }
}-
First, the filter needs to extract a username/password from the request. It could be via a Basic Auth HTTP Header, or form fields, or a cookie, etc.
-
Then the filter needs to validate that username/password combination against something, like a database.
-
The filter needs to check, after successful authentication, that the user is authorized to access the requested URI.
-
If the request survives all these checks, then the filter can let the request go through to your DispatcherServlet, i.e. your @Controllers.
FilterChains
Reality Check: While the above code works compiles, it would sooner or later lead to one monster filter with a ton of code for various authentication and authorization mechanisms.
In the real-world, however, you would split this one filter up into multiple filters, that you then chain together.
For example, an incoming HTTP request would…
-
First, go through a LoginMethodFilter…
-
Then, go through an AuthenticationFilter…
-
Then, go through an AuthorizationFilter…
-
Finally, hit your servlet.
This concept is called FilterChain and the last method call in your filter above is actually delegating to that very chain:
chain.doFilter(request, response);With such a filter (chain) you can basically handle every authentication or authorization problem there is in your application, without needing to change your actual application implementation (think: your @RestControllers / @Controllers).
Armed with that knowledge, let’s find out how Spring Security makes use of this filter magic.
I'm currently writing a short, super-crisp premium guide on bullet-proofing your REST APIs for production with Spring Security.
Want the first chapter for free, as soon as early access opens?
FilterChain & Security Configuration DSL
We’ll start covering Spring Security a bit unconventionally, by going in the reverse direction from the previous chapter, starting with Spring Security’s FilterChain.
Spring’s DefaultSecurityFilterChain
Let’s assume you set up Spring Security correctly and then boot up your web application. You’ll see the following log message:
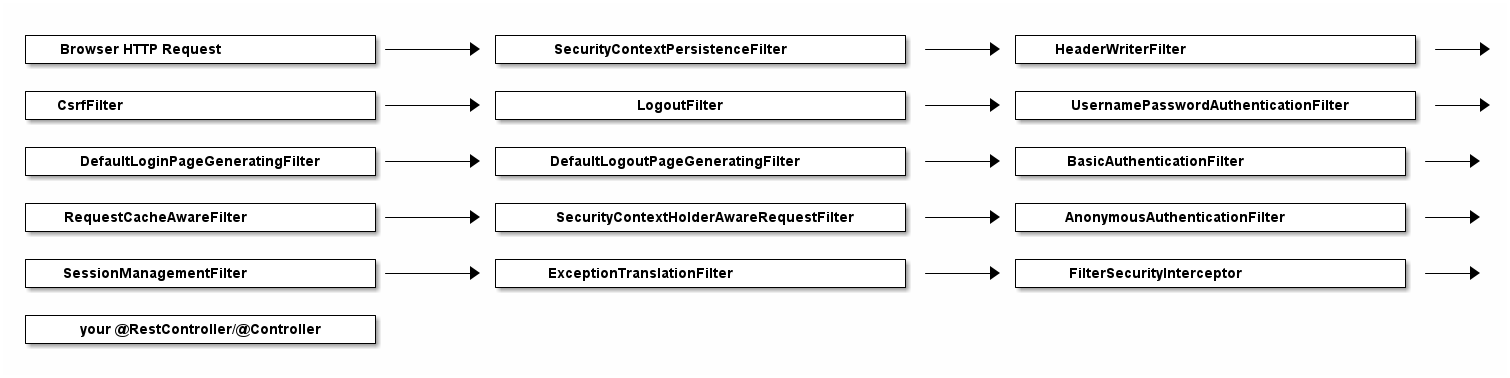
2020-02-25 10:24:27.875 INFO 11116 --- [ main] o.s.s.web.DefaultSecurityFilterChain : Creating filter chain: any request, [org.springframework.security.web.context.request.async.WebAsyncManagerIntegrationFilter@46320c9a, org.springframework.security.web.context.SecurityContextPersistenceFilter@4d98e41b, org.springframework.security.web.header.HeaderWriterFilter@52bd9a27, org.springframework.security.web.csrf.CsrfFilter@51c65a43, org.springframework.security.web.authentication.logout.LogoutFilter@124d26ba, org.springframework.security.web.authentication.UsernamePasswordAuthenticationFilter@61e86192, org.springframework.security.web.authentication.ui.DefaultLoginPageGeneratingFilter@10980560, org.springframework.security.web.authentication.ui.DefaultLogoutPageGeneratingFilter@32256e68, org.springframework.security.web.authentication.www.BasicAuthenticationFilter@52d0f583, org.springframework.security.web.savedrequest.RequestCacheAwareFilter@5696c927, org.springframework.security.web.servletapi.SecurityContextHolderAwareRequestFilter@5f025000, org.springframework.security.web.authentication.AnonymousAuthenticationFilter@5e7abaf7, org.springframework.security.web.session.SessionManagementFilter@681c0ae6, org.springframework.security.web.access.ExceptionTranslationFilter@15639d09, org.springframework.security.web.access.intercept.FilterSecurityInterceptor@4f7be6c8]|If you expand that one line into a list, it looks like Spring Security does not just install one filter, instead it installs a whole filter chain consisting of 15 (!) different filters.
So, when an HTTPRequest comes in, it will go through all these 15 filters, before your request finally hits your @RestControllers. The order is important, too, starting at the top of that list and going down to the bottom.
Analyzing Spring’s FilterChain
It would go too far to have a detailed look at every filter of this chain, but here’s the explanations for a few of those filters. Feel free to look at Spring Security’s source code to understand the other filters.
-
BasicAuthenticationFilter: Tries to find a Basic Auth HTTP Header on the request and if found, tries to authenticate the user with the header’s username and password.
-
UsernamePasswordAuthenticationFilter: Tries to find a username/password request parameter/POST body and if found, tries to authenticate the user with those values.
-
DefaultLoginPageGeneratingFilter: Generates a login page for you, if you don’t explicitly disable that feature. THIS filter is why you get a default login page when enabling Spring Security.
-
DefaultLogoutPageGeneratingFilter: Generates a logout page for you, if you don’t explicitly disable that feature.
-
FilterSecurityInterceptor: Does your authorization.
So with these couple of filters, Spring Security provides you a login/logout page, as well as the ability to login with Basic Auth or Form Logins, as well as a couple of additional goodies like the CsrfFilter, that we are going to have a look at later.
Half-Time Break: Those filters, for a large part, are Spring Security. Not more, not less. They do all the work. What’s left for you is to configure how they do their work, i.e. which URLs to protect, which to ignore and what database tables to use for authentication.
Hence, we need to have a look at how to configure Spring Security, next.
How to configure Spring Security: WebSecurityConfigurerAdapter
With the latest Spring Security and/or Spring Boot versions, the way to configure Spring Security is by having a class that:
-
Is annotated with @EnableWebSecurity.
-
Extends WebSecurityConfigurer, which basically offers you a configuration DSL/methods. With those methods, you can specify what URIs in your application to protect or what exploit protections to enable/disable.
Here’s what a typical WebSecurityConfigurerAdapter looks like:
@Configuration
@EnableWebSecurity // (1)
public class WebSecurityConfig extends WebSecurityConfigurerAdapter { // (1)

  @Override
  protected void configure(HttpSecurity http) throws Exception {  // (2)
      http
        .authorizeRequests()
          .antMatchers("/", "/home").permitAll() // (3)
          .anyRequest().authenticated() // (4)
          .and()
       .formLogin() // (5)
         .loginPage("/login") // (5)
         .permitAll()
         .and()
      .logout() // (6)
        .permitAll()
        .and()
      .httpBasic(); // (7)
  }
}-
A normal Spring @Configuration with the @EnableWebSecurity annotation, extending from WebSecurityConfigurerAdapter.
-
By overriding the adapter’s configure(HttpSecurity) method, you get a nice little DSL with which you can configure your FilterChain.
-
All requests going to
/and/homeare allowed (permitted) - the user does not have to authenticate. You are using an antMatcher, which means you could have also used wildcards (*, \*\*, ?) in the string. -
Any other request needs the user to be authenticated first, i.e. the user needs to login.
-
You are allowing form login (username/password in a form), with a custom loginPage (
/login, i.e. not Spring Security’s auto-generated one). Anyone should be able to access the login page, without having to log in first (permitAll; otherwise we would have a Catch-22!). -
The same goes for the logout page
-
On top of that, you are also allowing Basic Auth, i.e. sending in an HTTP Basic Auth Header to authenticate.
How to use Spring Security’s configure DSL
It takes some time getting used to that DSL, but you’ll find more examples in the FAQ section: AntMatchers: Common Examples.
What is important for now, is that THIS configure method is where you specify:
-
What URLs to protect (authenticated()) and which ones are allowed (permitAll()).
-
Which authentication methods are allowed (formLogin(), httpBasic()) and how they are configured.
-
In short: your application’s complete security configuration.
Note: You wouldn’t have needed to immediately override the adapter’s configure method, because it comes with a pretty reasonable implementation - by default. This is what it looks like:
public abstract class WebSecurityConfigurerAdapter implements
		WebSecurityConfigurer<WebSecurity> {

    protected void configure(HttpSecurity http) throws Exception {
            http
                .authorizeRequests()
                    .anyRequest().authenticated()  // (1)
                    .and()
                .formLogin().and()   // (2)
                .httpBasic();  // (3)
        }
}-
To access any URI (
anyRequest()) on your application, you need to authenticate (authenticated()). -
Form Login (
formLogin()) with default settings is enabled. -
As is HTTP Basic authentication (
httpBasic()).
This default configuration is why your application is on lock-down, as soon as you add Spring Security to it. Simple, isn’t it?
Summary: WebSecurityConfigurerAdapter’s DSL configuration
We learned that Spring Security consists of a couple of filters that you configure with a WebSecurityConfigurerAdapter @Configuration class.
But there’s one crucial piece missing. Let’s take Spring’s BasicAuthFilter for example. It can extract a username/password from an HTTP Basic Auth header, but what does it authenticate these credentials against?
This naturally leads us to the question of how authentication works with Spring Security.
Authentication with Spring Security
When it comes to authentication and Spring Security you have roughly three scenarios:
-
The default: You can access the (hashed) password of the user, because you have his details (username, password) saved in e.g. a database table.
-
Less common: You cannot access the (hashed) password of the user. This is the case if your users and passwords are stored somewhere else, like in a 3rd party identity management product offering REST services for authentication. Think: Atlassian Crowd.
-
Also popular: You want to use OAuth2 or "Login with Google/Twitter/etc." (OpenID), likely in combination with JWT. Then none of the following applies and you should go straight to the OAuth2 chapter.
Note: Depending on your scenario, you need to specify different @Beans to get Spring Security working, otherwise you’ll end up getting pretty confusing exceptions (like a NullPointerException if you forgot to specify the PasswordEncoder). Keep that in mind.
Let’s have a look at the top two scenarios.
1. UserDetailsService: Having access to the user’s password
Imagine you have a database table where you store your users. It has a couple of columns, but most importantly it has a username and password column, where you store the user’s hashed(!) password.
create table users (id int auto_increment primary key, username varchar(255), password varchar(255));In this case Spring Security needs you to define two beans to get authentication up and running.
-
A UserDetailsService.
-
A PasswordEncoder.
Specifying a UserDetailsService is as simple as this:
@Bean
public UserDetailsService userDetailsService() {
    return new MyDatabaseUserDetailsService(); // (1)
}-
MyDatabaseUserDetailsService implements UserDetailsService, a very simple interface, which consists of one method returning a UserDetails object:
public class MyDatabaseUserDetailsService implements UserDetailsService {

	UserDetails loadUserByUsername(String username) throws UsernameNotFoundException { // (1)
         // 1. Load the user from the users table by username. If not found, throw UsernameNotFoundException.
         // 2. Convert/wrap the user to a UserDetails object and return it.
        return someUserDetails;
    }
}

public interface UserDetails extends Serializable { // (2)

    String getUsername();

    String getPassword();

    // <3> more methods:
    // isAccountNonExpired,isAccountNonLocked,
    // isCredentialsNonExpired,isEnabled
}-
A UserDetailsService loads UserDetails via the user’s username. Note that the method takes only one parameter: username (not the password).
-
The UserDetails interface has methods to get the (hashed!) password and one to get the username.
-
UserDetails has even more methods, like is the account active or blocked, have the credentials expired or what permissions the user has - but we won’t cover them here.
So you can either implement these interfaces yourself, like we did above, or use existing ones that Spring Security provides.
Off-The-Shelf Implementations
Just a quick note: You can always implement the UserDetailsService and UserDetails interfaces yourself.
But, you’ll also find off-the-shelf implementations by Spring Security that you can use/configure/extend/override instead.
-
JdbcUserDetailsManager, which is a JDBC(database)-based UserDetailsService. You can configure it to match your user table/column structure.
-
InMemoryUserDetailsManager, which keeps all userdetails in-memory and is great for testing.
-
org.springframework.security.core.userdetail.User, which is a sensible, default UserDetails implementation that you could use. That would mean potentially mapping/copying between your entities/database tables and this user class. Alternatively, you could simply make your entities implement the UserDetails interface.
Full UserDetails Workflow: HTTP Basic Authentication
Now think back to your HTTP Basic Authentication, that means you are securing your application with Spring Security and Basic Auth. This is what happens when you specify a UserDetailsService and try to login:
-
Extract the username/password combination from the HTTP Basic Auth header in a filter. You don’t have to do anything for that, it will happen under the hood.
-
Call your MyDatabaseUserDetailsService to load the corresponding user from the database, wrapped as a UserDetails object, which exposes the user’s hashed password.
-
Take the extracted password from the HTTP Basic Auth header, hash it automatically and compare it with the hashed password from your UserDetails object. If both match, the user is successfully authenticated.
That’s all there is to it. But hold on, how does Spring Security hash the password from the client (step 3)? With what algorithm?
PasswordEncoders
Spring Security cannot magically guess your preferred password hashing algorithm. That’s why you need to specify another @Bean, a PasswordEncoder. If you want to, say, use the BCrypt password hashing function (Spring Security’s default) for all your passwords, you would specify this @Bean in your SecurityConfig.
@Bean
public BCryptPasswordEncoder bCryptPasswordEncoder() {
    return new BCryptPasswordEncoder();
}
What if you have multiple password hashing algorithms, because you have some legacy users whose passwords were stored with MD5 (don’t do this), and newer ones with Bcrypt or even a third algorithm like SHA-256? Then you would use the following encoder:
@Bean
public PasswordEncoder passwordEncoder() {
    return PasswordEncoderFactories.createDelegatingPasswordEncoder();
}
How does this delegating encoder work? It will look at the UserDetail’s hashed password (coming from e.g. your database table), which now has to start with a {prefix}. That prefix, is your hashing method! Your database table would then look like this:
username |
password |
|
{bcrypt}$2y$12$6t86Rpr3llMANhCUt26oUen2WhvXr/A89Xo9zJion8W7gWgZ/zA0C |
||
{sha256}5ffa39f5757a0dad5dfada519d02c6b71b61ab1df51b4ed1f3beed6abe0ff5f6 |
Spring Security will:
-
Read in those passwords and strip off the prefix ( {bcrypt} or {sha256} ).
-
Depending on the prefix value, use the correct PasswordEncoder (i.e. a BCryptEncoder, or a SHA256Encoder)
-
Hash the incoming, raw password with that PasswordEncoder and compare it with the stored one.
That’s all there is to PasswordEncoders.
Summary: Having access to the user’s password
The takeaway for this section is: if you are using Spring Security and have access to the user’s password, then:
-
Specify a UserDetailsService. Either a custom implementation or use and configure one that Spring Security offers.
-
Specify a PasswordEncoder.
That is Spring Security authentication in a nutshell.
2. AuthenticationProvider: Not having access to the user’s password
Now, imagine that you are using Atlassian Crowd for centralized identity management. That means all your users and passwords for all your applications are stored in Atlassian Crowd and not in your database table anymore.
This has two implications:
-
You do not have the user passwords anymore in your application, as you cannot ask Crowd to just give you those passwords.
-
You do, however, have a REST API that you can login against, with your username and password. (A POST request to the
/rest/usermanagement/1/authenticationREST endpoint).
If that is the case, you cannot use a UserDetailsService anymore, instead you need to implement and provide an AuthenticationProvider @Bean.
    @Bean
    public AuthenticationProvider authenticationProvider() {
        return new AtlassianCrowdAuthenticationProvider();
    }
An AuthenticationProvider consists primarily of one method and a naive implementation could look like this:
public class AtlassianCrowdAuthenticationProvider implements AuthenticationProvider {

        Authentication authenticate(Authentication authentication)  // (1)
                throws AuthenticationException {
            String username = authentication.getPrincipal().toString(); // (1)
            String password = authentication.getCredentials().toString(); // (1)

            User user = callAtlassianCrowdRestService(username, password); // (2)
            if (user == null) {                                     // (3)
                throw new AuthenticationException("could not login");
            }
            return new UserNamePasswordAuthenticationToken(user.getUsername(), user.getPassword(), user.getAuthorities()); // (4)
        }
	    // other method ignored
}-
Compared to the UserDetails load() method, where you only had access to the username, you now have access to the complete authentication attempt, usually containing a username and password.
-
You can do whatever you want to authenticate the user, e.g. call a REST-service.
-
If authentication failed, you need to throw an exception.
-
If authentication succeeded, you need to return a fully initialized UsernamePasswordAuthenticationToken. It is an implementation of the Authentication interface and needs to have the field authenticated be set to true (which the constructor used above will automatically set). We’ll cover authorities in the next chapter.
Full AuthenticationProvider Workflow: HTTP Basic Authentication
Now think back to your HTTP Basic Authentication, that means you are securing your application with Spring Security and Basic Auth. This is what happens when you specify an AuthenticationProvider and try to login:
-
Extract the username/password combination from the HTTP Basic Auth header in a filter. You don’t have to do anything for that, it will happen under the hood.
-
Call your AuthenticationProvider (e.g. AtlassianCrowdAuthenticationProvider) with that username and password for you to do the authentication (e.g. REST call) yourself.
There is no password hashing or similar going on, as you are essentially delegating to a third-party to do the actual username/password check. That’s AuthenticationProvider authentication in a nutshell!
Summary: AuthenticationProvider
The takeaway for this section is: if you are using Spring Security and do not have access to the user’s password, then implement and provide an AuthenticationProvider @Bean.
I'm currently writing a short, super-crisp premium guide on bullet-proofing your REST APIs for production with Spring Security.
Want the first chapter for free, as soon as early access opens?
Authorization with Spring Security
So far, we have only talked about authentication, e.g. username and password checks.
Let’s now have a look at permissions, or rather roles and authorities in Spring Security speak.
What is Authorization?
Take your typical e-commerce web-shop. It likely consists of the following pieces:
-
The web-shop itself. Let’s assume its URL is
www.youramazinshop.com. -
Maybe an area for callcenter agents, where they can login and see what a customer recently bought or where their parcel is. Its URL could be
www.youramazinshop.com/callcenter. -
A separate admin area, where administrators can login and manage callcenter agents or other technical aspects (like themes, performance, etc.) of the web-shop. Its URL could be
www.youramazinshop.com/admin.
This has the following implications, as simply authenticating users is not enough anymore:
-
A customer obviously shouldn’t be able to access the callcenter or admin area. He is only allowed to shop in the website.
-
A callcenter agent shouldn’t be able to access the admin area.
-
Whereas an admin can access the web-shop, the callcenter area and the admin area.
Simply put, you want to allow different access for different users, depending on their authorities or roles.
What are Authorities? What are Roles?
Simple:
-
An authority (in its simplest form) is just a string, it can be anything like: user, ADMIN, ROLE_ADMIN or 53cr37_r0l3.
-
A role is an authority with a
ROLE_prefix. So a role calledADMINis the same as an authority calledROLE_ADMIN.
The distinction between roles and authorities is purely conceptual and something that often bewilders people new to Spring Security.
Why is there a distinction between roles and authorities?
Quite honestly, I’ve read the Spring Security documentation as well as a couple of related StackOverflow threads on this very question and I can’t give you a definitive, good answer.
What are GrantedAuthorities? What are SimpleGrantedAuthorities?
Of course, Spring Security doesn’t let you get away with just using Strings. There’s a Java class representing your authority String, a popular one being SimpleGrantedAuthority.
public final class SimpleGrantedAuthority implements GrantedAuthority {

	private final String role;

    @Override
	public String getAuthority() {
		return role;
	}
}
(Note: There’s other authority classes as well, that let you store additional objects (e.g. the principal) alongside your string, I won’t cover them here. For now, we will go with SimpleGrantedAuthority, only.)
1. UserDetailsService: Where to store and get authorities?
Assuming you are storing the users in your own application (think: UserDetailsService), you are going to have a Users table.
Now, you would simply add a column called "authorities" to it. For this article I chose a simple string column here, though it could contain multiple, comma-separated values. Alternatively I could also have a completely separate table AUTHORITIES, but for the scope of this article this will do.
Note: Referring back to What are Authorities? What are Roles?: You save authorities, i.e. Strings, to the database. It so happens that these authorities start with the ROLE_ prefix, so, in terms of Spring Security these authorities are also roles.
username |
password |
authorities |
|
{bcrypt}… |
ROLE_ADMIN |
||
{sha256}… |
ROLE_CALLCENTER |
The only thing that’s left to do is to adjust your UserDetailsService to read in that authorities column.
public class MyDatabaseUserDetailsService implements UserDetailsService {

  UserDetails loadUserByUsername(String username) throws UsernameNotFoundException {
     User user = userDao.findByUsername(username);
     List<SimpleGrantedAuthority> grantedAuthorities = user.getAuthorities().map(authority -> new SimpleGrantedAuthority(authority)).collect(Collectors.toList()); // (1)
     return new org.springframework.security.core.userdetails.User(user.getUsername(), user.getPassword(), grantedAuthorities); // (2)
  }

}-
You simply map whatever is inside your database column to a list of SimpleGrantedAuthorities. Done.
-
Again, we’re using Spring Security’s base implementation of UserDetails here. You could also use your own class implementing UserDetails here and might not even have to map then.
2. AuthenticationManager: Where to store and get authorities?
When the users comes from a third-party application, like Atlassian Cloud, you’ll need to find out what concept they are using to support authorities. Atlassian Crowd had the concepts of "roles", but deprecated it in favour of "groups".
So, depending on the actual product you are using, you need to map this to a Spring Security authority, in your AuthenticationProvider.
public class AtlassianCrowdAuthenticationProvider implements AuthenticationProvider {

    Authentication authenticate(Authentication authentication)
            throws AuthenticationException {
        String username = authentication.getPrincipal().toString();
        String password = authentication.getCredentials().toString();

        atlassian.crowd.User user = callAtlassianCrowdRestService(username, password); // (1)
        if (user == null) {
            throw new AuthenticationException("could not login");
        }
        return new UserNamePasswordAuthenticationToken(user.getUsername(), user.getPassword(), mapToAuthorities(user.getGroups())); // (2)
    }
	    // other method ignored
}-
Note: This is not actual Atlassian Crowd code, but serves its purpose. You authenticate against a REST service and get back a JSON User object, which then gets converted to an atlassian.crowd.User object.
-
That user can be a member of one or more groups, which are assumed to be just strings here. You can then simply map these groups to Spring’s "SimpleGrantedAuthority".
Revisiting WebSecurityConfigurerAdapter for Authorities
So far, we talked a lot about storing and retrieving authorities for authenticated users in Spring Security. But how do you protect URLs with different authorities with Spring Security’s DSL? Simple:
@Configuration
@EnableWebSecurity
public class WebSecurityConfig extends WebSecurityConfigurerAdapter {

	@Override
	protected void configure(HttpSecurity http) throws Exception {
        http
          .authorizeRequests()
            .antMatchers("/admin").hasAuthority("ROLE_ADMIN") // (1)
            .antMatchers("/callcenter").hasAnyAuthority("ROLE_ADMIN", "ROLE_CALLCENTER") // (2)
            .anyRequest().authenticated() // (3)
            .and()
         .formLogin()
           .and()
         .httpBasic();
	}
}-
To access the
/adminarea you (i.e. the user) need to be authenticated AND have the authority (a simple string) ROLE_ADMIN. -
To access the
/callcenterarea you need to be authenticated AND have either the authority ROLE_ADMIN OR ROLE_CALLCENTER. -
For any other request, you do not need a specific role but still need to be authenticated.
Note, that the above code (1,2) is equivalent to the following:
  http
    .authorizeRequests()
      .antMatchers("/admin").hasRole("ADMIN") // (1)
.antMatchers("/callcenter").hasAnyRole("ADMIN", "CALLCENTER") // (2)-
Instead of calling "hasAuthority", you now call "hasRole". Note: Spring Security will look for an authority called
ROLE_ADMINon the authenticated user. -
Instead of calling "hasAnyAuthority", you now call "hasAnyRole". Note: Spring Security will look for an authority called
ROLE_ADMINorROLE_CALLCENTERon the authenticated user.
hasAccess and SpEL
Last, but not least, the most powerful way to configure authorizations, is with the access method. It lets you specify pretty much any valid SpEL expressions.
  http
    .authorizeRequests()
.antMatchers("/admin").access("hasRole('admin') and hasIpAddress('192.168.1.0/24') and @myCustomBean.checkAccess(authentication,request)") // (1)-
You are checking that the user has ROLE_ADMIN, with a specific IP address as well as a custom bean check.
To get a full overview of what’s possible with Spring’s Expression-Based Access Control, have a look at the official documentation.
Common Exploit Protections
There is a variety of common attacks that Spring Security helps you to protect against. It starts with timing attacks (i.e. Spring Security will always hash the supplied password on login, even if the user does not exist) and ends up with protections against cache control attacks, content sniffing, click jacking, cross-site scripting and more.
It is impossible to go into the details of each of these attacks in the scope of this guide. Hence, we will only look at the one protection that throws most Spring Security newbies off the most: Cross-Site-Request-Forgery.
Cross-Site-Request-Forgery: CSRF
If you are completely new to CSRF, you might want to watch this YouTube video to get up to speed with it. However, the quick takeaway is, that by default Spring Security protects any incoming POST (or PUT/DELETE/PATCH) request with a valid CSRF token.
What does that mean?
CSRF & Server-Side Rendered HTML
Imagine a bank transfer form or any form (like a login form) for that matter, that gets rendered by your @Controllers with the help of a templating technology like Thymeleaf or Freemarker.
<form action="/transfer" method="post">  <!-- 1 -->
  <input type="text" name="amount"/>
  <input type="text" name="routingNumber"/>
  <input type="text" name="account"/>
  <input type="submit" value="Transfer"/>
</form>
With Spring Security enabled, you won’t be able to submit that form anymore. Because Spring Security’s CSRFFilter is looking for an additional hidden parameter on any POST (PUT/DELETE) request: a so-called CSRF token.
It generates such a token, by default, per HTTP session and stores it there. And you need to make sure to inject it into any of your HTML forms.
CSRF Tokens & Thymeleaf
As Thymeleaf has good integration with Spring Security (when used together with Spring Boot), you can simply add the following snippet to any form and you’ll get the token injected automatically, from the session, into your form. Even better, if you are using "th:action" for your form, Thymeleaf will automatically inject that hidden field for you, without having to do it manually.
<form action="/transfer" method="post">  <!-- 1 -->
  <input type="text" name="amount"/>
  <input type="text" name="routingNumber"/>
  <input type="text" name="account"/>
  <input type="submit" value="Transfer"/>
  <input type="hidden" name="${_csrf.parameterName}" value="${_csrf.token}"/>
</form>

<!-- OR -->

<form th:action="/transfer" method="post">  <!-- 2 -->
  <input type="text" name="amount"/>
  <input type="text" name="routingNumber"/>
  <input type="text" name="account"/>
  <input type="submit" value="Transfer"/>
</form>-
Here, we are adding the CSRF parameter manually.
-
Here, we are using Thymeleaf’s form support.
Note: For more information on Thymeleaf’s CSRF support, see the official documentation.
CSRF & Other Templating Libraries
I cannot cover all templating libraries in this section, but as a last resort, you can always inject the CSRFToken into any of your @Controller methods and simply add it to the model to render it in a view or access it directly as HttpServletRequest request attribute.
@Controller
public class MyController {
    @GetMaping("/login")
    public String login(Model model, CsrfToken token) {
        // the token will be injected automatically
        return "/templates/login";
    }
}
CSRF & React or Angular
Things are a bit different for a Javascript app, like a React or Angular single page app. Here’s what you need to do:
-
Configure Spring Security to use a CookieCsrfTokenRepository, which will put the CSRFToken into a cookie "XSRF-TOKEN" (and send that to the browser).
-
Make your Javascript app take that cookie value, and send it as an "X-XSRF-TOKEN" header with every POST(/PUT/PATCH/DELETE) request.
For a full copy-and-paste React example, have a look at this great blog post: https://developer.okta.com/blog/2018/07/19/simple-crud-react-and-spring-boot.
Disabling CSRF
If you are only providing a stateless REST API where CSRF protection does not make any sense, you would completely disable CSRF protection. This is how you would do it:
@EnableWebSecurity
@Configuration
public class WebSecurityConfig extends
   WebSecurityConfigurerAdapter {

  @Override
  protected void configure(HttpSecurity http) throws Exception {
    http
      .csrf().disable();
  }
}
I'm currently writing a short, super-crisp premium guide on bullet-proofing your REST APIs for production with Spring Security.
Want the first chapter for free, as soon as early access opens?
OAuth2
Spring Security’s OAuth2 integration is a complex topic and enough for another 7,000 words, which do not fit into the scope of this article.
Update August 21st, 2020: I just published the Spring Security & OAuth2 guide. Check it out!
Spring Integrations
Spring Security & Spring Framework
For most of this article, you only specified security configurations on the web tier of your application. You protected certain URLs with antMatcher or regexMatchers with the WebSecurityConfigurerAdapter’s DSL. That is a perfectly fine and standard approach to security.
In addition to protecting your web tier, there’s also the idea of "defense in depth". That means in addition to protecting URLs, you might want to protect your business logic itself. Think: your @Controllers, @Components, @Services or even @Repositories. In short, your Spring beans.
Method Security
That approach is called method security and works through annotations that you can basically put on any public method of your Spring beans. You also need to explicitly enable method security by putting the @EnableGlobalMethodSecurity annotation on your ApplicationContextConfiguration.
@Configuration
@EnableGlobalMethodSecurity(
  prePostEnabled = true, // (1)
  securedEnabled = true, // (2)
  jsr250Enabled = true) // (3)
public class YourSecurityConfig extends WebSecurityConfigurerAdapter{
}-
The prePostEnabled property enables support for Spring’s
@PreAuthorizeand@PostAuthorizeannotations. Support means, that Spring will ignore this annotation unless you set the flag to true. -
The securedEnabled property enables support for the
@Securedannotation. Support means, that Spring will ignore this annotation unless you set the flag to true. -
The jsr250Enabled property enables support for the
@RolesAllowedannotation. Support means, that Spring will ignore this annotation unless you set the flag to true.
What is the difference between @PreAuthorize, @Secured and @RolesAllowed?
@Secured and @RolesAllowed are basically the same, though @Secured is a Spring-specific annotation coming with the spring-security-core dependency and @RolesAllowed is a standardised annotation, living in the javax.annotation-api dependency. Both annotations take in an authority/role string as value.
@PreAuthorize/@PostAuthorize are also (newer) Spring specific annotations and more powerful than the above annotations, as they can contain not only authorities/roles, but also any valid SpEL expression.
Lastly, all these annotations will raise an AccessDeniedException if you try and access a protected method with an insufficient authority/role.
So, let’s finally see these annotations in action.
@Service
public class SomeService {

    @Secured("ROLE_CALLCENTER") // (1)
    // == @RolesAllowed("ADMIN")
    public BankAccountInfo get(...) {

    }

    @PreAuthorize("isAnonymous()") // (2)
    // @PreAuthorize("#contact.name == principal.name")
    // @PreAuthorize("ROLE_ADMIN")
    public void trackVisit(Long id);

    }
}-
As mentioned, @Secured takes an authority/role as parameter. @RolesAllowed, likewise. Note: Remember that
@RolesAllowed("ADMIN")will check for a granted authorityROLE_ADMIN. -
As mentioned, @PreAuthorize takes in authorities, but also any valid SpEL expression. For a list of common built-in security expressions like
isAnonymous()above, as opposed to writing your own SpEL expressions, check out the official documentation.
Which annotation should I use?
This is mainly a matter of homogenity, not so much of tying yourself too much to Spring-specific APIs (an argument, that is often brought forward).
If using @Secured, stick to it and don’t hop on the @RolesAllowed annotation in 28% of your other beans in an effort to standardise, but never fully pull through.
To start off, you can always use @Secured and switch to @PreAuthorize as soon as the need arises.
Spring Security & Spring Web MVC
As for the integration with Spring WebMVC, Spring Security allows you to do a couple of things:
-
In addition to antMatchers and regexMatchers, you can also use mvcMatchers. The difference is, that while antMatchers and regexMatchers basically match URI strings with wildcards, mvcMatchers behave exactly like @RequestMappings.
-
Injection of your currently authenticated principal into a @Controller/@RestController method.
-
Injection of your current session CSRFToken into a @Controller/@RestController method.
-
Correct handling of security for async request processing.
@Controller
public class MyController {

    @RequestMapping("/messages/inbox")
    public ModelAndView findMessagesForUser(@AuthenticationPrincipal CustomUser customUser, CsrfToken token) {  // (1) (2)

    // .. find messages for this user and return them ...
    }
}-
@AuthenticationPrincipal will inject a principal if a user is authenticated, or null if no user is authenticated. This principal is the object coming from your UserDetailsService/AuthenticationManager!
-
Or you could inject the current session CSRFToken into each method.
If you are not using the @AuthenticationPrincipal annotation, you would have to fetch the principal yourself, through the SecurityContextHolder. A technique often seen in legacy Spring Security applications.
@Controller
public class MyController {

    @RequestMapping("/messages/inbox")
    public ModelAndView findMessagesForUser(CsrfToken token) {
         SecurityContext context = SecurityContextHolder.getContext();
         Authentication authentication = context.getAuthentication();

         if (authentication != null && authentication.getPrincipal() instanceof UserDetails) {
             CustomUser customUser = (CustomUser) authentication.getPrincipal();
             // .. find messages for this user and return them ...
         }

         // todo
    }
}
Spring Security & Spring Boot
Spring Boot really only pre-configures Spring Security for you, whenever you add the spring-boot-starter-security dependency to your Spring Boot project.
Other than that, all security configuration is done with plain Spring Security concepts (think: WebSecurityConfigurerAdapter, authentication & authorization rules), which have nothing to do with Spring Boot, per se.
So, everything you read in this guide applies 1:1 to using Spring Security with Spring Boot. And if you do not understand plain Security, don’t expect to properly understand how both technologies work together.
Spring Security & Thymeleaf
Spring Security integrates well with Thymeleaf. It offers a special Spring Security Thymeleaf dialect, which allows you to put security expressions directly into your Thymeleaf HTML templates.
<div sec:authorize="isAuthenticated()">
  This content is only shown to authenticated users.
</div>
<div sec:authorize="hasRole('ROLE_ADMIN')">
  This content is only shown to administrators.
</div>
<div sec:authorize="hasRole('ROLE_USER')">
  This content is only shown to users.
</div>
For a full and more detailed overview of how both technologies work together, have a look at the official documentation.
FAQ
What is the latest Spring Security version?
As of May 2022, that is 5.7.1.RELEASE.
Note that if you are using the Spring Security dependencies defined by Spring Boot, you might be on a slightly older Spring Security version, like 5.2.1.
Are older Spring Security versions compatible with the latest version?
Spring Security has been undergoing quite some heavy changes recently. You’ll therefore need to find the migration guides for your targeted versions and work through them:
-
Spring Security 3.x to 4.x → https://docs.spring.io/spring-security/site/migrate/current/3-to-4/html5/migrate-3-to-4-jc.html
-
Spring Security 4.x to 5.x(< 5.3) → https://docs.spring.io/spring-security/site/docs/5.0.15.RELEASE/reference/htmlsingle/#new (not a migration guide, but a what’s new)
-
Spring Security 5.x to 5.3 → https://docs.spring.io/spring-security/site/docs/5.3.1.RELEASE/reference/html5/#new (not a migration guide, but a what’s new)
-
Spring Security Latest Version → https://docs.spring.io/spring-security/reference/whats-new.html (not a migration guide, but a what’s new)
What dependencies do I need to add for Spring Security to work?
Plain Spring Project
If you are working with a plain Spring project (not Spring Boot), you need to add the following two Maven/Gradle dependencies to your project:
<dependency>
    <groupId>org.springframework.security</groupId>
    <artifactId>spring-security-web</artifactId>
    <version>5.7.1.RELEASE</version>
</dependency>
<dependency>
    <groupId>org.springframework.security</groupId>
    <artifactId>spring-security-config</artifactId>
    <version>5.7.1.RELEASE</version>
</dependency>
You’ll also need to configure the SecurityFilterChain in your web.xml or Java config. See how to do it here.
Spring Boot Project
If you are working with a Spring Boot project, you need to add the following Maven/Gradle dependency to your project:
<dependency>
    <groupId>org.springframework.boot</groupId>
    <artifactId>spring-boot-starter-security</artifactId>
</dependency>
Everything else will automatically be configured for you and you can immediately start writing your WebSecurityConfigurerAdapter.
How do I programmatically access the currently authenticated user in Spring Security?
As mentioned in the article, Spring Security stores the currently authenticated user (or rather a SecurityContext) in a thread-local variable inside the SecurityContextHolder. You can access it like so:
SecurityContext context = SecurityContextHolder.getContext();
Authentication authentication = context.getAuthentication();
String username = authentication.getName();
Object principal = authentication.getPrincipal();
Collection<? extends GrantedAuthority> authorities = authentication.getAuthorities();
Note, that Spring Security by default will set an AnonymousAuthenticationToken as authentication on the SecurityContextHolder, if you are not logged in. This leads to some confusion, as people would naturally expect a null value there.
AntMatchers: Common Examples
A non-sensical example displaying the most useful antMatchers (and regexMatcher/mvcMatcher) possibilities:
@Override
protected void configure(HttpSecurity http) throws Exception {
    http
      .authorizeRequests()
      .antMatchers("/api/user/**", "/api/ticket/**", "/index").hasAuthority("ROLE_USER")
      .antMatchers(HttpMethod.POST, "/forms/**").hasAnyRole("ADMIN", "CALLCENTER")
      .antMatchers("/user/**").access("@webSecurity.check(authentication,request)");
}
How to use a custom login page with Spring Security?
@Override
protected void configure(HttpSecurity http) throws Exception {
  http
      .authorizeRequests()
          .anyRequest().authenticated()
          .and()
      .formLogin()
          .loginPage("/login") // (1)
          .permitAll();
}-
The URL for your custom login page. As soon as you specify this, the automatically generated login page will disappear.
How to do a programmatic login with Spring Security?
UserDetails principal = userDetailsService.loadUserByUsername(username);
Authentication authentication = new UsernamePasswordAuthenticationToken(principal, principal.getPassword(), principal.getAuthorities());
SecurityContext context = SecurityContextHolder.createEmptyContext();
context.setAuthentication(authentication);
How to disable CSRF just for certain paths?
@Override
    protected void configure(HttpSecurity http) throws Exception {
      http
       .csrf().ignoringAntMatchers("/api/**");
    }
Fin
If you have read this far, you should now have a pretty good understanding of the complexity of the Spring Security ecosystem, even without OAuth2. To sum things up:
-
It helps if you have a basic understanding of how Spring Security’s FilterChain works and what its default exploit protections are (think: CSRF).
-
Make sure to understand the difference between authentication and authorization. Also what @Beans you need to specify for specific authentication workflows.
-
Make sure you understand Spring Security’s WebSecurityConfigurerAdapter’s DSL as well as the annotation-based method-security.
-
Last but not least, it helps to double-check the integration Spring Security has with other frameworks and libraries, like Spring MVC or Thymeleaf.
Enough for today, as that was quite a ride, wasn’t it? Thanks for reading!
Acknowledgments
A big "thank you" goes out to Patricio "Pato" Moschcovich, who not only did the proofreading for this article but also provided invaluable feedback!
There's more where that came from
I'll send you an update when I publish new guides. Absolutely no spam, ever. Unsubscribe anytime.
Comments (read-only)
157 comments
Anonymous
September 16, 2025
Wow .....you really know how to author documents de-mystifying concepts in a clear, understandable manner ....thanks Marco !
Anonymous
August 16, 2025
masterpiece!
Anonymous
June 24, 2025
And it auto-generates login/logout pages and protects against common exploits like CSRF. https://www.marcobehler.com/guides/spring-security#commento-login-box-containerSnow Rider 3D
Anonymous
March 03, 2025
Best explanation of spring security concepts! Thanks for putting this together!
Anonymous
February 16, 2025
Great guide. Is there a updated version of it which covers spring 6 ?
Anonymous
January 03, 2025
hyperlink Wow, excellent information in one post. Appreciate
Anonymous
December 29, 2024
one of the best article I have ever seen I got addicted to your articles that in 2 hours I have read 4 article about spring you have wrote! thanks a lot and keep it up!
Anonymous
December 13, 2024
Hi Marco, Thank you for this article. Do you have an updated version of this for Spring Security 6 maybe?
Anonymous
December 06, 2024
Nice post!
Anonymous
October 24, 2024
Thank you sir!
Anonymous
September 17, 2024
Update lazım ancak genel mantığı kavramak için yeterli bir blog. Thanks.
Anonymous
August 10, 2024
Thank you so much Marco !! Juss loved your blog, its more clear, crispy !!
Anonymous
August 06, 2024
Awesome Resource. Was really stuck for weeks understanding different terms and their use cases and was felling demotivated to learn Spring Security or Security in general . Now i am felling like i get the clarity which i wanted to dive deep into Security. Thanks Man !!
Anonymous
August 05, 2024
Nice, but outdated now. I'm trying to figure out how to configure Spring Security 5.8.7 in preparation to move to Security 6.x where WebSecurityConfigurerAdapter is completely removed.
Anonymous
July 19, 2024
what a wonderful article this is!! The "how it works under the hood" matters a lot for an in-depth understanding of the technology and you have an incredible job in explaining all that with great eloquence. Thank you.
Anonymous
July 16, 2024
Great article. very useful to understand the internals
kias.22
June 17, 2024
It's really nice article and I found a lot of answers for my questions about Spring security
shauryatomer10
April 30, 2024
Please, update code in the tutorial, majority of this has been deprecated with Spring Security 2.7. Like WebSecurityConfigurerAdapter is Deprecated in Spring Boot 2.7 and later. Also antMatchers are also deprecated with 5.7
Anonymous
April 23, 2024
great guide!
Anonymous
January 24, 2024
Thanks for provide deep and dive spring security documentation. Thanks a lot!! @MarcoBehler
Anonymous
January 04, 2024
Very nice article! I hope you continue this in the future covering more of spring security and updating it to the newest releases! I just want to mention that in the "How to do a programmatic login with Spring Security?" FAQ entry you only call the createEmptyContext() method to initialize a new security context. However it only initializes one and does not set it as the current, for that you need the setContext(context) method as well. If someone is interested, you can check out the sendStartAuthentication method in the ExceptionTranslationFilter. This is the filter, that initiates an authentication attempt if you are unauthorized when loading a page. It also clears the security context the same way.
Csaba Leitner
January 04, 2024
Very nice article! I hope you continue this in the future covering more of spring security and updating it to the newest releases!
I just want to mention that in the "How to do a programmatic login with Spring Security?" FAQ entry you only call the createEmptyContext() method to initialize a new security context. However it only initializes one and does not set it as the current, for that you need the setContext(context) method as well.
If someone is interested, you can check out the sendStartAuthentication method in the ExceptionTranslationFilter. This is the filter, that initiates an authentication attempt if you are unauthorized when loading a page. It also clears the security context the same way.
Additionally, the SecurityContextHolderFilter is now the default instead of SecurityContextPersistenceFilter and this means that you need to save the context to the SecurityContextRepository as well to keep it between requests or configure the requireExplicitSave to false.
Anonymous
November 02, 2023
this guide really needs an update.
facuarielgomezz
October 28, 2023
i read it all thanks for all!! this help me so much :D
Anonymous
October 18, 2023
thanks for the easy to follow article 👍
salman1m22
September 13, 2023
writing hardcoded String type roles/authorities in spring security is a very none flexible way i think. Let me share the facts. lets say I have a controller method below here I have already a role ROLE_ADMIN and logged-in used already have relation with this authority/role so user can access can access this resource "api/configs" but if I want to add role ROLE_SUPPORT_ADMIN with this user then we have to add that in database and here in code base then have to deploy application and after all these user can access this "api/configs" isn't it a huge mechanism. So my point is whatever we use role/authority/privilege we need to hard coded in controller method or antMatchers and also have to insert that in database to build relationship with user.
why not we check the url "api/configs" in security chain and establish a relationship with user. yes that's possible but the narrow point is again role as spring keep it as String very funny and we can use Objet instead of String but again it closed my boundary by using so called SimpleGrantedAuthority or any Granted authority.
IF anyone have any idea then share please
why not we check the url "api/configs" in security chain and establish a relationship with user. yes that's possible but the narrow point is again role as spring keep it as String very funny and we can use Objet instead of String but again it closed my boundary by using so called SimpleGrantedAuthority or any Granted authority.
@PostMapping("api/configs")
@Secured({"ROLE_ADMIN"})
public ResponseEntity<ConfigDTO> createConfig(@Valid @RequestBody ConfigDTO configDTO) throws URISyntaxException {
   return ResponseEntity.created(new URI("/api/configs/" + configDTO.getId()))
            .body(configDTO);
}
IF anyone have any idea then share please
Anonymous
August 23, 2023
this is very helpful.
Anonymous
August 16, 2023
Can you please update this article with the latest Spring Security 6?
Anonymous
July 05, 2023
Many thanks for your helpful and fantastic blog about Spring Security :D.
Anonymous
June 21, 2023
add a detailed blog about the latest spring security, with custom login page and required controller classes.
Anonymous
May 19, 2023
it was ok, but does not contain end-2-end systems, if you could include such code or links to github, then it will be really appreciated.
Although I appreciate what you have done but I expected a bit more from you.
- Anonymous (Alpha Q)
Although I appreciate what you have done but I expected a bit more from you.
- Anonymous (Alpha Q)
Marco Behler
May 19, 2023
This is one of the rudest and insane comments I have read in a while, congratulations! :)
Anonymous
April 10, 2023
I've spent the last few days trying to get my head around Spring Security and your article is by far the clearest explanation I have read - so helpful. Thank you! I'm going see what else you've written.
beksultan.melisov
March 17, 2023
Your articles are the best! Are you planning to add changes based on the new Spring Security 6? That would be great
Anonymous
February 12, 2023
Very great explanation
Anonymous
February 09, 2023
Thank you for this.
Anonymous
February 01, 2023
Very well explained how spring security works internally.
I would add the information about how the session of a logged user is saved - so basically to answer the question "how it is done that after login subsequent requests does not require login" --> e.g. session_id cookie.
I would add the information about how the session of a logged user is saved - so basically to answer the question "how it is done that after login subsequent requests does not require login" --> e.g. session_id cookie.
Anonymous
January 16, 2023
Hi Marco, you have written all these great code snippets, but not made it clear what class they should be written in, or what kind of structure there should be, so it's a little confusing...
Anonymous
December 08, 2022
wawoo nice script
Anonymous
November 04, 2022
Wow thank you very much for this!
Octavian Nita
October 19, 2022
Great resource, as usual, coming from Marco! Congrats!
Just a heads-up -- the article might need a bit of refreshing since WebSecurityConfigurerAdapter has been deprecated since the beginning of 2022; see Spring Security without the WebSecurityConfigurerAdapter.
Just a heads-up -- the article might need a bit of refreshing since WebSecurityConfigurerAdapter has been deprecated since the beginning of 2022; see Spring Security without the WebSecurityConfigurerAdapter.
Anonymous
October 16, 2022
Watched many videos but no explained like this. Great article.
Anonymous
September 24, 2022
This the article of spring security I was looking for. Straight to the point without much technical mumbo-jumbo.
Anonymous
September 20, 2022
Its by far the best explanation I have ever read.
3120465015
August 25, 2022
This is the best article that explains SpringSecurity's Authentication in such a simple and understandable way. Thank you!
hasanli.vusala.73
August 03, 2022
Hello, Marco!
Thank you a lot for this amazing article.
Now I am ready to fight with spring security related exceptions:))
Thank you a lot for this amazing article.
Now I am ready to fight with spring security related exceptions:))
Anonymous
July 08, 2022
Finally a Spring Security article I can finish!
Anonymous
June 24, 2022
Thank you Marco for the excellent post.
caoduy.com
caoduy.com
Anonymous
June 23, 2022
Fantastic. The best explanation I've seen about spring security. Congratulations
Anonymous
June 23, 2022
More articles like this please!
Anonymous
June 14, 2022
Thanks for the wonderful article on Spring Security.Could you please code level also JWT
Anonymous
May 31, 2022
Excellent job !
Anonymous
May 30, 2022
love you, thanks god for let me see this topic <3
Anonymous
May 19, 2022
Kudos to the author for this fabulous content. Cheers!
jdecuirm
May 06, 2022
Amazing article it simplified some points of spring security that I was lacking. I do have a question regarding of DAOAuthenticationProvider… when does it is used? I created a UserDetailsService annotated with @Service and I didn’t provide any configuration for DAOAuthenticationProvider and my app works as expected! I just have a @Bean for Bcrypt and overridden configure for http security. Hope anyone can help me to understand this!
Anonymous
April 27, 2022
Superb! You have made Spring security so much easier to understand.
Anonymous
April 25, 2022
Nice article
Anonymous
April 01, 2022
Thanks bro!
anantsheshblogs
February 21, 2022
Really nice article with details explanations and examples.
I want to know one thing though.
In Facebook for example, I can see all my details, my friends can see many of my details and if someone is not my friend, they can see very limited info.
If we want to do this with spring boot, do I need to do the whole check in each of my APIs or is there an easier way to achieve this? To me it didn't very much seem a Role-based authorization because the role "friend" is universal here.
Can there be some centralized configuration for such requirements?
Anonymous
February 14, 2022
Heads Off. very nice article.
Anonymous
February 04, 2022
beautiful!!! the best I have found after a long search. Hope others can find this article and solve their confusion...
Anonymous
February 03, 2022
Thanks Marco!
mamun7025
January 26, 2022
Great Article ever I read, Thanks a lot.
Anonymous
January 14, 2022
Thanks
Anonymous
January 10, 2022
Thanks man, finally I understood this concept. This article actually explains the STUFF and not how to make it work.
keep up the good work.
keep up the good work.
Anonymous
December 12, 2021
This is one of the best explanation I went across on internet. I think you should make mention some script without Atlassian also. Thanks a lot!!
Anonymous
December 07, 2021
explained with a beginer's eye! awesome👍
Anonymous
November 29, 2021
the best collection of info in one place. Thank you for explanation
Anonymous
November 17, 2021
Great article, thanks for taking us 'on a ride' to understand Spring Security. I noticed there was nothing on actuator health checks - I assume that it's just required to permitAll() on those but it's a bit surprising that this is not done by default. Does actuator come with it's own default security etc?
Anonymous
November 13, 2021
Just wanted to let you know, this tutorial is amazing, Marco!
This has helped me understand Spring Security way more than anything else I could find on the internet. Thanks a lot for that!
Also, maybe the issue is somewhere in my project, but adding the "/transfer" action to my html like so:
<form th:action="/transfer" method="post">
results in an error:
Exception processing template "login": Could not parse as expression: "/transfer"
Anonymous
November 06, 2021
Lot's of confusion about spring security goes away. Thank you very much
Anonymous
October 29, 2021
Thank you!
neverlandxy.naix
October 29, 2021
Great article, thank you very much
Anonymous
October 23, 2021
Thanks for the article
Anonymous
October 17, 2021
AuthenticationProvider can be plugged in two ways
@Bean
public AuthenticationProvider authenticationProvider() {
return new MyAuthenticationProvider();
}
1. @Bean
@Override
public AuthenticationManager authenticationManagerBean() throws Exception {
return super.authenticationManagerBean();
}
OR
2. @Override
protected void configure(AuthenticationManagerBuilder auth) throws Exception {
auth.authenticationProvider(authenticationProvider());
}
Could you please explain how it is working for the approach 1. In this approach, public boolean supports(Class<?> authentication) is getting called where in second approach it won't
Anonymous
October 09, 2021
Man, thanks!
Anonymous
October 08, 2021
Brilliant! Simply, thank you!
Anonymous
October 05, 2021
Thank you very much!
Anonymous
September 30, 2021
wonderful explanation regarding spring security!
Anonymous
September 25, 2021
That was absolute gangster!!! Thank you.
Haunv1503
September 14, 2021
Thanks you about this article, i can read all without boring, thanks so much
juan.lopez
September 11, 2021
List<SimpleGrantedAuthority> grantedAuthorities = user.getAuthorities().map(authority -> new SimpleGrantedAuthority(authority)).collect(Collectors.toList());
That line in loadByUsername() in UserDetailsService troubles me because user.getAuthorities returns a String
Am I right?
That line in loadByUsername() in UserDetailsService troubles me because user.getAuthorities returns a String
Am I right?
Anonymous
September 11, 2021
List<SimpleGrantedAuthority> grantedAuthorities = user.getAuthorities().map(authority -> new SimpleGrantedAuthority(authority)).collect(Collectors.toList());
that previous line of code in loadByUserName() in UserDetails troubles me because user.getAuthorities() returns a String which is the authorities content of the specified user, instead of returning all of the values in the userTable.
Is there a way to fix this?
that previous line of code in loadByUserName() in UserDetails troubles me because user.getAuthorities() returns a String which is the authorities content of the specified user, instead of returning all of the values in the userTable.
Is there a way to fix this?
Anonymous
September 03, 2021
Thank you so much Great explanation!!
sustic
August 30, 2021
Thanks so much for your article. I am having trouble understanding how to perform the REST API calls after the user has successfully authenticated through LDAP.
After LDAP authentication I need to:
1. Perform a GET request to https://isimserver:port/itim/restlogin/login.jsp to obtain a JSESSIONID
2. Perform a POST request to https://isimserver:port/itim/j_security_check passing ISIM credentials via j_username & j_password
3. Perform a GET request to https://isimserver:port/itim/rest/systemusers/me which pulls details of the current logged in user along with the required CSRF token needed to perform PUT/POST/DELETE requests
Can you suggest how to tie the REST part to the successful LDAP login:
[Authentication=UsernamePasswordAuthenticationToken [Principal=xxx, Credentials=[PROTECTED], Authenticated=true, Details=WebAuthenticationDetails [RemoteIpAddress=0:0:0:0:0:0:0:1, SessionId=718205C0D97B0F2D6EE15DE7F1951E26], Granted Authorities=[]]]
Anonymous
August 19, 2021
Thank you!
Anonymous
August 18, 2021
That was hell of a knowledge :) Loved it
Anonymous
August 13, 2021
Thank you so much for this. Massively helpful, and really appreciate the time and effort you took to share this knowledge.
anhtuannguyen226
July 29, 2021
hi macro and thanks for this article. But while i read your article i still not understand that the DSL is stand for what ? i hope that i can receive the response soon. Thanks so much.
Anonymous
September 21, 2023
i believe it stands for "domain-specific language"
Anonymous
July 28, 2021
You sire have the best words.
Anonymous
July 21, 2021
No doubt this is one of the fantastic blog about Spring Security. Really appreciate your expertise and effort.
Anonymous
May 19, 2023
thanks thanks> thanks
>
thanks
Anonymous
July 13, 2021
Thanks a lot dude, this was a fantastic articles that covered a lot gotchas
Anonymous
May 19, 2023
>
thanks
Anonymous
July 07, 2021
Thank you! That is exactly what i was looking for
Anonymous
July 06, 2021
Wow, great stuff. Thanks Marco!
Anonymous
April 19, 2023
@MarcoBehler
I am trying to use the @Secured annotation on top of my controller for 3 out of 6 methods. But for some reason it is securing all 6 of the endpoints
I am trying to use the @Secured annotation on top of my controller for 3 out of 6 methods. But for some reason it is securing all 6 of the endpoints
Anonymous
June 13, 2021
Thank you very much , you did a phenomenal job explaining in depth the concept of spring security. It’s hard to find articles like those for people like me to learn , this along with other articles of yours summarizes everything needed to Handle security aspect of an application.
jgroenendijk
May 16, 2021
"Why is there a distinction between roles and authorities?"
Roles are related to the function an employee has in a company; i.e. Administrator, Manager, Cashier, and so forth.
Authorities are related to the actions that can be performed by a user such as Add users or Delete users.
So you would have roles defined such as ROLE\_ADMINISTRATOR and ROLE\_MANAGER which you can test using http...hasRole("ADMINISTRATOR"), and for authorities you could do something like; http...hasAuthority("ADD_USER").
Marco Behler
May 19, 2021
This is really well put. I'll include it into one of the future revisions, if you don't mind.
Anonymous
May 11, 2021
This is really fantastic. There are far too many "guides" that walk you through the paces of how to get something working, but everything inevitably falls over when you realise you don't understand how it actually works.
It's difficult to express how useful this article was to me, and I wish there were more 7000 word explanations of things.
You did a really great job explaining all of the concepts in a simple way, while going into enough depth.
It's difficult to express how useful this article was to me, and I wish there were more 7000 word explanations of things.
You did a really great job explaining all of the concepts in a simple way, while going into enough depth.
Marco Behler
May 19, 2021
Thank you!
Anonymous
April 28, 2021
Fantastic guide, all the series should be called Spring Demystified because you throw such clarity to a seemingly-impossible-to-understand topic as Spring. Thank you for this.
Anonymous
April 13, 2021
Great article, thank you Marco! I have a question though. Could you elaborate why for stateless REST APIs, it makes no sense to enable CSRF? Much appreciated
Anonymous
April 03, 2021
Awesome.. nice explanation and very clear..
thank you
thank you
huyngo1407
April 01, 2021
One of the best... Oh wait! BEST Spring Security article!!! Thank you so much!
wholeofmine
March 15, 2021
I am from India. How to pay? I don't have paypal
Anonymous
March 15, 2021
Loads of thanks for such a wonderful article
Anonymous
February 23, 2021
This article has been very useful to me. Thanks for your time and effort on this!
malu.t90
February 22, 2021
Great article telling me what exactly I needed to know about Spring security. Thanks!!!
Anonymous
February 10, 2021
Very helpful!
Anonymous
January 23, 2021
Great article!!!
Anonymous
January 15, 2021
Best explanation about the spring security. Very detailed explanation. Thanks.
Anonymous
December 14, 2020
Really good introduction and awesome explanation as always. Thanks for this article
Anonymous
December 10, 2020
Nice article! Thanks a lot.
Anonymous
December 04, 2020
Great article! Thanks a lot!
appteck01
December 03, 2020
Any idea how to encode SHA-512 i did the following but doesn't work: My db using password encode sha-512 and username as salt !!!
@Bean
public PasswordEncoder encoder() {
return PasswordEncoderFactories.createDelegatingPasswordEncoder();
}
@Bean
public PasswordEncoder encoder() {
return PasswordEncoderFactories.createDelegatingPasswordEncoder();
}
Anonymous
November 26, 2020
Great Article! Thank you Marco
Anonymous
November 05, 2020
Excellent Article 👌!!!
It would be great if you could highlight on PermissionEvaluator with @PreAuthorize and Rolehierarchy.
It would be great if you could highlight on PermissionEvaluator with @PreAuthorize and Rolehierarchy.
Anonymous
October 25, 2020
Woow.. one of the amazing content about spring-security. I wish google list your blog as first link when searched for spring security.
Anonymous
October 23, 2020
thanks! Thanks for taking the time to go in depth on these topics! I learned a lot. This is a great write up!
Anonymous
October 13, 2020
The best and simplest article ever read for a complex topic. Really impressed and motivated.
- Ankur
- Ankur
Anonymous
October 13, 2020
Very to the point topics with detail explanation.
Best thing is all the possible ways and scenarios are covered for every small topic(Kudos for that).
Thankfully, you have covered every topic that we usually search that are related to Spring Security.
Great initiative and keep up the great work Sir!
Best thing is all the possible ways and scenarios are covered for every small topic(Kudos for that).
Thankfully, you have covered every topic that we usually search that are related to Spring Security.
Great initiative and keep up the great work Sir!
Anonymous
October 07, 2020
This is all in one page information that I need to understand Spring Security. Thank you so much
Anonymous
September 30, 2020
God bless, such a good article.
Anonymous
September 26, 2020
Thanks for the article, this is really helpful to understand Spring Security and its use cases.
Anonymous
September 12, 2020
I am guilty if I do not appreciate such an explanation. You are awesome. Thank You.
Anonymous
September 02, 2020
Great tutorial. I'm also curious about how to see the number of logged in users. I've seen some examples elsewhere but they usually omit how to inject the SessionRegistry bean, java config style, if this is the way to do it...
Anonymous
August 29, 2020
This is really a gem article for the beginners like me, I think with the detailed information provided it will be very useful for the experts. Great article, I was not bored for a single minute while reading this. Great Job! And thank you for this article.
Anonymous
August 25, 2020
Thank you, Man! Very good content.
Regards,
Antonio
ac@marketmining.com.br - Brazil
Regards,
Antonio
ac@marketmining.com.br - Brazil
Anonymous
August 13, 2020
What is DSL?
Anonymous
July 16, 2021
Java Domain Specific Language
Anonymous
August 12, 2020
This is one of the best explanation of Spring Security I have had. Just what I was looking.
pranjalchakrabortybabu
July 30, 2020
A big fan, Marco. Watched the session that you took about 7-8 months ago for Java User Group Bangladesh on Spring Boot.
I think someone who has already worked with some legacy security codes, will appreciate Spring Security and this blog. Amazing. Learned a lot, learned what to learn next.
I think someone who has already worked with some legacy security codes, will appreciate Spring Security and this blog. Amazing. Learned a lot, learned what to learn next.
Anonymous
July 30, 2020
Agreed, this article is incredibly useful and detailed, thank you so much!
Anonymous
July 26, 2020
Thanks and very good.
Twitter follower, now.
Shared on FB
Twitter follower, now.
Shared on FB
ddjong67
July 21, 2020
Dear Marco, is there any best practice for row based authorization (if you have 1000 rows in a table / view / ... and that contains users of multiple departments but my role only allows to see users in my department .. or set of departments ... is there best practice for such? (e.g. if you have www.strava.com and you want to see only rides of friends ... how to filter such in backend ...
Anonymous
July 17, 2020
This is just great! I'm new to spring security, and a lot of tutorials weren't clear for me clear. Mostly those are going like "put that, put that..." with no deeper/ clear explanations.
Thank you Marco!
Thank you Marco!
Anonymous
July 06, 2020
Great article! However I added spring security dependencies into my maven project and spring filters haven't been invoked.
I missed some configuration when using spring-mvc (not spring boot). It would be great if you could add this information to your post for future reference.
The configuration was missing an empty class that extends from AbstractSecurityWebApplicationInitializer
public class SecurityWebAppInitializer extends AbstractSecurityWebApplicationInitializer {}
and security config class should be registered in the config as well.
public void onStartup(javax.servlet.ServletContext container) {
AnnotationConfigWebApplicationContext rootContext = new AnnotationConfigWebApplicationContext();
rootContext.register(BeanConfig.class, SecurityConfig.class);
container.addListener(new ContextLoaderListener(rootContext));
...
}
Anonymous
July 02, 2020
Best Spring Security in-depth i read, thanx!
Looking forward to OAuth2 Security!
Looking forward to OAuth2 Security!
Anonymous
June 26, 2020
I have never seen such a clear and simple tutorial of Spring Security, though I have read a lot about it.
Most of tutorials left a mess in my mind.
Thank you very much!
Most of tutorials left a mess in my mind.
Thank you very much!
Anonymous
June 24, 2020
Excellent Article, Looking forward for OAuth2 article!
Anonymous
June 24, 2020
Wonderful write up. Looking forward to OAuth2 Security
Anonymous
June 12, 2020
Thanks Marco
Anonymous
June 05, 2020
Excellent article. Very much needed. Thank you Marco!
Can't wait for OAuth2. How to use spring security in case of spring-boot REST API whose only client is front end (angular) application that doesn't need login? The security needed that no third party applications should be able to access the REST API. Thanks!
Can't wait for OAuth2. How to use spring security in case of spring-boot REST API whose only client is front end (angular) application that doesn't need login? The security needed that no third party applications should be able to access the REST API. Thanks!
Anonymous
June 02, 2020
Best article on Spring Security. Can't wait for the OAuth one.
Anonymous
May 31, 2020
Thanks Marco, this article helped me a lot to understand how Spring Security works. The concepts you introduced and the order of them make this easy to follow. Again, thank you so much.
Anonymous
May 28, 2020
I think this is the best and the clearest explanation of Spring Security I have seen. Do an article regarding OAuth2 and JWT.
Anonymous
May 17, 2020
This is one of the best articles on Spring Security. The use case driven approach helps readers to understand and use spring easily
Anonymous
May 15, 2020
Great article. Got more than what I came here for.
Anonymous
May 09, 2020
Amazing article. As other posts on this site, it's well written and full of good info. I'm excited for the OAuth2 section!
Anonymous
May 07, 2020
one of the best explanation of spring security. easy to read, understand and to the point.
Anonymous
May 06, 2020
Fantastic. I wish I had had this explanation when I first started with spring security!
Anonymous
May 02, 2020
Amazing article!
Thanks very much for have written it.
Thanks very much for have written it.
andrei
April 24, 2020
Great article! I like that you also give more information (for e.g. list of filters).
From https://github.com/spring-projects/spring-security/issues/2984
> > Can someone point out why a "ROLE_" prefix is appended at all?
>
> The reason is because there is more to authorities than just roles. For example, you can have a group based authority. The ROLE_ is a way to distinguish between the type of the authority.
Anonymous
April 19, 2020
This was a great guide! I am just beginning to wrap my head around spring security, but having a hard time finding current stuff!
Anonymous
April 15, 2020
Fantastic. The best explanation I've seen about spring security. Congratulations
Anonymous
April 11, 2020
Thank you for your article, i believe it is one of the best introductions to Spring Security out there. One important note: You write passwords should be ENCRYPTED. What you mean, I think, is that passwords should be HASHED. Encrypted passwords would be huge security fault. Thank you again.
Marco Behler
April 11, 2020
You are absolutely right, will fix this in the next revision.
andrei
April 24, 2020
And they should also be salted.
Anonymous
April 08, 2020
Thanks lot ! Like always very awesome explanation !
Would have been even more awesome to explain in a microservice architecture using a open connect id provider !
Cheers !
Would have been even more awesome to explain in a microservice architecture using a open connect id provider !
Cheers !
lochschmidt
April 06, 2020
Another good introduction. Thanks!
Method security is an easy source for security issues because the security rules from the annotations are only applied, when the object is invoked from the outside. Maybe you want to add a hint regarding that. So it never works when annotating private methods or when calling a @Secured... method from within the same class.
Method security is an easy source for security issues because the security rules from the annotations are only applied, when the object is invoked from the outside. Maybe you want to add a hint regarding that. So it never works when annotating private methods or when calling a @Secured... method from within the same class.
Anbu Sampath
April 06, 2020
As usual Amazing article with excellent under the hood working details. Looking forward for OAuth2 article.
Anonymous
April 06, 2020
Gread Article. Hoping for reactive part of spring like internal working :)
Anonymous
April 06, 2020
Great Article!

let mut author = ?
I'm @MarcoBehler and I share everything I know about making awesome software through my guides, screencasts, talks and courses.
Follow me on Twitter to find out what I'm currently working on.