
https://moneymoneymoney.com/callback?code=89sHBN123nd&state=...
Spring Security & OAuth 2.0 - In-Depth
Last updated on March 25, 2021 - 39 comments
(Buy now if you're already convinced!)
You can use this guide to get a deep understanding of OAuth 2.0 and how you integrate Spring Security with it.
(Editor’s note: At ~7000 words, you probably don’t want to try reading this on a mobile device. Bookmark it and come back later.)
Introduction
The confusing OAuth 2.0 world
It seems like almost every company out there is using OAuth (2.0), but understanding what it does or how it works leads to a lot of head-scratching.
You get bombarded with words like Authorization Server, Protected Resource, Client, Access Tokens, Refresh Tokens, different Authorization Flows, grant types, JWT, JOSE, OpenID Connect, social logins and the list seemingly never stops.
Then add Spring Security on top of that, a framework that is already complex enough without OAuth, consisting of different projects, modules and versions supporting different parts of the OAuth universe.
This could easily lead to learned helplessness, so let’s try and bring some light into the OAuth darkness.
What is OAuth 2.0
The short answer:
At its core, OAuth 2.0 is just an authorization framework, granting clients access to protected resources via an authorization server.
Wow, that sentence doesn’t help at all, does it?
Luckily, there’s also a long answer:
The remainder of this document. Note, that whenever I mention OAuth in this article, I’m referring to 2 of the OAuth protocol, i.e. OAuth 2.0.
Changelog
Update 2 - March 25, 2021
-
Added: Single Page Javascript & Native Apps
-
Added: How does the PKCE protocol work?
-
Added: The SPA & Native App Callback Problem
-
Added: FAQ - Can a resource server simultaneously be a client?
Update 1 - Sep 29, 2020
-
Significantly reworked social login section (Facebook, GitHub), with explanations and code examples
Initial Release - Aug 21st, 2020
-
First Release
-
Containing: Chapters on Spring Security & Authorization Servers, Clients and Resource Servers
Beta 1 — Aug 13th, 2020
-
Initial Beta
-
Containing: OAuth Overview, Flows, (parts on) JWT and JOSE.
OAuth 2.0 - Fundamentals
As always, it helps to start with the basics. It absolutely does not make sense to jump right into Spring Security’s OAuth integration, before having a firm grasp of the OAuth 2.0 basics.
Forget all the social logins (like 'login with GitHub') or whatever you might associate with OAuth, for now, and focus on what the original problem is that it tries to solve.
Imagine you have a bank account (or in this website’s case a Stripe account). Also, imagine, you want to give a 3rd party (limited) access to that bank account.
That 3rd party could be a consumer app which tries to categorize and report on your monthly spendings or, in my case, a web-service that generates PDF invoices for all transactions in my Stripe account.
The problem:
-
You don’t really want to give that 3rd party application your username/password combination to your account.
-
Also, you want to somehow limit what the 3rd party application can do with your account: I.e. allow it to read your banking transactions, but certainly not allow it to create new transactions.
-
You also want to be easily able to revoke that access, i.e. not let the 3rd party access your bank account anymore, whenever you say so. (If they have your credentials, good luck with that.)
In other words, the original problem that OAuth tries to solve in this very specific example:
How can you safely give a 3rd party application limited and revokable access to your bank account?
Meet: Resources, Owners & Clients
To answer that question, let’s get technical and learn about OAuth’s terminology.
Rephrasing the problem above in OAuth speak looks like this:
How can the resource owner (you) give a client (3rd party software) scoped access (read or write or both) to a protected resource (bank account)?
Let’s break this down.
-
The
resource owneris you, the user, who holds the rights to something. -
That something is called
protected resource, i.e. your bank account. -
The 3rd party application, who wants to access the
protected resourcein your place, is called theclient. Never confuse theclientwith theresource owner. -
(Additionally, the client only gets
scopedaccess, i.e. it can only read transactions in this example)
These are three main players of every OAuth interaction, but a fourth one is missing. Who is it?
Meet: Authorization Servers
Let’s have a quick Q&A session.
Q: How does the client (3rd party software) convince the protected resource (bank account) that it is allowed to read the transactions in your bank account?
A: Simple: It needs to show up at the protected resource with a valid access token. For now, if it helps, think of an access token as a physical key card and your bank account as a vault with a printed list of transactions inside.
The client doesn’t care how the key card is built and how it works etc. The client only cares that he has it and it opens up the vault.

Q: I’ve heard that access tokens are sometimes also called bearer token. Why?
A: Because whoever bears (fancy word for: holds) a (valid) token, gets access to the protected resource. Think back to your key card. Anyone who bears the key card could open your bank account, with no more questions being asked.
Q: Ok ok. Now, where does the client get that access token from?
A: From another involved party, that everyone (you, the client, the protected resource) trusts: the authorization server. Its main job is to hand out those access tokens.
In our banking example, the protected resource (bank account) and authorization server would both be provided by the bank. It could be two different systems, or the same system with two different endpoints.
Q: But then any client can simply go to the authorization server and ask for an access token?
A: Not quite. There’s one piece of information missing. The client only gets an access token from the authorization server, when you, the resource owner, successfully authenticates (think: login) at the authorization server and allows the client to get that access token.
A bit too abstract? In summary: The main goal of the OAuth 2.0 flow is for the client to get a valid access token. How that’s done specifically, we’ll see next.
The Access Token OAuth 2.0 Dance
Meet the (quite elaborate) access token dance. (A big thank you goes out to Andreas Eisele, who drew the flow chart below).
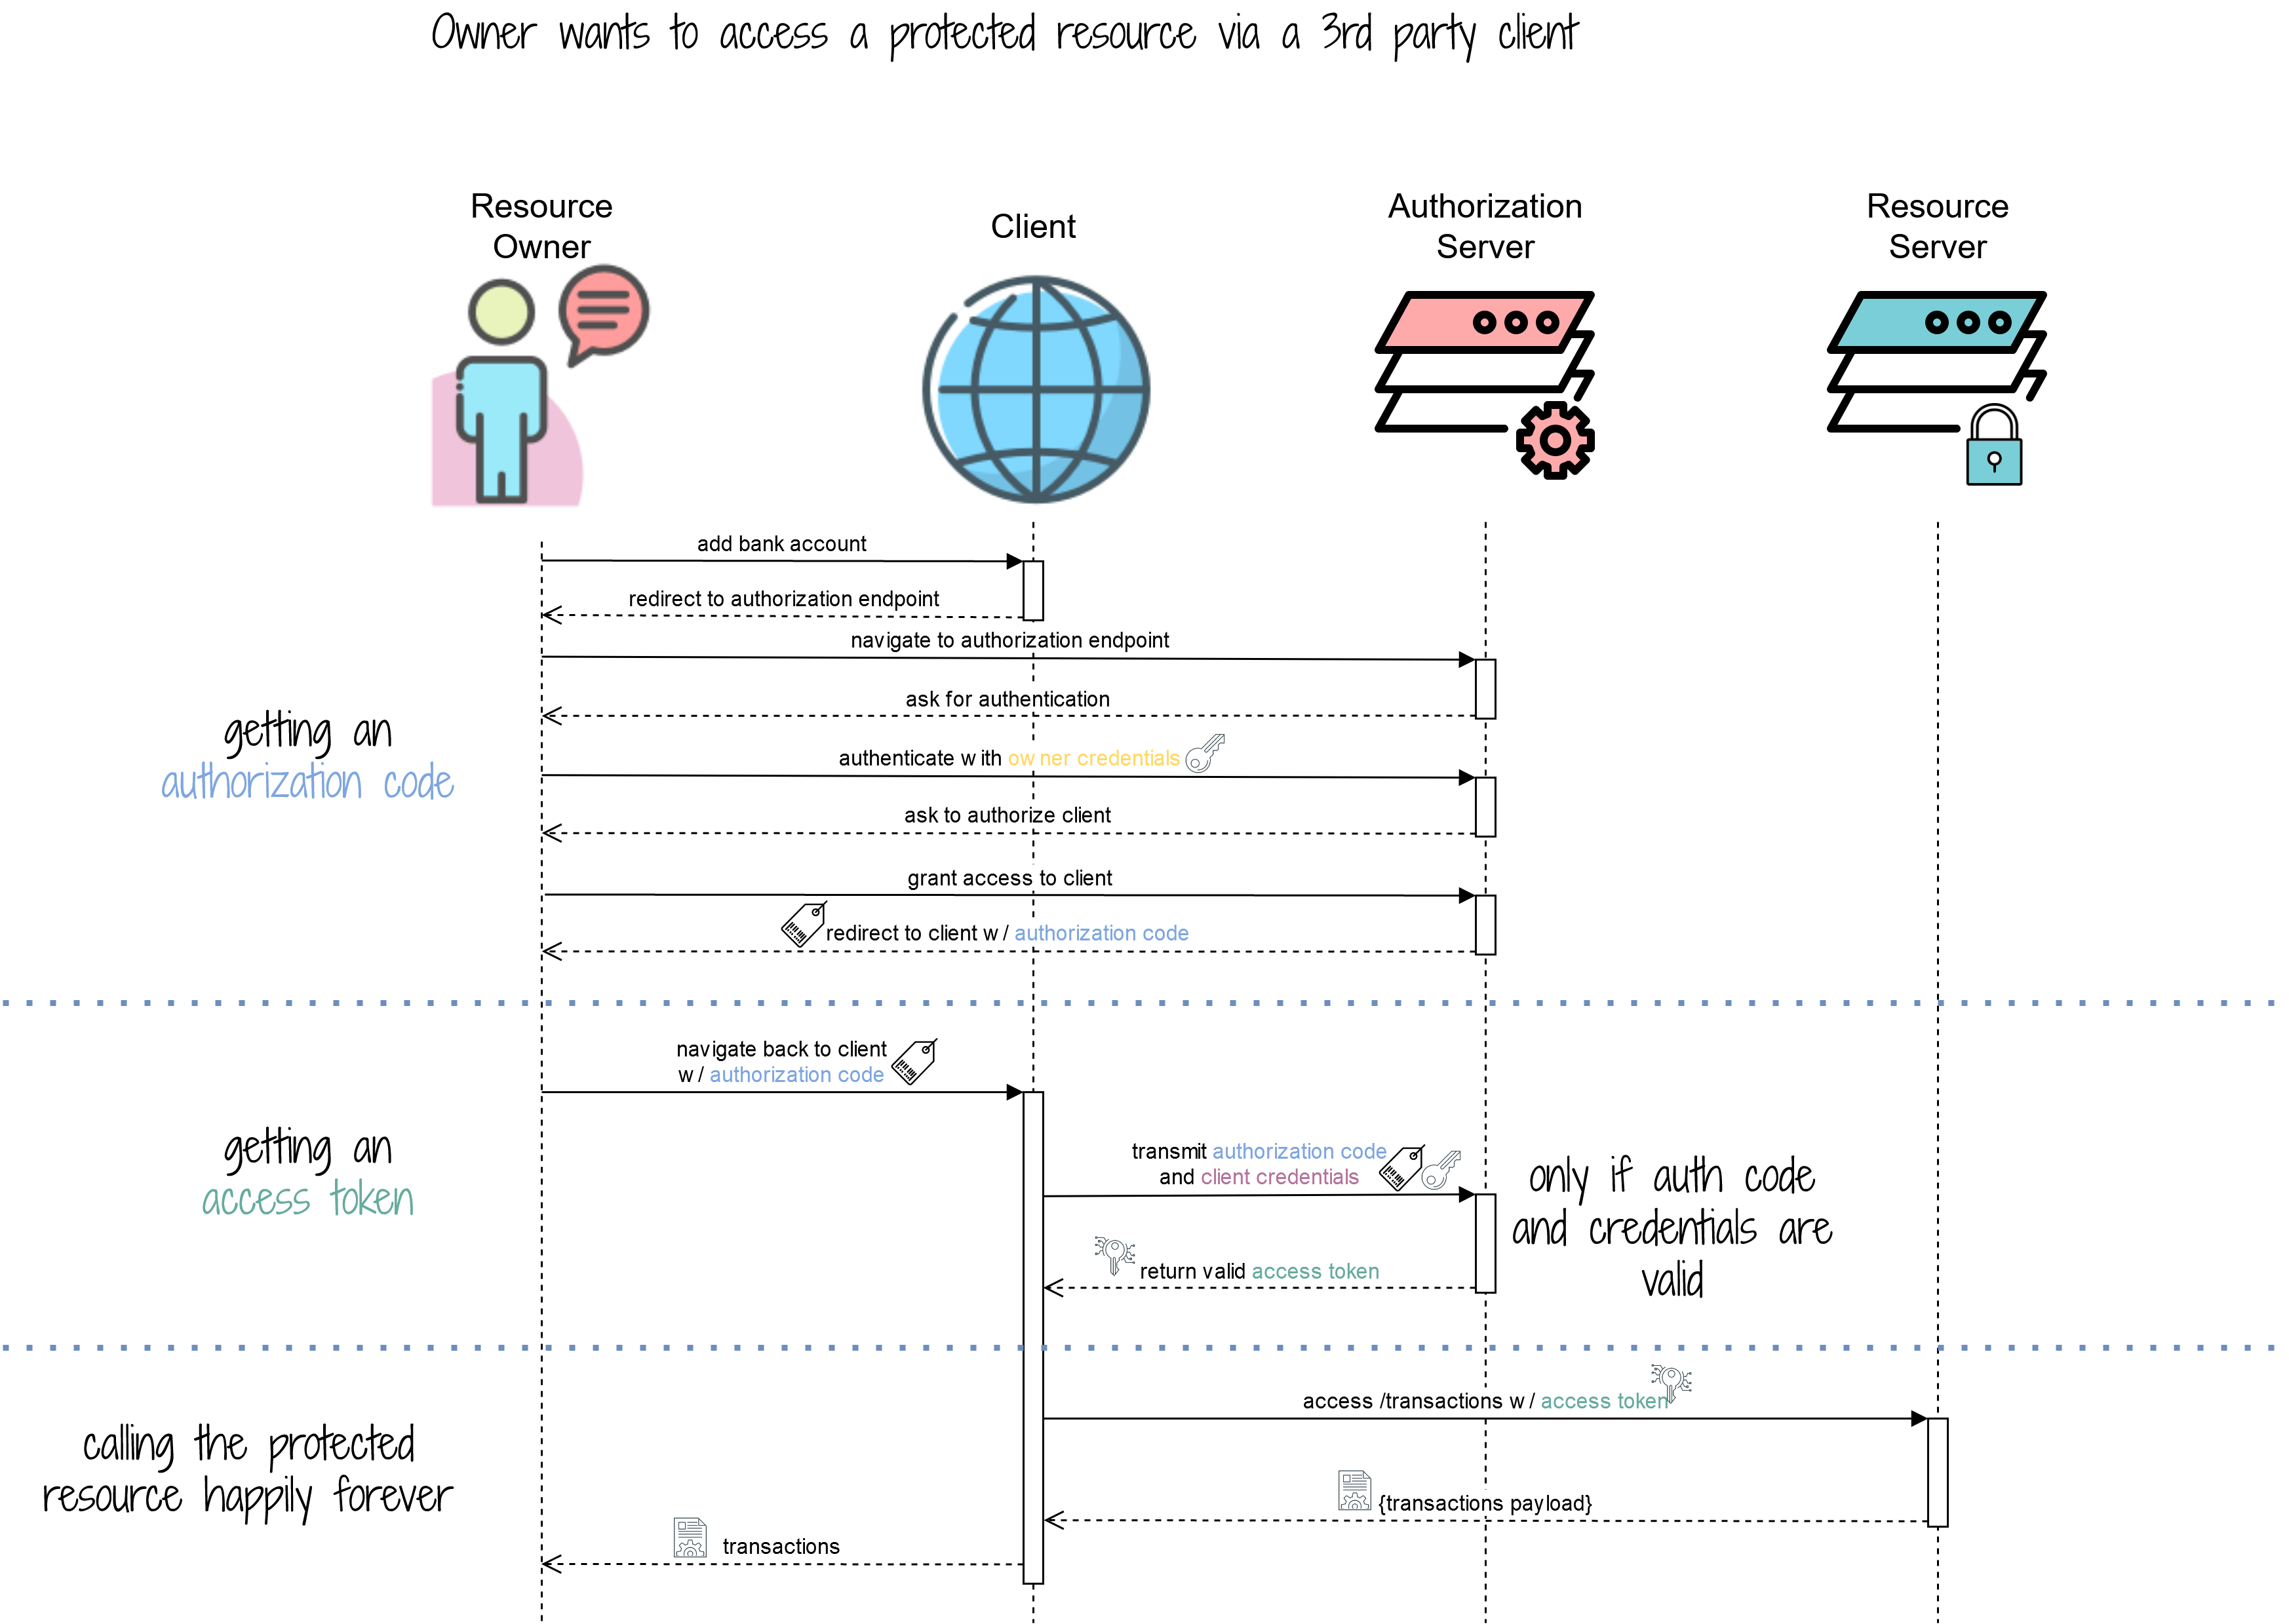
Getting and using an access token happens in 3 phases and you can see those phases in the flow above depicted by the horizontal, dotted lines.
Let’s break the phases down.
Phase 1 : Getting An Authorization Code
Imagine, you (the resource owner), are logged into the website of that 3rd party application (client) which categorizes your monthly spendings (household, electronics, utilities etc.). Let’s call that 3rd party application MoneyMoneyMoney for now.
There’s a big button:

Now what happens when you click that button?
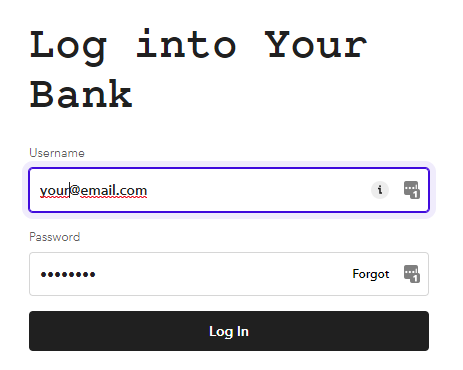
The answer is, you get redirected away from that website, to an authentication endpoint of your bank.
And, upon successful login, the bank asks you if you want to grant MoneyMoneyMoney access to your bank account. It also displays you a list of "rights" that MoneyMoneyMoney is supposed to get.
In this case, it should only be able to access and manage transactions (like tagging them), not create new transactions.
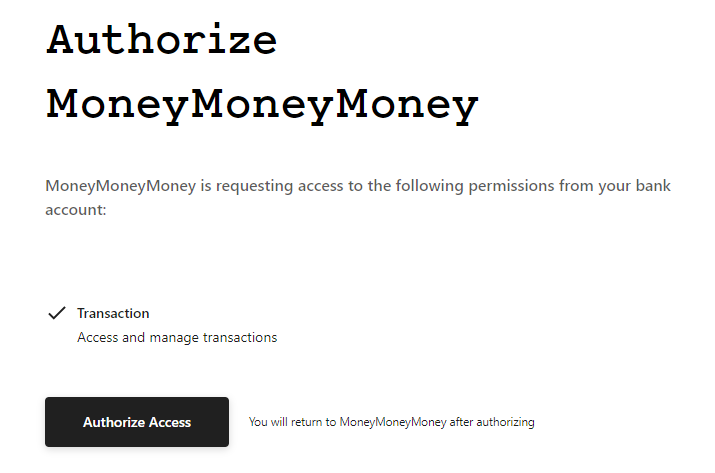
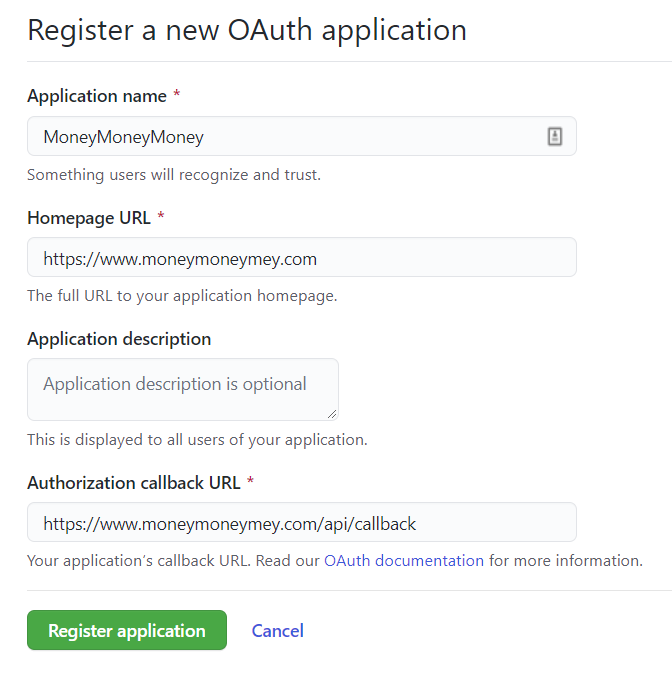
If you click Authorize Access, what actually happens is that the authorization server generates a so-called authorization code and redirects you back to MoneyMoneyMoney’s website with that authorization code as a URL parameter.
This could result in the following request back to the client.
With the authorization code being 89sHBN123nd (and ignoring the other parameters for now).
Now, your job, as the resource owner (user) is done. The client needs to turn that authorization code into an access token, for now.
Phase 2 : Getting An Access Token
This phase is essential, but happens entirely in the background. Hence, there are no fancy screenshots.
Upon receiving the authorization code, the client needs to turn it into an access token. This happens through a separate HTTP call to the authorization server, but there’s a tiny catch.
The client needs to present the authorization code and client credentials in that HTTP call.
Where do these client credentials come from?
At some point, before being able to do this whole OAuth dance, every client must register with an authorization server, so that the authorization server actually knows the client. In this process, the client gets its credentials.
So, if you are the developer of the MoneyMoneyMoney application, you would try to get a developer account at the bank and create a new OAuth application through its website.
This is the form that you’ll likely have to submit. The most important part is the callback URL, i.e. the URL from your application that the authorization server needs to call with the authorization code.
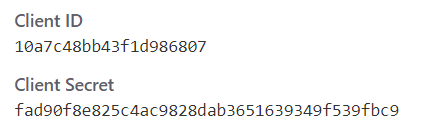
Upon successful registration, you will get a set of credentials. Which you can use to convert the authorization code into an access token.
(Note: More advanced readers might already know that, additionally, there is a process of dynamic client registration, but we will skip this for now and keep things static & simple).
The access token is returned as a JSON object and could look like this:
{
    "access_token": "lkjl5qwek516nbleearrgh",
    "token_type": "Bearer"
}
The interesting part is now this: Contrary to popular belief, there is no pre-defined format for <access tokens>, they can literally be any string, from "lkjl5qwek516nbleearrgh" to a Base64 encoded JSON Object (like the popular JWT - more on that in a bit). Some people might even use a wrongly indented Kubernetes YAML descriptor as access token ;).
Also: The client doesn’t care, nor know, nor understand what the access token it gets back is. It only needs to store it somewhere and then use it whenever it wants to get access to the bank account.
Get Full Access
Table of Contents. All prices include VAT. 21-day Money-Back Guarantee.
personal
online access just for me!
Tip: Most employers will reimburse this purchase$[xx]
company
online access for my team(s)
+
What others are saying
This is by far the best Spring Security & OAuth guide on the Internet https://t.co/VqQxR5er6k
— the_lil_mandelbro (@lil_mandelbro) March 25, 2021
Purchased
— Sunny Dubey (@SunnyDu88652987) November 2, 2020
Marco Behler's Spring Security Basic + OAuth 2.0 @ https://t.co/wM03hzhNdH
This is one of those BEST tutorials you will find which takes you to basics of spring security and when you finish, you end up knowing in-depth practical knowledge of OAuth 2.0. @MarcoBehler
Thanks @MarcoBehler for another great course . I strongly recommend @MarcoBehler Spring security & OAuth for any @springframework/@SpringSecurity developers who want to understand it in detail and add security to their Application.
— KC (@krishchennupati) November 2, 2020
Link:https://t.co/082kwdyw5J
Comments (read-only)
39 comments
AnonymousAugust 06, 2024
WebSecurityConfigurerAdapter appears to be deprecated - https://spring.io/blog/2022/02/21/spring-security-without-the-websecurityconfigureradapter I don't understand what it is or what it does or how best to update your Client code above to handle this.
AnonymousApril 08, 2024
Bad article
AnonymousJanuary 18, 2024
Thank you for the detailed tutorial, Marco! I have a question with regards to the access token authorization code flow. After the user enters his credentials, an authorization code is returned and then is exchanged with the access token, which then used to authorize access to an API/the resource server. According to the sequence diagram it also seems like the access token is saved in the client, so if the user/resource owner wanted to access the resource server again, the access token that is already saved in the client will be used to authorize the access. If this is the case, then what is the point of having an authorization code after successful authentication? Why not just return the access token immediately and save it in the client, because regardless of the flow used, the access token will be saved in the client anyway? Thank you for answering!
M NurJanuary 18, 2024
Thank you for the detailed tutorial, Marco!
I have a question with regards to the authorization code flow. After the user enters his credentials, an authorization code is returned and then is exchanged with the access token, which then used to authorize access to an API/the resource server. According to the sequence diagram it also seems like the access token is saved in the client, so if the user/resource owner wanted to access the resource server again, the access token that is already saved in the client will be used to authorize the access. If this is the case, then what is the point of having an authorization code after successful authentication? Why not just return the access token immediately and save it in the client, because regardless of the flow used, the access token will be saved in the client anyway?
Thank you for answering!
OSCAR DESeptember 28, 2023
Excellent content and especially the didactic way of explaining. Do you have any predictions on when we would see the refresh and invalidate tokens?
Hugo JavadiJanuary 11, 2023
I'm building a social network for fun and to learn. I'd like it to support OAuth 2.0 (with an in-house, custom-built Authorization Server.) All credentials will be persisted in my social network's database. Signing in with Google, Facebook, GitHub etc., will NOT be an option. The users should be able to sign in to other services (e.g. https://www.marcobehler.com) with my social network in the unlikely event anyone ever supports it. Should my social network use OAuth 2.0 internally?
I assume the website and mobile app would be Clients, and the individual microservices would be Resource Servers/Clients/both.
I wouldn't want the users to have to grant permission to my social network to use the data stored in my social network's database.
I'm pretty confused and can barely articulate my question, so I'm going to re-read this guide - but perhaps my rant will be sufficient for you to know how to save me from my confusion and point me in the right direction.
Marco BehlerJanuary 12, 2023
Hi Hugo,
in general, my advice would be to take baby steps. In your specific scenario this means:
1. Build your tiny social network, and do the authentication/authorization all in-application, without any additional services. Store your credentials in a database etc.
2. Don't (simply don't ever) build your own authorization server. Instead, use Keycloak. Install Keycloak, migrate your users there and THEN think about which flows you might need, i.e. how OAuth would help you in this very specific scenario.
3. Many other smaller steps after that.
In short, the "bite" you're trying to eat is a bit too big, imho. Forget about the mobile app, microservices etc etc at the moment. You first want to be able to understand everything being done locally and then changing ONE piece of the architecture (e.g. keycloak). Once that's done, THEN think about how to add a mobile client and what it would represent in Oauth2 terms.
Hope that helps.
Hugo JavadiJanuary 17, 2023
Thank you, Marco. When I said "custom", I meant with Spring Authorization Server. Though if Keycloak fits my needs, I will run with that. Thanks for the great article and advice!
Sunny DubeyNovember 01, 2022
Awesome!
AnonymousSeptember 07, 2022
Will this be updated to spring boot 3 and/or will the new spring authorization server 1.0 be covered. I'd like to pay for your content but want it somewhat up-to-date.
Marco BehlerSeptember 07, 2022
Hey,
at the moment there are no plans to cover authorization server 1.0 in detail ( that alone would actually warrant a new guide) . As for Spring Boot 3/newer Spring Security versions, there aren't any crazy breaking changes (not counting stuff like deprecating WebSecurityConfigurerAdapter), but the guide is based so much around concepts/general OAuth2 ideas etc. that it should allow you to navigate the waters yourself - unfortunately can't keep it up to date for every Spring version update that's happening.
at the moment there are no plans to cover authorization server 1.0 in detail ( that alone would actually warrant a new guide) . As for Spring Boot 3/newer Spring Security versions, there aren't any crazy breaking changes (not counting stuff like deprecating WebSecurityConfigurerAdapter), but the guide is based so much around concepts/general OAuth2 ideas etc. that it should allow you to navigate the waters yourself - unfortunately can't keep it up to date for every Spring version update that's happening.
Himanshu SharmaJuly 04, 2022
Hey, this is the best article on Oauth2 I have come across after going so many articles on the internet. Thanks a lot. I came to this article after I read your transaction management article which described it from scratch. I have one question. Can you throw some light on how to secure microservice intercommunication with any api gateway with oauth2 dance flow.
AnonymousJune 26, 2022
I've been trying to overcome some implementation glitches with OAuth2 + Spring Boot at both the Resource Server layer and machine client layers. The material here and on the companion page at https://www.marcobehler.com/guides/spring-security is the most coherent description of the process I have encountered across literally hundreds of questions on StackOverflow, Baeldung etc. One quick question about some of the protected content... Does the full content describe how to implement all of these functionalities with the newer SecurityFilterChain approach rather than the now-deprecated WebSecurityConfigurerAdapter approach? I have gotten most of the mechanics working with WebSecurityConfigurerAdapter but run into duplication of beans or missing beans when trying to implement with the new directional approach.
It may be worth my while to purchase the $20 access but I'm curious if you've encountered the same problems / conflicts between Spring, Spring Security and Spring Boot.
mdh
It may be worth my while to purchase the $20 access but I'm curious if you've encountered the same problems / conflicts between Spring, Spring Security and Spring Boot.
mdh
Marco BehlerJune 27, 2022
Hey there, nope, it's currently still describing the new-deprecated WebSecurityConfigurerAdapter approach.
entrycheckApril 13, 2022
I need to implement a showcase client where the authentication details (acr, aud, nonce, granted authorities ...), decoded JWT (like jwt.io), access token and refresh token is displayed after logging in on a oauth/openid connect server. I already get the authentication details and the cypted JWT displayed after http.oauth2login(), passing the variables from Authentication authentication = SecurityContextHolder.getContext().getAuthentication(); to Thymeleaf via ${authentication.principal.idToken.tokenValue}. Is there a possibility to get the access and refresh token via SecurityContextHolder or do I need to get it from org.springframework.security.oauth2.client.authentication.OAuth2AuthorizationCodeAuthenticationToken? And is there also a way decode the Jwt and then passing the decoded variables to Thymeleaf with Java with my Spring Boot app (no javascript), maybe via org.springframework.security.oauth2.jwt?
entrycheckApril 15, 2022
Problem solved. I found a post in the internet how to decode a JWT with plain java (base64) and I can get the access and refresh token with OAuth2AuthorizedClient.
Marco BehlerApril 15, 2022
Great to hear! (bit late to the party now)
JOHN FRANEYMarch 19, 2022
Yours is a high-quality explanation. Thank you.
I have questions within this context: My application is embedded within my partner's application. When my partner launches my application, it sends a time-sensitive token to my application. This token must be passed to my partner's authorization server when requesting an authorization code. I'm concerned that the token could expire BEFORE its needed. I need a way to add the time-sensitive value to the authorization code request, and a way to drive the authorization before time expires.
1) For a WebClient, can I add custom parameters to the request for authorization code? The custom parameters are dependent on session data. With what Spring Security API?
2) In Spring Security, can I get the access token separately and before sending a request to the resource server with WebClient? With what Spring Security API?
Marco BehlerMarch 21, 2022
Hi John, frankly, I don't know off the top of my head. I guess the only thing that would help is debugging SS's code.
Andrii ZaburiannyiJanuary 27, 2022
Hello,
Really great article.
But could you please describe in more detail how can we configure our own Authorization Server?
And also can our server be simultaneously our Authorization Server, Resource Server and Client?
Thank you very much)
Really great article.
But could you please describe in more detail how can we configure our own Authorization Server?
And also can our server be simultaneously our Authorization Server, Resource Server and Client?
Thank you very much)
Alexander Shikanga-TindiSeptember 22, 2021
Hi @Marco where can I find details of using https, ssl certs, .p12 keys etc?
Marco BehlerSeptember 22, 2021
Hi Alexander, Https/SSL certs in what regard? Are we talking custom certificates? Let's Encrypt? What for etc?
AnonymousAugust 31, 2021
Nice friendly introduction, but as you get into details (starting from Authorization servers) it gets complicated.
Timothy VogelJuly 13, 2021
I am currently trying to debug why the return from the auth server isn't getting to my app and keeps returning to the scope approval page on the external auth server site.
It would be helpful to have the Spring specific classes / methods added to a version of the Oauth2 dance diagram. That would help me know where to put break statements and trace down the issue.
It would be helpful to have the Spring specific classes / methods added to a version of the Oauth2 dance diagram. That would help me know where to put break statements and trace down the issue.
Timothy VogelJuly 13, 2021
In the Spring Security & OAuth 2.0 Clients section you list spring-boot-starter-oauth2-client as the required dependency. You then use the WebClient which requires additional dependencies, specifically spring-webflux and reactor-netty.
Marco BehlerJuly 13, 2021
Hi Timothy,
spring-boot-starter-oauth2-client automatically pulls in spring-webflux, as well as reactor - transitively.
spring-boot-starter-oauth2-client automatically pulls in spring-webflux, as well as reactor - transitively.
Timothy VogelJuly 13, 2021
Marco, Might be different versions but using Spring Boot 2.5.2, I get compile errors unless I manually add webflux and reactor.
The project was not built since its build path is incomplete. Cannot find the class file for org.springframework.web.reactive.function.client.WebClient$Builder. Fix the build path then try building this project.
The project was not built since its build path is incomplete. Cannot find the class file for org.springframework.web.reactive.function.client.WebClient$Builder. Fix the build path then try building this project.
dropurmensajeApril 03, 2021
Marco Behler, I think ,another missing part is where the resource server needs to validate the access token before granting the resource .
So, to do that it calls authorization server for that validation.
So, to do that it calls authorization server for that validation.
Marco BehlerApril 03, 2021
Hi, how did you come to that conclusion?. It's explained in detail in the OAuth 2.0 Overview section as well as in the Spring Security & Oauth2 .0 Resource Server section.
dropurmensajeApril 03, 2021
Great read,well done Marco Behler
Chris BuckettMarch 05, 2021
Great article, but the bit I'm still confused about is the relationship of oauth2 client and oauth2 resource server.
Eg: my spring-boot app has both static pages and an API. I can add .oauth2login() and get users to login using oauth - that works fine for protecting routes, whether static pages or API, and I can even step through the debugger into spring classes and retrieve the JWT json text. But I can't for the life of me work out how an external application (ie, a frontend SPA) would authenticate against my app and get hold of that JWT so that it can access the API.
Any chance of a diagram showing: Frontend client SPA / Android / iphone app -> Spring backend (serving API or static pages)with oauth2 login -> external authorisation server (eg google) - and the flow of data between the different concrete components? Thanks
dropurmensajeApril 03, 2021
May i add,this is a scenario where your front-end application needs to communicate directly with the resource server.
Therefore , the front-end can aswell register with the backend(client) then use its credentials to request for the access token.
Which it would later use to fetch resources from the resource server.
However,I think ,spring implementation of an oauth client sets the access token as a cookie.
In the response payload.
Marco BehlerApril 03, 2021
This scenario is covered in the SPA & Native App section of this guide.
Marco BehlerMarch 07, 2021
Hi Chris,
as already quite a few others asked the same question, I'll try and add a proper description about that flow in the next ~2 weeks. Fingers crossed.
as already quite a few others asked the same question, I'll try and add a proper description about that flow in the next ~2 weeks. Fingers crossed.
Andrei LifchitsMarch 20, 2021
+1, I came here hoping to understand how to configure my Spring Boot server when I perform the "login with Google" from a (separately-hosted) frontend that would then call my server API with a manually-set JWT in the request header.
Jakub ZelmanowiczFebruary 04, 2021
Article is missing some details like e.x how resource server would know that we are logging in via GitHub or Google? It has only information about our authorization server, which also doesn't know we are logging with GitHub.
Marco BehlerMarch 25, 2021
Hi Jakub,
I'm not entirely sure if you read the whole thing.
Under the authorization server section there's examples of google and facebook + a link to the documentation for others, like GitHub.
In the resource server section it tells you that setting the correct "spring.security.oauth2.resourceserver.jwk.key-set-uri" is enough, which yes, you'll have to find out from the official docs or the Google/GitHub docs.
Hope that helps :)
SAIDULU YJanuary 07, 2021
"Those other flows and differences between those flows will be covered in a future revision of this guide."
As per the above statement, when can we expect that in the article. Very curious to know.
As per the above statement, when can we expect that in the article. Very curious to know.
Marco BehlerMarch 25, 2021
Article has been updated Mar 25, 2021 with info about SPAs/Native Apps etc.
AnonymousMay 19, 2023
Marco, there is nothing about SPAs/Native Apps in this article. Where is it? Thanks
angelospapouNovember 30, 2020
Ηι,
does the full version of this article entail the certificate hashing as specified in OAuth 2.0 Mutual-TLS Client Authentication and Certificate-Bound Access Tokens? Or do you have any article/s about this?
Thanks
does the full version of this article entail the certificate hashing as specified in OAuth 2.0 Mutual-TLS Client Authentication and Certificate-Bound Access Tokens? Or do you have any article/s about this?
Thanks
Marco BehlerMarch 25, 2021
Short: No, sorry.
ahmedbenyahiassNovember 23, 2020
I would love to read this article, unfortunately, I can't make a payment from my country!
Marco BehlerNovember 24, 2020
What country are you based in and what payment method would you like to see?
Sujatha ParameshNovember 09, 2020
Really nice how you start from the basics, and work your way up to the more gory details. You have been my go-to website ever since I started reading your articles. So please keep writing!
AnonymousOctober 15, 2020
emmm...will consider supporting other payment methods? For example, alipay, wechat pay.
Marco BehlerMay 19, 2021
Hey, it took a while, but AliPay is now available as payment method.
Marco BehlerOctober 15, 2020
Where are you from? What's your preferred payment method? Currently there are no plans, but let me know and I'll see what I can do.
AnonymousOctober 18, 2020
Well, I'm from China and prefer wechat pay.
asikrajaOctober 13, 2020
I dont have credit card or paypal account; what are other payment mode available?
Marco BehlerOctober 15, 2020
Where are you from? What's your preferred payment method?
Otto DvaliOctober 04, 2020
Hey Marco, great article as always.
I'm trying to set up google auth for my app. I want to add google sing in button frontend. Lets assume I have everything at the backend side as you wrote in the article, now I don;t want to trigger google sign in automatically, I want user to click on the button and then show the google sing in form. How would I do that?
I'm trying to set up google auth for my app. I want to add google sing in button frontend. Lets assume I have everything at the backend side as you wrote in the article, now I don;t want to trigger google sign in automatically, I want user to click on the button and then show the google sing in form. How would I do that?
Marco BehlerOctober 06, 2020
Hi Otto,
you'll need to set a custom loginPage [ .oauth2Login().loginPage("/someUrl) ] and then simply add a link with an url of
OAuth2AuthorizationRequestRedirectFilter.DEFAULT_AUTHORIZATION_REQUEST_BASE_URI + "/google" or ( +"/github", or whatever your provider is.)
you'll need to set a custom loginPage [ .oauth2Login().loginPage("/someUrl) ] and then simply add a link with an url of
OAuth2AuthorizationRequestRedirectFilter.DEFAULT_AUTHORIZATION_REQUEST_BASE_URI + "/google" or ( +"/github", or whatever your provider is.)
Otto DvaliOctober 11, 2020
Thanks Marco for quick reply, I appreciate it very much.
I have a question with regard to logout. When we use oauth2 , how should we log user out? Do we just send get request to /logout user ? Are not we supposed to delete access tokens/refresh tokens and so on?
The other questions is , I gave google my own redirect link and as I see it appends some of the parameters,for instance:
http://localhost:3000/home?state=<state here> &code=<code here> &scope=email+profile+openid+https%3A%2F%2Fwww.googleapis.com%2Fauth%2Fuserinfo.profile+https%3A%2F%2Fwww.googleapis.com%2Fauth%2Fuserinfo.email&authuser=2&prompt=consent#
Is it secure that google adds those parameters lice code and others in the url tab? Can I just tell google
not to append anything and just redirect to lets say, localhost:3000, wihout other parameters?
Dragos PrediSeptember 30, 2020
Is there a way to impose roles on users logged with oauth2Login? Usually, you have 2 types of logins, one FormLogin and Oauth2Login, is there a way to have some uniformity between the 2?
Marco BehlerOctober 01, 2020
I updated the article with info on how to do this just now.
Marco BehlerSeptember 30, 2020
Yes. You can either write a custom "GrantedAuthoritiesMapper", adding your roles, or override the OAuth2UserService.loadUser method. I myself work with the GrantedAuthoritiesMapper.
Arvid MildnerSeptember 18, 2020
I could not get the Resource Server to auto-configure by following the steps described so I am wondering if I am missing something? After a lot of searching I found that I had to do all those steps mentioned in the article and also, in my SecurityConfig write:
.and().oauth2ResourceServer { obj: OAuth2ResourceServerConfigurer<HttpSecurity?> -> obj.jwt() }
Marco BehlerOctober 01, 2020
Did you have a chance to compare your code with the code posted in the article's GitHub repo? I'll need some time to look into it.
Kuldeep YadavSeptember 07, 2020
Hi Marco, great article, I will eagerly wait for next revisions, but one thing I would love to see (as already asked by few commenters), if you shed some light about the stateless flow (react, angular or mobile client completely decoupled from server) as well, I will really appreciate. Thanks for the article though!!!
Arvid MildnerSeptember 04, 2020
Hello! Great article altogether. I am however running into a problem:
I am serving a frontend only application on localhost:3000. I want to access my api at localhost:8080 through javascript (eg GET localhost:8080/transactions) to access the transactions and render them for the user at localhost:3000. If I have no access token I'd like to be redirected to the login flow at my oauth2 provider (just as the case when I explicitly type localhost:8080/transactions in the web browser) and then recieve back the token and the requested resource. For later calls when I have the token, the resource should be served directly. How would I go about solving this problem?
I am serving a frontend only application on localhost:3000. I want to access my api at localhost:8080 through javascript (eg GET localhost:8080/transactions) to access the transactions and render them for the user at localhost:3000. If I have no access token I'd like to be redirected to the login flow at my oauth2 provider (just as the case when I explicitly type localhost:8080/transactions in the web browser) and then recieve back the token and the requested resource. For later calls when I have the token, the resource should be served directly. How would I go about solving this problem?
Marco BehlerSeptember 06, 2020
Hi Arvid,
just to get this right, you have the flow working "traditionally", i.e. server-side rendered HTML and the question is how would you go about the redirects in a frontend/Javascript application when doing REST calls?
just to get this right, you have the flow working "traditionally", i.e. server-side rendered HTML and the question is how would you go about the redirects in a frontend/Javascript application when doing REST calls?
Arvid MildnerSeptember 18, 2020
Yes that is correct. However, the question is essentially resolved now as I got it working by using a reverse proxy to "fool" the browser into thinking it is talking to the same server. So the JSESSIONID can be passed properly which makes the authentication filter trigger as expected. Thank you for the response though.
More details for people running into similar problems:
The SPA (think react app) is served on
My reverse proxy is just the following:
More details for people running into similar problems:
The SPA (think react app) is served on
localhost:3000 (which is what is serving the content when I visit localhost:5555/) and the api is served at localhost:8080/api which is responding when I call localhost:5555/api. It is all configured via the reverse proxy. Then I expose a login button in the frontend SPA which kicks off the login flow (i.e link to /api/login ) with a context path set to /api in my case. When it returns to localhost:5555/ after successfull login, we can now call the resources at /api/transactions.
My reverse proxy is just the following:
var proxy = require('redbird')({port: 5555});

 proxy.register("http://localhost:5555", "http://localhost:3000");

 proxy.register("http://localhost:5555/api", "http://localhost:8080/api");
huangyejunzeroAugust 24, 2020
I appreciate your paying, look forward your next article.
AnonymousAugust 21, 2020
Thank you for this great article. Do you have a plan to release it in epub format? It's a long article and it would be very nice to read it with Kindle.
Marco BehlerAugust 22, 2020
Not sure, yet. If there's more demand for an ebook version, then I'm going to look into it how to make it happen.
Gary ArlingtonAugust 21, 2020
Thanks very much for the great writing. It would save me quite a few days of ad-hoc reading if I had found the blog earlier. Highly recommended!
Here are a few questions:
(1) Why do you want to persist the OAuth2User instead of fetch it from a controller method as needed?
(2) Seems the access token lives in memory in the client app runtime. Does this make the client app stateful?
(3) What is the preferred way to make the client app stateless if the answer is yes to the question above. Should the access token be saved into a cookie, or in database? In either way, how can you re-construct the WebClient in a new session between UI and the client (for example, after the client app restart).
(4) Can you also add the log out in the HttpSecurity chain ? Basically when user logs out the client app, the access and refresh tokens should be invalidated.
Marco BehlerAugust 21, 2020
Hi Gary,
thank you! Regarding your questions (and btw, great questions, I will weave the answers into the article next week or so):
(1). You don't really want to persist the whole OAuth2User, but essentially you'd like to have a local copy of (some attributes of) that User in a table - be it just his email address, so that you can associate stuff with him. Think, on this website, "article purchases". I want to know that user hello@marcobehler.com can access this article or his progress on a specific course etc.
(2) In short: Yes.
(3) You basically want to have your custom implementation of "OAuth2AuthorizedClientService", which saves access_tokens and refresh_tokens. There's already a JdbcOAuth2AuthorizedClientService including a corresponding .sql, provided by Spring Security.
(4). In short: yes. Will update the article.
Hope that helps!
Gary ArlingtonSeptember 09, 2020
Thanks Marco for your answers. I noticed my previous reply is not showing up here. Maybe I forgot to click the "Add Comment" button or something happened? Regardless, I have one more question here: What is the best way to step up the scopes? For example, the client got an access token for "read" scope, now it needs to perform an action with both "read" and "write" scopes. My thoughts are in the following steps: (1)Invoke the action and get 403; (2)Add a 403 handler that append the "write" scope to the client registration, then trigger authorization again somehow. Is this already implemented by the WebClient or oauth2Login?
AnonymousAugust 14, 2020
So far i am loving the way it has been laid out with great deal of insight into the topic.
AnonymousAugust 14, 2020
I appreciate the work you put into this article. Waiting to read the next parts. I'll come back on 21st.
AnonymousAugust 07, 2020
i would love to read this article.
rimictdAugust 01, 2020
can't tell how eagerly I am waiting for this article.
Marco BehlerAugust 01, 2020
Me too ;)

let mut author = ?
I'm @MarcoBehler and I share everything I know about making awesome software through my guides, screencasts, talks and courses.
Follow me on Twitter to find out what I'm currently working on.