
@Configuration
public class ReallyBigCompanySharedContextConfiguration { // (1)

    @Bean
    public ReallyBigCompanyProprietaryFlywayClone flywayClone() {
        return new ReallyBigCompanyProprietaryFlywayClone(); // (2)
    }

}
How Spring Boot’s Autoconfigurations Work
Last updated on December 26, 2020 - 36 comments
Star me on GitHub →You can use this guide to get an in-depth understanding of what Spring Boot's Autoconfigurations are and how they work.
(Editor’s note: At ~3500 words, you probably don’t want to try reading this on a mobile device. Bookmark it and come back later.)
Introduction
It looks like everyone and their grandma are using Spring Boot to build projects. But very few can answer the question: "What really is Spring Boot? What are these AutoConfigurations I have heard of?"
The short answer:
Spring Boot’s website offers the following answer: "Spring Boot takes an opinionated view of the Spring platform and third-party libraries so you can get started with minimum fuss."
Wow, that doesn’t help at all, does it?
Luckily, there’s also a long answer:
The remainder of this article.
A quick caveat
I can give you a 99,99% guarantee, that you’d rather want to read the What is Spring Framework? article first, if…:
-
…you are completely new to Spring Boot (or Java).
-
…you think " Spring Framework, Spring Web MVC and Spring Boot are all the same".
-
…you think "Cut all this other crap, I just want to learn about Spring Boot!".
-
(Especially if you think "cut all this other crap").
Take the time to finish the previous article first, then come back here.
Furthermore, if you are looking for some simple copy & paste Spring Boot REST/microservice tutorials, I would advise you to go to https://spring.io/guides, instead.
This article’s goals
-
To give you an in-depth understanding of Spring Boot and its AutoConfigurations.
-
To show you how Spring Boot automagically boots up a Tomcat server whenever you run a main() method.
-
To show you how Spring Boot’s properties magic works. You specify a couple of properties and suddenly have working database access.
Let’s start.
Conditionals
Before you become a Spring Boot guru, you need to understand just one very important concept: Spring Framework’s @Conditional annotation.
Parental Advice: Don’t skip this section, as it is the basis for everything that Spring Boot does. Also, I’ll make it as interesting as possible.
How to share ApplicationContextConfigurations?
Imagine you are working for ReallyBigCompany™ with a couple of teams working on different Spring projects or products. But you are not using Spring Boot, just plain Spring Framework.
Also imagine that at one point, one of your developers had a great idea to extract one common ApplicationContextConfiguration out of all projects, because she noticed that every company project uses a few of the same beans.
-
This SharedContextConfiguration would live in its own project, eventually published as its own .jar file that all your company’s Spring projects can import as a Maven/Gradle dependency.
-
Imagine that ReallyBigCompany built a proprietary Flyway clone, i.e. something that initializes and manages databases. And as every project in your company uses a relational database, it makes sense to extract it to this shared configuration.
Your actual project ApplicationContextConfigurations would then do this:
@Configuration
@Import(ReallyBigCompanySharedConfiguration.class) // (1)
public class EarlyExitUnicornProjectContextConfiguration {

   // (2)
}-
Every company project from now on imports the SharedConfiguration, as it contains so many goodies (well, only the Flyway clone at the moment, but you get the point).
-
You would specify your project-specific beans here, as normal.
What is the problem with shared ApplicationContextConfigurations?
Having such a shared Spring configuration in your company works, but there’s a problem on the horizon.
What if you want to create another project which wants to import that shared configuration, but not have a ReallyBigCompanyProprietaryFlywayClone, because it does not use a relational database?
Then you need a way to tell Spring: That @Configuration is fine, but please don’t create that one specific @Bean - just ignore it. Go ahead and create all other @Beans though.
That’s exactly what Spring’s @Conditional annotation is for.
What is Spring’s @Conditional annotation?
The Spring Framework offers the @Conditional annotation since version 4.0 (released on 2013). You can put it on @Bean methods, @Components or even @Configurations and it looks like so:
@Conditional(SomeCondition.class) // (1)-
It has a "Condition" class parameter, which is a class that has a method called "matches", returning a simple Boolean.
-
True: (Further Evaluate/Register) Create that @Bean, @Component or @Configuration
-
False: (Stop Evaluating/Registering) Don’t create that @Bean, @Component or @Configuration
-
In short: Even though an ApplicationContextConfiguration comes with certain @Bean definitions, you as the end-user can still somewhat influence if a bean gets created or not.
Making the shared ApplicationContextConfiguration @Conditional
What does that mean for our SharedConfiguration? We could refactor it to look like this:
@Configuration
public class ReallyBigCompanySharedContextConfiguration {

    @Bean
    @Conditional(IsRelationalDatabaseCondition.class) // (1)
    public ReallyBigCompanyProprietaryFlywayClone flywayClone() {
        return new ReallyBigCompanyProprietaryFlywayClone();
    }

}-
It is exactly the same ContextConfiguration as before, only now your @Bean method is also annotated with a condition that we have yet to write.
What could this condition look like?
Implementing a Spring Condition
package com.marcobehler;

import org.springframework.context.annotation.Condition;
import org.springframework.context.annotation.ConditionContext;
import org.springframework.core.type.AnnotatedTypeMetadata;

public class IsRelationalDatabaseCondition implements Condition {

    @Override
    public boolean matches(ConditionContext context, AnnotatedTypeMetadata metadata) {  // (1)
        return oracleJdbcDriverOnClassPath() && databaseUrlSet(context); // (2)
    }

    private boolean databaseUrlSet(ConditionContext context) { // (3)
        return context.getEnvironment().containsProperty("spring.datasource.url");
    }

    private boolean oracleJdbcDriverOnClassPath() { // (4)
        try {
            Class.forName("oracle.jdbc.driver.OracleDriver");
            return true;
        } catch (ClassNotFoundException e) {
            return false;
        }
    }
}-
Condition is an interface which exposes one method called "matches" that returns true/false: Has the condition been met or not.
-
I am mixing up two conditions here: I want to check if the Oracle driver class is on the classpath. And I want to check if the user has set a database URL in a .properties file.
-
Checking for a property is rather simple, as you can go through Spring’s environment class, which will, in turn, check all @PropertySources (think: application.properties) for a property.
-
Checking for dependencies is also rather simple: You can check for the availability of a certain class on your classpath and if it is there, then you can assume the whole library is there.
Though you would very likely split this class up into two different conditions in the real world, it highlights two very important conditions:
-
You can create @Beans depending on specific available properties.
-
You can create @Beans depending on specific libraries on your classpath.
Half-Time Break: What is Spring Boot?
Even though we haven’t covered any Spring Boot source code just yet, there is now a new insight looming.
What if Spring Boot is just a shared context configuration with tons of @Conditionals?
Conditionals that create a DataSource for you, because you have set specific properties (think: spring.datasource.url)? Or @Conditionals that boot up an embedded Tomcat server for you because you have the Tomcat libraries on your classpath?
Yes, that (and not much more) is exactly what Spring Boot is. Don’t believe me? Let’s see some code.
AutoConfigurations
What happens when you start a Spring Boot application?
Everyone who has created a new Spring Boot application knows you’ll end up with a runnable main() method that launches Spring Boot’s magic.
package com.example;

import org.springframework.boot.SpringApplication;
import org.springframework.boot.autoconfigure.SpringBootApplication;

@SpringBootApplication
public class MySpringBootApp {

    public static void main(String[] args) { // (1)
        SpringApplication.run(MySpringBootApp.class, args);
    }

}-
You run this main method and suddenly your Tomcat server boots up, your application.properties file gets read in and you can immediately start writing @RestControllers.
How does this work?
Spring Boot: Three Internal Core Features
There are many things happening when running your SpringApplication, but let’s have a look at three specific ones which, at first, don’t have much in common, but together form most of the basis of Spring Boot.
1. Auto-registered @PropertySources
You can tell any plain Spring Framework application to read in .properties files from basically any location you want, with the help of the @PropertySource annotation.
@PropertySource(value = "classpath:application.properties", ignoreResourceNotFound = true)When you run the main method of your MySpringBootApp, Spring Boot will automatically register 17 of these PropertySources for you (even though not correct, you can think of it as 17 of these annotations automatically added to your project).
You can find the complete list of default PropertySources in the official documentation, but here’s an excerpt:
4. Command line arguments.
...
10. OS environment variables.
...
15. Application properties packaged inside your jar (application.properties and YAML variants).
So, Spring Boot merely has a default set of property locations that it always tries to read in, like command line arguments, or application.properties inside your .jar file etc. Or, it ignores the location. That’s it.
Now, what does it do with these .properties? Before we have a look at that in Spring Boot’s original source code, let’s have a look at the second big thing that happens when running a Spring Boot’s main method.
2. Read-in META-INF/spring.factories
Every Spring Boot project has a dependency on the following library: org.springframework.boot:spring-boot-autoconfigure. It is a simple .jar file containing pretty much all of Spring Boot’s magic.
In addition, it comes with a file called spring.factories, under the META-INF folder.
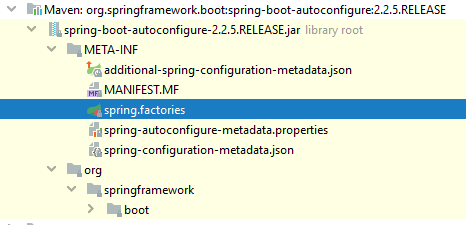
When you open up that file, there’s one section called "#Auto Configure", which spans over a hundred lines.
# Auto Configure
org.springframework.boot.autoconfigure.EnableAutoConfiguration=\
org.springframework.boot.autoconfigure.admin.SpringApplicationAdminJmxAutoConfiguration,\
org.springframework.boot.autoconfigure.aop.AopAutoConfiguration,\
org.springframework.boot.autoconfigure.amqp.RabbitAutoConfiguration,\
org.springframework.boot.autoconfigure.batch.BatchAutoConfiguration,\
org.springframework.boot.autoconfigure.cache.CacheAutoConfiguration,\
org.springframework.boot.autoconfigure.cassandra.CassandraAutoConfiguration,\
org.springframework.boot.autoconfigure.cloud.CloudServiceConnectorsAutoConfiguration,\
org.springframework.boot.autoconfigure.context.ConfigurationPropertiesAutoConfiguration,\
org.springframework.boot.autoconfigure.context.MessageSourceAutoConfiguration,\
org.springframework.boot.autoconfigure.context.PropertyPlaceholderAutoConfiguration,\
org.springframework.boot.autoconfigure.couchbase.CouchbaseAutoConfiguration,\
org.springframework.boot.autoconfigure.dao.PersistenceExceptionTranslationAutoConfiguration,\
// 100+ more lines
These AutoConfigurations (more on that in a second) are normal Spring @Configurations with a ton of @Conditionals that Spring Boot reads in and tries to evaluate on every application startup.
But before we look at these AutoConfigurations, let’s have one last look at one additional Spring Boot feature.
3. Enhanced Conditional Support
A couple of paragraphs earlier, we saw that Spring Framework comes with the @Conditional annotation. But that annotation is a bit low-level.
Spring Boot comes with its own set of additional @Conditional annotations, which make developers' lives easier. (Note, that the following parameter values of the @Conditional annotations are just an example)
-
@ConditionalOnBean(DataSource.class). The condition is true only if the user specified a DataSource @Bean in a @Configuration.
-
@ConditionalOnClass(DataSource.class). The condition is true if the DataSource class is on the classpath.
-
@ConditionalOnCloudPlatform(CloudPlatform.Heroku). The condition is true if the CloudPlatform is set to Heroku.
-
@ConditionalOnExpression("someSpELExpression). The condition is true if the SpEL expression is true.
-
@ConditionalOnJava(JavaVersion.EIGHT). The condition is true if the current Java version is 8.
-
@ConditionalOnJndi("java:comp/env/ejb/myEJB"). The condition is true if the specified JNDI context exists.
-
@ConditionalOnMissingBean(DataSource.class). The condition is true if the user did not specify a DataSource @Bean in any @Configuration.
-
@ConditionalOnMissingClass(DataSource.class). The condition is true if the DataSource class is not on the classpath.
-
@ConditionalOnNotWebApplication. The condition is true if the application is not a web application.
-
@ConditionalOnProperty("my.property"). The condition is true if my.property is set.
-
@ConditionalOnResource("classpath:my.properties"). The condition is true if my.properties exists.
-
@ConditionalOnSingleCandidate(DataSource.class). Matches if there is exactly one primary DataSource bean specified in your application.
-
@ConditionalOnWebApplication. The condition is true if the application is a web application.
So, in short, with Spring Boot you do not have to write the most common conditions yourself (like checking for a property). Instead, you can use its enhanced @Conditional annotations.
Summary
When Spring Boot boots up:
-
It tries to read in .properties from 17 hard-coded locations.
-
It also reads in the spring.factories file of your autoconfigure-module and finds out which AutoConfigurations it should evaluate.
-
It has an enhanced concept of @Conditionals, compared to plain Spring. This will come in handy in a second.
This is enough knowledge to start analyzing said AutoConfigurations.
Where to get Spring Boot’s source code
To follow along, you might want to checkout the Spring Boot project yourself. Don’t worry, it is just a quick 'git clone' and project import away.
Also note, that Spring Boot effectively switched to Gradle as build system in the master branch, whereas older release branches are still Maven based.
git clone https://github.com/spring-projects/spring-boot.gitHow to analyze an AutoConfiguration: DataSourceAutoConfiguration
Inside the spring-boot-autoconfigure module, you’ll find a subpackage and AutoConfiguration for every Spring or 3rd party library that Spring Boot integrates with.
Let’s have a look at the DataSourceAutoConfiguration class first. It is the one that builds a DataSource for you, after you put a couple of properties like "spring.datasource.url" into one of your .properties files.
Woohaa, look at this annotation festival! Let’s step through it line-by-line.
@Configuration(proxyBeanMethods = false)  // (1)
@ConditionalOnClass({ DataSource.class, EmbeddedDatabaseType.class }) // (2)
@EnableConfigurationProperties(DataSourceProperties.class) // (3)
@Import({ DataSourcePoolMetadataProvidersConfiguration.class, DataSourceInitializationConfiguration.class }) // (3)
public class DataSourceAutoConfiguration {

	@Configuration(proxyBeanMethods = false)
	@Conditional(EmbeddedDatabaseCondition.class)
	@ConditionalOnMissingBean({ DataSource.class, XADataSource.class })
	@Import(EmbeddedDataSourceConfiguration.class)
	protected static class EmbeddedDatabaseConfiguration {

	}

	@Configuration(proxyBeanMethods = false) // (4)
	@Conditional(PooledDataSourceCondition.class) // (5)
	@ConditionalOnMissingBean({ DataSource.class, XADataSource.class }) // (6)
	@Import({ DataSourceConfiguration.Hikari.class, DataSourceConfiguration.Tomcat.class, // (7)
			DataSourceConfiguration.Dbcp2.class, DataSourceConfiguration.Generic.class,
			DataSourceJmxConfiguration.class })
	protected static class PooledDataSourceConfiguration {

	}

	// some more
}-
A DataSourceAutoConfiguration is a normal Spring @Configuration.
-
For the @Configuration to get evaluated further, you need to have two classes on the classpath: DataSource and EmbeddedDatabaseType. If that Conditional is false, the whole @Configuration is not evaluated.
-
We can ignore these two lines for now, but as a quick side-note: @EnableConfigurationProperties enables that the properties you put into your .properties files can get automatically set/converted to an object, like the DataSourceProperties here.
-
The DataSourceAutoConfiguration has two other, inner, @Configurations. One of them is the PooledDataSourceConfiguration, which will (conditionally) create a connection pool DataSource for you.
-
It has a @Condition on a PooledDataSourceCondition, which really is a nested @ConditionalOnProperty. Ouch!
-
The PooledDataSourceConfiguration only gets evaluated further if the user (i.e. YOU) has not specified a DataSource or an XADataSource himself, yet.
-
The PooledDataSourceConfiguration imports quite a few other configurations, to be more specific: one configuration for each supported connection pool library (Hikari, Tomcat, Dbcp2, etc.).
That is a lot to digest, but essentially it is normal Spring @Configurations, safe-guarded with @Conditionals. To top it off, let’s have a look at the imported DataSourceConfiguration.Hikari.class.
Even more annotations!
/**
	 * Hikari DataSource configuration.
	 */
	@Configuration(proxyBeanMethods = false) // (1)
	@ConditionalOnClass(HikariDataSource.class) // (2)
	@ConditionalOnMissingBean(DataSource.class) // (3)
	@ConditionalOnProperty(name = "spring.datasource.type", havingValue = "com.zaxxer.hikari.HikariDataSource", // (4)
			matchIfMissing = true)
	static class Hikari {

		@Bean // (5)
		@ConfigurationProperties(prefix = "spring.datasource.hikari")
		HikariDataSource dataSource(DataSourceProperties properties) {
			HikariDataSource dataSource = createDataSource(properties, HikariDataSource.class);
			if (StringUtils.hasText(properties.getName())) {
				dataSource.setPoolName(properties.getName());
			}
			return dataSource;
		}

}-
Another normal Spring @Configuration.
-
The HikariDataSource.class must be on the classpath, i.e. hikari-cp must be added to your pom.xml/build.gradle file.
-
The user must not have specified a DataSource bean himself.
-
Either the property "spring.datasource.type" is missing, or it must have a specific value of "com.zaxxer.hikari.HikariDataSource".
-
If all these conditions match, then a good old Spring @Bean gets created. A HikariDataSource. This is what you would otherwise have to create yourself, by looking at HikariCP’s documentation.
So, essentially all the DataSourceAutoConfiguration does is check for 3rd party dependencies on the classpath and a couple of properties to be set. Then it boots up a DataSource for you that you would otherwise have to configure yourself, manually.
Or in simpler terms: If you have HikariCP on your classpath, then you automatically get a HikariDataSource @Bean created. If you had the DBCP2 library on your classpath (and Hikari excluded), then you’d get a different connection pool. Simply by switching dependencies.
This is the power of @Conditionals!
Exercise: Analyze the Tomcat AutoConfiguration
Back to the question from the beginning: How can Spring Boot boot up an embedded Tomcat server by default? Simple:
-
It needs to check if Tomcat is on the classpath. (@ConditionalOnClass(Tomcat.class))
-
It might take into account specific properties that the user sets, like server.port.
-
It needs to take Spring WebMVC’s DispatcherServlet and register it with Tomcat, to make your @RestControllers with their @GetMappings and @PostMappings work.
-
It needs to start your embedded Tomcat server (and therefore your DispatcherServlet).
The exercise for you is to find and understand those servlet specific auto-configurations, with their appropriate conditionals.
A hint: Have a look at DispatcherServletAutoConfiguration, as well as EmbeddedWebServerFactoryCustomizerAutoConfiguration.
And if you are done with that, you can have a look at the AutoConfiguration for one of your favorite libraries, like Flyway, or Jackson, or MongoDB.
Final Answer: What is Spring Boot?
Spring Boot is just a couple of AutoConfigurations classes (== normal Spring @Configurations), that create @Beans for you if certain @Conditions are met.
Three of the most important conditions are
-
@ConditionalOnClass. Checking for dependencies or rather specific classes of dependencies (think: Tomcat, HikariCP, etc).
-
@ConditionalOnProperty. Self-explanatory.
-
@ConditionalOnMissingBean. If the user specified his own, e.g. DataSource, already, then Spring Boot won’t try to create its auto-configured one.
That is what is meant by "opinionated defaults" on the Spring Boot homepage.
Dependency Management
One last piece of the puzzle is missing. How do all these dependencies get on the classpath in Spring Boot projects? And how come you do not have to specify any version numbers for your 3rd party libraries?
Analyzing spring-boot-starter-web
The one dependency every web-based Spring Boot project includes, is the spring-boot-starter-web dependency. Its pom.xml file looks like this:
<dependencies>
		<!-- other dependencies left out for conciseness -->
		<dependency>
			<groupId>org.springframework.boot</groupId>
			<artifactId>spring-boot-starter-tomcat</artifactId> <!-- 1 -->
		</dependency>
		<!-- other dependencies left out for conciseness -->
		<dependency>
			<groupId>org.springframework</groupId>
			<artifactId>spring-webmvc</artifactId> <!-- 2 -->
		</dependency>
</dependencies>-
Among other dependencies, the spring-boot-starter-tomcat dependency gets pulled in transitively by the starter-web dependency.
-
Also, Spring WebMVC, Spring’s web framework gets pulled in transitively.
Now, the pom.xml file for spring-boot-starter-tomcat looks like this:
<dependencies>
		<dependency>
			<groupId>org.apache.tomcat.embed</groupId>
			<artifactId>tomcat-embed-core</artifactId> <!-- 1 -->
			<exclusions>
				<exclusion>
					<groupId>org.apache.tomcat</groupId>
					<artifactId>tomcat-annotations-api</artifactId>
				</exclusion>
			</exclusions>
		</dependency>
		<!-- other dependencies left out for conciseness -->
</dependencies>-
This dependency is everything you need to start/run an embedded Tomcat server. Spring Boot pulls it in, and guess what that means. That by default, @ConditionalOnClass(Tomcat.class) conditions will be true! And that is exactly the condition Spring Boot evaluates to start up an embedded Tomcat server. Not so much rocket science, anymore, is it?
In general, by browsing through the starters, you’ll find that the spring-boot-starter-web pulls in 60+ other dependencies and third-party libraries into your project - by default. From JSON and YAML libraries, to logging, to Spring’s WebMVC framework. It’s all basic Maven/Gradle dependency management.
Why can you drop dependency versions in Spring Boot?
This leaves us with the last question. Why don’t you (rather: almost never) have to specify third-party dependency versions, when including them in your pom.xml file? So, instead of this:
<dependency>
    <groupId>org.hibernate</groupId>
    <artifactId>hibernate-core</artifactId>
    <version>5.4.12.Final</version>
</dependency>
You would do this in Spring Boot projects.
<dependency>
    <groupId>org.hibernate</groupId>
    <artifactId>hibernate-core</artifactId>
</dependency>
That is because the Spring Boot project that is generated by Spring’s Initializr extends from a parent project called spring-boot-dependencies. It is not so much of a project, but a simple pom.xml file.
And in that pom.xml file, you have a huge dependencyManagement section (covering every 3rd party library Spring Boot integrates with), which defines dependencies that you can include in your pom.xml file, without specifying the version number. Because it is already specified in that parent pom.xml.
  <properties>
    <hibernate.version>5.4.12.Final</hibernate.version> <!-- 1 -->
    <!-- other versions left out for brevity -->
  </properties>

 <dependencyManagement> <!-- 2 -->
 <dependency>
        <groupId>org.hibernate</groupId>
        <artifactId>hibernate-c3p0</artifactId>
        <version>${hibernate.version}</version>
      </dependency>
      <dependency>
        <groupId>org.hibernate</groupId>
        <artifactId>hibernate-core</artifactId>
        <version>${hibernate.version}</version>
      </dependency>
      <dependency>
        <groupId>org.hibernate</groupId>
        <artifactId>hibernate-ehcache</artifactId>
        <version>${hibernate.version}</version>
      </dependency>
      <dependency>
        <groupId>org.hibernate</groupId>
        <artifactId>hibernate-entitymanager</artifactId>
        <version>${hibernate.version}</version>
      </dependency>
      <dependency>
        <groupId>org.hibernate</groupId>
        <artifactId>hibernate-envers</artifactId>
        <version>${hibernate.version}</version>
      </dependency>
      <dependency>
        <groupId>org.hibernate</groupId>
        <artifactId>hibernate-hikaricp</artifactId>
        <version>${hibernate.version}</version>
      </dependency>
</dependencyManagement>-
Spring Boot puts the version numbers into the <properties> section so that you can easily override these version numbers in your sub-project.
-
The <dependencyManagement> block is Maven’s standard feature for defining dependency versions "globally", across all the modules of your project.
That pom.xml file is the reason you do not have to specify 3rd party library versions anymore. Unless of course, your specific 3rd party library is not in that pom.xml file. Then you still need to define the version yourself.
(Note: Inheriting from spring-boot-dependencies is one way to get Spring Boot’s dependency management working, another way would be to import the bom, but I won’t show that here.)
Dependency Management: Summary
-
Starters like spring-boot-starter-web include a ton of third-party libraries into your project - by default. Its AutoConfigurations use these dependencies (remember: @ConditionalOnClass) to setup and preconfigure these libraries automatically.
-
The spring-boot-dependencies pom.xml contains every 3rd party library (and version) that Spring Boot knows. These libraries are predefined in a dependenciesManagement section, so you do not need to specify the version numbers in your own project, anymore.
FAQ
How can I exclude specific AutoConfigurations?
Say you didn’t want Spring Boot to execute its DataSourceAutoConfiguration, you could disable it in multiple ways:
@SpringBootApplication(exclude = {DataSourceAutoConfiguration.class)
public class Application {

    public static void main(String[] args) {
        SpringApplication.run(PayPalApplication.class, args);
    }
}
or
spring.autoconfigure.exclude=org.springframework.boot.autoconfigure.jdbc.DataSourceAutoConfigurationThough this means you need to roughly know which AutoConfiguration is responsible for creating which @Beans, which you’ll ultimately find out in Spring Boot’s source code.
What are the best docs for Spring Boot?
Ha, this question was a trap. There is, of course, the official Spring Boot documentation. But by now you should understand that Spring Boot really only pre-configures other libraries for you.
So, for writing @RestControllers you still need to look at the official Spring Web MVC documentation. For Flyway, the Flyway documentation. For Couchbase, the Couchbase documentation.
And THEN you also need to know the autoconfigurations AND properties that Spring Boot uses to configure these libraries. You can find a complete property list here: Common Application properties. Yes, it is a loooong list.
What is the difference between Spring and Spring Boot?
Spring, as in Spring Framework is a set of tools that help you build Java applications faster (hopefully).
After having read this article, you should understand that Spring Boot merely preconfigures these tools for you with sane settings (i.e. let’s always read in an classpath:application.properties file and use the property server.port to preconfigure a Tomcat server on a specific port). Hence, Spring Boot builds on top of Spring Framework.
Things get confusing, though, as the current marketing push is to call everything Spring Boot or Spring Framework simply "Spring".
Fin
Hopefully this article sheds some light on what Spring Boot’s Autoconfiguration is. Some final thoughts:
When it comes to building Spring Boot applications, you can roughly go two ways:
-
Recursively copy & paste your way through your Spring Boot projects with the help of Stackoverflow or Baeldung.
-
Try to understand what you are doing. That starts with understanding Spring Framework. Then understanding the 3rd party libraries (like Log4j 2 or Flyway). Then understanding what Spring Boot does with all these little bits and pieces.
In case it was not clear, the second option is the only serious way to do it :)
Thanks for reading.
Acknowledgments
A big "thank you" goes out to Patricio "Pato" Moschcovich, who not only did the proofreading for this article but also provided invaluable feedback!
There's more where that came from
I'll send you an update when I publish new guides. Absolutely no spam, ever. Unsubscribe anytime.
Comments (read-only)
36 comments
Anonymous
March 14, 2024
don't read @MarcoBehler articles. This is a trap. if you read one line, you will have to read complete article. you just can't help yourself.
Anonymous
December 10, 2023
Brilliant article....Thank you so much.
facuarielgomezz
November 01, 2023
Ufff thank for all this information, i think that i will read it again in the future ejej
fthiagomedeiros
September 05, 2023
Awesome article. It couldn't be better.
Thanks :)
Thanks :)
brundabharadwaj22
August 13, 2023
Amazing Article ! :)
Thanks a lot for sharing!
Thanks a lot for sharing!
Anonymous
April 14, 2023
Detailed and crisp explanation.
Thanks a lot
Thanks a lot
rajshreerai931
February 23, 2023
I wish I had found this sooner
Anonymous
December 31, 2022
Very concise and well explained. Thanks for this invaluable information.
Anonymous
July 03, 2022
Great article. Thank you!
Anonymous
June 26, 2022
What a great read!! Thank you so much for your time and efforts for sharing this.
Anonymous
January 14, 2022
Thanks
Anonymous
January 08, 2022
Nice post Marco. I agree with your final parting thoughts on how people approach Spring. 95% of the developers I have met use StackOverflow or another website to copy and paste code snippets without spending time to understand. I won't blame the developer community at all.
When Spring was invented by Rod Johnson 18 years ago (circa 2003-2004), his original vision was to offer a simplified framework that would replace the complexities with JEE. But somewhere along the road, that vision has been obliterated with this over indulgence in annotations. Spring Boot is a poor example of where there is an over indulgence in Annotations. A lot of these annotations are not documented in the manual. There is a manual for namesake but it cover only 10% of what the framework offers.
In essence, the recent Spring contributors have taken away creativity from what programming ought to be. The creators and contributors of Spring Boot should take the responsibility for bringing software development to this state of affairs.
Anonymous
January 05, 2022
Thank you!:) This article was a big help.
Anonymous
October 15, 2021
Very well written sir!! Thanks!
guihai.dev
September 30, 2021
Cool article,Thanks for sharing!
Anonymous
September 09, 2021
非常好的文章!
taru.saumya
September 06, 2021
this is the first article i have read which is in so much of depth and actually explains how things work under the hood. thank you for putting so much efforts. Would really look forward to more of these guides on spring and java.
Anonymous
May 16, 2021
Hi Marco,
Thanks for providing amazing articles. I have few questions related to spring boot and I googled it as well but looks like I am the only one who is looking for it. I hope you can help me to get answers. Please spare few minutes if possible and provide answers to following:
1. Can I use spring boot with other java based framework like apache ofbiz? Let me explain it more. Apache ofbiz has multiple web applications and I want to create a new web application in it but it would be spring web MVC with all other spring support like spring security.
2. Can spring boot only be used to create standalone applications?
Marco Behler
May 19, 2021
1. I don't really know Apache ofbiz, e.g. I don't understand by "ofbiz has multiple web applications"? In gernal, if you don't find documentation online about people having tried to integrate these two, you could be in for a rough ride.
2. You mean command line programs? Yes.
2. You mean command line programs? Yes.
Anonymous
May 05, 2021
Awesome Article.!!! Thank You .. :)
learnittryit
January 04, 2021
Amazing and crystal clear article, thanks a lot in tons
javax4u
December 02, 2020
great article, better than baeldung. I was also thinking spring boot is just auto adding tomcat , i dont have to copy paste war into tomcat and start stop server every time. Except that its not doing much, its just doing repeated tasks for me. Which is great and your articles adds on some more repeated tasks it does. Thanks for validating my thoughts . Your blog is very good and .
Sujatha Paramesh
October 30, 2020
I love the way you break down what may seem like daunting technology buzzwords into such simple terms! Thanks to your articles I have a much better handle on all things software! Don't stop publishing please. :)
Anonymous
August 04, 2020
Really enjoyed reading this article
Anonymous
May 26, 2020
Great article. Thank you.
Anonymous
April 30, 2020
The best, brilliant explanation, thanks for your work!
maks.mephi
April 22, 2020
Am I right that spring boot firstly configures ApplicationContext, secondly EmbeddedWebServerFactoryCustomizerAutoConfiguration, thirdly DispatcherServletAutoConfiguration?
maks.mephi
April 22, 2020
Cool article!
"Say you didn’t want Spring Boot to execute its DataSourceAutoConfiguration", - you mean to include, right?)
"Say you didn’t want Spring Boot to execute its DataSourceAutoConfiguration", - you mean to include, right?)
Anonymous
April 05, 2020
Great article, thank you! Hope to see more of them in the future
Anonymous
March 30, 2020
Really cool article!! Thanks for sharing!
Anonymous
March 26, 2020
Great article,
Thanks for sharing your knowledge!
Thanks for sharing your knowledge!
belen.emre
March 25, 2020
Great article! Thanks a lot for the enjoyable language and thank for getting us being used to read FAQs :)
Anonymous
March 24, 2020
Great article, thanks a bunch!
Anonymous
March 24, 2020
My favourite no-bullshit java expert. Thanks so much Marco!
Istiaq Hossain
March 24, 2020
Great .Always enjoy your contents....
Anonymous
March 22, 2020
Great article! I'm really enjoying these In-Depth Spring articles, as someone who is comfortable using Spring, but eager to find out more on how it works under the hood.
Anonymous
March 22, 2020
@ConditionalOnNotWebApplication. The condition is true, if the application is a web application.
Should that be "if the application is not a web application" ?
Should that be "if the application is not a web application" ?
Marco Behler
March 25, 2020
Thanks, will be fixed, soon.

let mut author = ?
I'm @MarcoBehler and I share everything I know about making awesome software through my guides, screencasts, talks and courses.
Follow me on Twitter to find out what I'm currently working on.